Translate this blog....

Thursday, December 24, 2020

Part One - Beans, Beans, and More Beans (and some recipes)

 In all my talk about upping my daily fiber intake, I think I've only really mentioned bread. Every eating regime needs variety and it's literally true that man cannot live by bread alone. Or, at least, this woman can't.

(Speaking of bread, though: I anxiously await my bread machine (thanks, oh family of mine!) and cannot wait to start exploring recipes.)

As I try moving more toward a 90/10 plant-based regimen, I am trying different beans. I really do love beans but have limited myself to pinto and navy beans for the most part. I don't like dry-tasting beans and I can live without black-eyed peas. Thankfully, there are a lot of varieties of beans to try. 

The first "new" beans I tried were the black beans from Faraon. (I read lots of info about the benefits of black beans.)When I soaked these overnight (as I tend to do with all my beans), I was shocked at the deep purple/black of the water. I wondered if I had gotten sham beans that had been dyed to indicated a healthier color! Nope. That is common for these beans. For as much of the color that washed off in the soak, there was still a deep black color to the soup that cooked off the beans. The color actually adds to the appeal. It's certainly not boring.

Here is the nutritional label on the Faraon Beans I got from Amazon.


Here is the recipe for the way I cooked the beans (pretty much the same as I cook pinto beans):

BLACK BEANS

  1. Soak beans overnight (at least 10 hours) in cold water (in the fridge)
  2. Drain the water, put the beans in a pot with fresh water (at least 3 inches above the beans).
  3. Do NOT add salt or salty seasonings until beans have cooked at least an hour or almost finished cooking. Apparently, adding salt slows the softening of the beans.
  4. Let the beans boil for a few minutes, then turn them down to just a strong simmer, checking every half an hour. (NOTE: I keep a second, smaller pot of water heated on low to add to the beans if they start drying out.)
  5. Once the beans are on simmer, add a little bit of olive oil (I add about a teaspoon for every dry cup I'm cooking) and add onions and garlic pieces.  Some people use different seasonings like bay leaves, thyme, etc.
  6. Check the water level and texture of the beans about every 30 minutes. Add the other hot water as needed. Don't add too much at a time; you don't want the finished beans to be too watery. They will take anywhere from 2 hours to 2 1/2 hours to cook. (The longer they have been pre-soaked, the sooner they will finish cooking.) 
  7. Don't forget to add any salty seasonings when they are near finished.


Black beans with onion & garlic


(The next time I make them, I will add the things I use in my pinto beans: diced, stewed tomatoes, a little tomato paste, and on some occasions, ground beef that's been cooked and seasonings.)

The taste of the black beans is so nice. They have the creamy tasted I read about when looking up information. Creamy and smooth. I was able to eat these beans with cornbread just the same as I do with pinto beans. Yummy and extremely filling. I can see why people like eating these beans with rice, but I don't want to add any more starch to my diet if I can help it.

Here's my basic cornbread recipe as remembered from how my mom used to make it:

BASIC CORNBREAD

  1. Using a cast-iron or oven-safe skillet or baking pan (I use a 9.5-inch cast iron skillet), add a tablespoon of butter to the skillet or pan. Either use melted butter or let it melt by sitting the pan on a low-heat stove. Heat stove to 450 degrees.
  2. In a bowl, mix the dry ingredients:
    1. 1 1/2 cup of yellow cornmeal
    2. 1 cup all-purpose flour
    3. 2 tsp of baking powder
    4. 1 tsp table salt
    5. 1 1/2 Tbl of sugar
  3. Add to the dry ingredients and just mix enough to combine everything (I like to mix cornbread with a wooden spoon):
    1. 1 cup of milk (I use whole milk) 
    2. A lightly beaten egg
    3. 1/4 cup of oil (I use vegetable or canola)
  4. Pour the batter into the center of the skillet, then using a spoon, scoop some of the butter from the sides onto the center of the batter.
  5. Depending on the size and depth of the pan, bake from 15 to 25 minutes, until a toothpick comes out of the center cleanly. Edges might be very brown.

Oven-baked cornbread in 
a cast-iron skillet

By the way, this odd-looking thing on the pot of beans is one of those "spill-stopper" lids


PureGenius boil-over 
spill-stopper lid

Even though I had low expectations, I have to say that I am thrilled with the way this one works. It really did save me from a nasty spill-over when I got yakking on the phone and forgot to check the beans. Thanks to the contrast of colors on the lid, you can easily see the black of the bean juice.

Next time, I will talk about the small red beans and pink beans. I have no idea what to expect from the pink beans!

Peace

--Free

Tuesday, December 08, 2020

Not All Fiber Works The Same

 Okay. This is going to get a little bit personal. Today, I am going to be talking about my fiber regimen. Not too personal but... real personal.

I told you recently about my need to change up my daily nutritional habits. My kidneys are being crazy and my energy is dropping more than usual. I have been advised to seriously up my fiber intake, lower my intake of preservatives, and drink SO much more water. I feel like I am participating in a water challenge with fiber thrown in for extra credit.


Before now, if I needed it, I would take an OTC stool softener - Dulcalax was my go-to - and that always worked. Eventually. I remember once taking one Dulcalax every eight hours for a couple of days with no result. Until there were results. Results of sudden and horrific proportions.  After that, I stuck to things like Benefiber and it's generic siblings and Psyllium supplements. Same result: they don't work until they suddenly do work too well. Or not, depending.

The past few days, I have been taking in nothing but vegetables (mostly tomato, avocado, onion, cabbage), water, and bread. Not just any bread though but only the most fiber-filled and nutritious kind. I've eaten whole-grain bread, seeded bread, sprouted grain, and sprouted seed bread. I even went near bankruptcy to buy a loaf of the famous Ezekiel bread. 

Here's the thing: not all fiber works the same. The stool softeners and the manufactured fiber supplements work slow and unpredictably. The fiber in the bread and the fiber in the vegetables... That is swift justice. Swift but not brutal.

Without going into more detail than necessary, I will just say that I can highly recommend the fiber found in food over the supplements and manufactured types. Results are more predictable and comfortable. And regular. Very regular.

Also, I feel better. My belly is a lot less bloated so my clothes fit better. I don't have that constant feeling of slight discomfort. My energy is not up as much as I would like but I think that might take more time.

I have learned that with taking in so much natural fiber, the real trick to results and comfort is to drink the water. Lots of water. It's as if the fiber is the wind-up and the water is the pitch. (Look at me talking in baseball lingo!)

Another benefit is that I am not eating as much food. I know that this is Fiber 101 because fiber is more filling than most other nutrients. Eating less means buying fewer groceries, That's awesome because I can only afford one loaf of Ezekiel bread every 3rd quarter of the fiscal year...

Do you know how thankful I am that my family is the best ever? They are getting me a bread machine for Christmas. The makers of Ezekiel bread (and Dave's Killer Bread) will not be seeing any more of my collected pennies once I get that machine. I love their concept and backstories (especially for Dave's), but I leave it to Gwen Paltrow and Oprah and friends to pick up the tab. I really don't see enough difference between Ezekiel Bread and some other choices to warrant spending all that extra moolah.

By the way, the Ezekiel bread is not bad but it's not as tasty (in my opinion) as some of the other grain bread. It's free of preservatives, which is a good thing, but that shortens the shelf-life. Also, I found it to be very dry. I can only eat it in nibbles or else I have to toast it. I keep it in the freezer and thaw it one piece at a time. I have to protect that investment.

I told you previously that I have found an affordable supplier of grains and seeds. I already found yeast in larger quantities so I think I can keep up this high fiber situation without going broke.

For anyone else looking for decent quality and nutritious bread, I can say (speaking with no credentials other than my taste buds and ability to read a label) that Aldi's Seedtastic and Ancient Grains breads are amazingly tasty.  They aren't cheap-cheap (around $3.25 to 3.85 a loaf, depending on the type), but they are so good


Ezekiel Bread
Ingredients

Again, I am no expert, so take everything I say the way you would an article in the Daily Mail. Do your own research. I have been checking info from papers/articles by dieticians and nutritionists (you know- doing my search-learning) and, so far, I think there are some rules of thumb to go by and some things I have learned:

  • High fiber is best with proper water intake. I wonder if it isn't even troublesome to not drink enough water if you are doing a high-fiber diet.
  • When choosing bread and cereals, etc, look for "sprouted" seeds and grains. I can't remember why this is even though I looked it up.
  • Avoiding preservatives as much as possible is great.
  • The first high-fiber day I had killed my cravings for "junk".
  • I have been eating at a different pace (see below) than before doing high-fiber.
A typical day's meals for me prior to this was something like this:
  • breakfast of coffee with creamer, white toasted bread with butter and jam.
  • lunch of white bread (or Brioche, or thick Italian loaf) sandwich of chicken patty or deli turkey and something sweet like a honey bun
  • snacks of honey bun, vanilla brioche loaf (Aldi's has the best), or some other sweet treat
  • dinner or vegetables (maybe), fish or chicken of, if I'm lazy or tired, another sandwich.
  • evening snack(s) PB&J sandwich or a bun or sweet bread and some hot tea with sweetened creamer.
A typical day recently:
  • breakfast of coffee & creamer, toasted bread (seeded, sprouted or something like that) either dry or with butter
  • lunch of sandwich of avocado, tomato, sweet onion, and maybe mini sweet peppers on seeded bread with mayo.
  • snack of bread, toasted or not, buttered or not.
  • dinner or baked fish or chicken with a side or avocado, tomatoes,onions seasoned with sweet and mild rice vinegar or just salt and pepper, a piece of bread - and you know what kind.
  • evening snack of a banana or a couple of dates or a piece of bread (toasted or raw, buttered or not).
I am planning to make small batches of honey butter* to put on my bread (as a snack). I have not yet made the trendy "avocado toast" and I refuse to. 

It will be fun to do an update on how I feel after a longer period of eating fiber-filled foods on a regular basis. I promise, but right now, I have to go to the Ladies Room...

Peace
--Free

Thursday, December 03, 2020

**REVIEW** Cute Contact Lens Carry Cases

This is going to be a quick post about something I picked up the other day.

My new contact lenses are - once again - a pain in the boot. I miss the days of having the same prescription for each eye. Too easy. However, I had to get a new case to carry spares in. My old one lasted over 4 years but... I think I damaged the hinges. The case will pop open if I move it or tip it. So I replaced it with what I thought was just another cheap case:


It cost around 6 bucks so I wasn't really expecting much. I was surprised. Several cases look (and probably function) the same, depending on color and shape preferences. I just picked this one and I guess I didn't read the description well enough (I only cared about a cheap price) and I got two cases, not one.


Getting 2 is certainly a reason to choose this particular case.

Each case comes with a bottle for carrying a bit of solution (always handy); a tiny set of rubber-tipped tweezers (learning to love them); and something called a "stick connection" (really a stick to place the lens in the eye). That's all on top of the cute little lens case. And a mirror. For under 7 bucks.

I've never used a "stick connection" and was a little nervous. Now I don't ever want to be without one. I always hate trying to balance a lens on the tip of my finger. I usually drop the lens and have to hope it didn't fall into my toothbrush holder.

My two favorite things though are the holder for the solution and the tweezers. Listen, there's nothing worse than trying to dump a lens out of a case onto your palm. Or trying to dig out the lens without turning it inside out. 

The only thing I don't like is that the cases are so glossy that the outsides are print magnets. On the other hand, they are so glossy that they can be used as mirrors. Speaking of mirrors: the ones inside each case are not useful for inserting lenses. The case is too small and difficult to prop anywhere. I might get better at using the mirror but for now, I just love the bottle, tweezers, and stick.

Like I said, you can find cases similar to these all over Amazon. I saw round ones, oval ones, gold- or silver- or copper-toned ones. There are even some with cartoon or pop culture characters on them. There are some for men and for teens. I even saw some that came in sets of 6.  

these are from here


these are from here


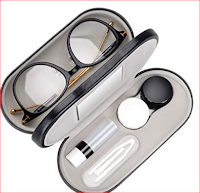
Better yet, I saw one set that holds a pair of glasses and a pair of contacts.

Add caption

You're welcome.


Peace

--Free


NOTE: For those who might wonder, Thought it might seem so, I do NOT get any affiliate benefits from the Amazon links I post. I simply like sharing info about items that I find and buy - whether on Amazon or elsewhere. 

Wednesday, December 02, 2020

Trying to Make Artisan Wheat (I think)

 Okay, so this is my first time doing bread in the Dutch oven. I'm not even sure if what I am doing can be called "artisan". Because of the type of flour I'm using, I'm not sure if I can call it a true "wheat" bread.


It is wheat, so...

Here's the thing though, I felt so good while preparing the dough. I've been really wiped out lately and with trying to change my diet (again), it's been a drain. This recipe was one of the easier ones because it's a "no-knead" type. I don't have to knead it because it has to sit for 8 to 24 hours to rise.

I didn't take a Before photo. It was after 9 at night and, yeah. But here is what it looked like this morning:


That did better than I expected. The dough is really damp and was just one big odd-looking lump when I went to bed. This morning's dough was puffed and kind of yummy-looking. Before I had to push out the air and get it ready for the 2nd rise.


I changed a couple of things about the recipe, but here is the video I used.


I like this dude. He gets to the point and is very clear with instructions. If this bread is messed up, it's totally going to be on me. 

Like I said, I made changes. I didn't have sesame seeds and I didn't have the flax in seed form. I used pumpkin and sunflower seeds. I literally picked up the cheap packs of seeds at the corner grocery. I do have ground flax and since this is all about a high-fiber diet, I added that. Without measuring. Yikes. I didn't measure the seeds either. I figured the more the merrier and just went for it.

One thing that I really did want to add but held back was some brown sugar or blackstrap molasses. Or vanilla extract. Restraint is the word of the day. I played around the rules enough. I can always test adding things the next time.

As I was writing this, I was waiting for the bread to finish baking. Nervous! But, it turned out to look a lot like the one in the video. I am impressed with myself.


I am pleased! It smells amazing and none of the seeds burned. I am nervous about cutting into it, but... 


It turned out awesome and really could do with another 5 or 6 minutes in the oven (I'm putting it back in).  I am trying to remember what Paul Hollywood says about the seeds not distributing throughout the bake... Still, I am kinda happy.

The one thing I am really disappointed in is that I didn't follow my instincts and add something sweet - sugar, syrup, honey - the bread tastes like organic store-bought bread that is slightly salty.

Okay. So now I know. I will be making more and this time, I am going to add sugar, syrup, or honey. This would be the best thing ever with some sweetness to it.

Peace

--Free