Translate this blog....

Thursday, December 24, 2020

Part One - Beans, Beans, and More Beans (and some recipes)

 In all my talk about upping my daily fiber intake, I think I've only really mentioned bread. Every eating regime needs variety and it's literally true that man cannot live by bread alone. Or, at least, this woman can't.

(Speaking of bread, though: I anxiously await my bread machine (thanks, oh family of mine!) and cannot wait to start exploring recipes.)

As I try moving more toward a 90/10 plant-based regimen, I am trying different beans. I really do love beans but have limited myself to pinto and navy beans for the most part. I don't like dry-tasting beans and I can live without black-eyed peas. Thankfully, there are a lot of varieties of beans to try. 

The first "new" beans I tried were the black beans from Faraon. (I read lots of info about the benefits of black beans.)When I soaked these overnight (as I tend to do with all my beans), I was shocked at the deep purple/black of the water. I wondered if I had gotten sham beans that had been dyed to indicated a healthier color! Nope. That is common for these beans. For as much of the color that washed off in the soak, there was still a deep black color to the soup that cooked off the beans. The color actually adds to the appeal. It's certainly not boring.

Here is the nutritional label on the Faraon Beans I got from Amazon.


Here is the recipe for the way I cooked the beans (pretty much the same as I cook pinto beans):

BLACK BEANS

  1. Soak beans overnight (at least 10 hours) in cold water (in the fridge)
  2. Drain the water, put the beans in a pot with fresh water (at least 3 inches above the beans).
  3. Do NOT add salt or salty seasonings until beans have cooked at least an hour or almost finished cooking. Apparently, adding salt slows the softening of the beans.
  4. Let the beans boil for a few minutes, then turn them down to just a strong simmer, checking every half an hour. (NOTE: I keep a second, smaller pot of water heated on low to add to the beans if they start drying out.)
  5. Once the beans are on simmer, add a little bit of olive oil (I add about a teaspoon for every dry cup I'm cooking) and add onions and garlic pieces.  Some people use different seasonings like bay leaves, thyme, etc.
  6. Check the water level and texture of the beans about every 30 minutes. Add the other hot water as needed. Don't add too much at a time; you don't want the finished beans to be too watery. They will take anywhere from 2 hours to 2 1/2 hours to cook. (The longer they have been pre-soaked, the sooner they will finish cooking.) 
  7. Don't forget to add any salty seasonings when they are near finished.


Black beans with onion & garlic


(The next time I make them, I will add the things I use in my pinto beans: diced, stewed tomatoes, a little tomato paste, and on some occasions, ground beef that's been cooked and seasonings.)

The taste of the black beans is so nice. They have the creamy tasted I read about when looking up information. Creamy and smooth. I was able to eat these beans with cornbread just the same as I do with pinto beans. Yummy and extremely filling. I can see why people like eating these beans with rice, but I don't want to add any more starch to my diet if I can help it.

Here's my basic cornbread recipe as remembered from how my mom used to make it:

BASIC CORNBREAD

  1. Using a cast-iron or oven-safe skillet or baking pan (I use a 9.5-inch cast iron skillet), add a tablespoon of butter to the skillet or pan. Either use melted butter or let it melt by sitting the pan on a low-heat stove. Heat stove to 450 degrees.
  2. In a bowl, mix the dry ingredients:
    1. 1 1/2 cup of yellow cornmeal
    2. 1 cup all-purpose flour
    3. 2 tsp of baking powder
    4. 1 tsp table salt
    5. 1 1/2 Tbl of sugar
  3. Add to the dry ingredients and just mix enough to combine everything (I like to mix cornbread with a wooden spoon):
    1. 1 cup of milk (I use whole milk) 
    2. A lightly beaten egg
    3. 1/4 cup of oil (I use vegetable or canola)
  4. Pour the batter into the center of the skillet, then using a spoon, scoop some of the butter from the sides onto the center of the batter.
  5. Depending on the size and depth of the pan, bake from 15 to 25 minutes, until a toothpick comes out of the center cleanly. Edges might be very brown.

Oven-baked cornbread in 
a cast-iron skillet

By the way, this odd-looking thing on the pot of beans is one of those "spill-stopper" lids


PureGenius boil-over 
spill-stopper lid

Even though I had low expectations, I have to say that I am thrilled with the way this one works. It really did save me from a nasty spill-over when I got yakking on the phone and forgot to check the beans. Thanks to the contrast of colors on the lid, you can easily see the black of the bean juice.

Next time, I will talk about the small red beans and pink beans. I have no idea what to expect from the pink beans!

Peace

--Free

Tuesday, December 08, 2020

Not All Fiber Works The Same

 Okay. This is going to get a little bit personal. Today, I am going to be talking about my fiber regimen. Not too personal but... real personal.

I told you recently about my need to change up my daily nutritional habits. My kidneys are being crazy and my energy is dropping more than usual. I have been advised to seriously up my fiber intake, lower my intake of preservatives, and drink SO much more water. I feel like I am participating in a water challenge with fiber thrown in for extra credit.


Before now, if I needed it, I would take an OTC stool softener - Dulcalax was my go-to - and that always worked. Eventually. I remember once taking one Dulcalax every eight hours for a couple of days with no result. Until there were results. Results of sudden and horrific proportions.  After that, I stuck to things like Benefiber and it's generic siblings and Psyllium supplements. Same result: they don't work until they suddenly do work too well. Or not, depending.

The past few days, I have been taking in nothing but vegetables (mostly tomato, avocado, onion, cabbage), water, and bread. Not just any bread though but only the most fiber-filled and nutritious kind. I've eaten whole-grain bread, seeded bread, sprouted grain, and sprouted seed bread. I even went near bankruptcy to buy a loaf of the famous Ezekiel bread. 

Here's the thing: not all fiber works the same. The stool softeners and the manufactured fiber supplements work slow and unpredictably. The fiber in the bread and the fiber in the vegetables... That is swift justice. Swift but not brutal.

Without going into more detail than necessary, I will just say that I can highly recommend the fiber found in food over the supplements and manufactured types. Results are more predictable and comfortable. And regular. Very regular.

Also, I feel better. My belly is a lot less bloated so my clothes fit better. I don't have that constant feeling of slight discomfort. My energy is not up as much as I would like but I think that might take more time.

I have learned that with taking in so much natural fiber, the real trick to results and comfort is to drink the water. Lots of water. It's as if the fiber is the wind-up and the water is the pitch. (Look at me talking in baseball lingo!)

Another benefit is that I am not eating as much food. I know that this is Fiber 101 because fiber is more filling than most other nutrients. Eating less means buying fewer groceries, That's awesome because I can only afford one loaf of Ezekiel bread every 3rd quarter of the fiscal year...

Do you know how thankful I am that my family is the best ever? They are getting me a bread machine for Christmas. The makers of Ezekiel bread (and Dave's Killer Bread) will not be seeing any more of my collected pennies once I get that machine. I love their concept and backstories (especially for Dave's), but I leave it to Gwen Paltrow and Oprah and friends to pick up the tab. I really don't see enough difference between Ezekiel Bread and some other choices to warrant spending all that extra moolah.

By the way, the Ezekiel bread is not bad but it's not as tasty (in my opinion) as some of the other grain bread. It's free of preservatives, which is a good thing, but that shortens the shelf-life. Also, I found it to be very dry. I can only eat it in nibbles or else I have to toast it. I keep it in the freezer and thaw it one piece at a time. I have to protect that investment.

I told you previously that I have found an affordable supplier of grains and seeds. I already found yeast in larger quantities so I think I can keep up this high fiber situation without going broke.

For anyone else looking for decent quality and nutritious bread, I can say (speaking with no credentials other than my taste buds and ability to read a label) that Aldi's Seedtastic and Ancient Grains breads are amazingly tasty.  They aren't cheap-cheap (around $3.25 to 3.85 a loaf, depending on the type), but they are so good


Ezekiel Bread
Ingredients

Again, I am no expert, so take everything I say the way you would an article in the Daily Mail. Do your own research. I have been checking info from papers/articles by dieticians and nutritionists (you know- doing my search-learning) and, so far, I think there are some rules of thumb to go by and some things I have learned:

  • High fiber is best with proper water intake. I wonder if it isn't even troublesome to not drink enough water if you are doing a high-fiber diet.
  • When choosing bread and cereals, etc, look for "sprouted" seeds and grains. I can't remember why this is even though I looked it up.
  • Avoiding preservatives as much as possible is great.
  • The first high-fiber day I had killed my cravings for "junk".
  • I have been eating at a different pace (see below) than before doing high-fiber.
A typical day's meals for me prior to this was something like this:
  • breakfast of coffee with creamer, white toasted bread with butter and jam.
  • lunch of white bread (or Brioche, or thick Italian loaf) sandwich of chicken patty or deli turkey and something sweet like a honey bun
  • snacks of honey bun, vanilla brioche loaf (Aldi's has the best), or some other sweet treat
  • dinner or vegetables (maybe), fish or chicken of, if I'm lazy or tired, another sandwich.
  • evening snack(s) PB&J sandwich or a bun or sweet bread and some hot tea with sweetened creamer.
A typical day recently:
  • breakfast of coffee & creamer, toasted bread (seeded, sprouted or something like that) either dry or with butter
  • lunch of sandwich of avocado, tomato, sweet onion, and maybe mini sweet peppers on seeded bread with mayo.
  • snack of bread, toasted or not, buttered or not.
  • dinner or baked fish or chicken with a side or avocado, tomatoes,onions seasoned with sweet and mild rice vinegar or just salt and pepper, a piece of bread - and you know what kind.
  • evening snack of a banana or a couple of dates or a piece of bread (toasted or raw, buttered or not).
I am planning to make small batches of honey butter* to put on my bread (as a snack). I have not yet made the trendy "avocado toast" and I refuse to. 

It will be fun to do an update on how I feel after a longer period of eating fiber-filled foods on a regular basis. I promise, but right now, I have to go to the Ladies Room...

Peace
--Free

Thursday, December 03, 2020

**REVIEW** Cute Contact Lens Carry Cases

This is going to be a quick post about something I picked up the other day.

My new contact lenses are - once again - a pain in the boot. I miss the days of having the same prescription for each eye. Too easy. However, I had to get a new case to carry spares in. My old one lasted over 4 years but... I think I damaged the hinges. The case will pop open if I move it or tip it. So I replaced it with what I thought was just another cheap case:


It cost around 6 bucks so I wasn't really expecting much. I was surprised. Several cases look (and probably function) the same, depending on color and shape preferences. I just picked this one and I guess I didn't read the description well enough (I only cared about a cheap price) and I got two cases, not one.


Getting 2 is certainly a reason to choose this particular case.

Each case comes with a bottle for carrying a bit of solution (always handy); a tiny set of rubber-tipped tweezers (learning to love them); and something called a "stick connection" (really a stick to place the lens in the eye). That's all on top of the cute little lens case. And a mirror. For under 7 bucks.

I've never used a "stick connection" and was a little nervous. Now I don't ever want to be without one. I always hate trying to balance a lens on the tip of my finger. I usually drop the lens and have to hope it didn't fall into my toothbrush holder.

My two favorite things though are the holder for the solution and the tweezers. Listen, there's nothing worse than trying to dump a lens out of a case onto your palm. Or trying to dig out the lens without turning it inside out. 

The only thing I don't like is that the cases are so glossy that the outsides are print magnets. On the other hand, they are so glossy that they can be used as mirrors. Speaking of mirrors: the ones inside each case are not useful for inserting lenses. The case is too small and difficult to prop anywhere. I might get better at using the mirror but for now, I just love the bottle, tweezers, and stick.

Like I said, you can find cases similar to these all over Amazon. I saw round ones, oval ones, gold- or silver- or copper-toned ones. There are even some with cartoon or pop culture characters on them. There are some for men and for teens. I even saw some that came in sets of 6.  

these are from here


these are from here


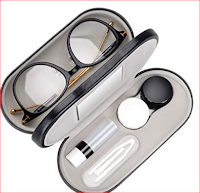
Better yet, I saw one set that holds a pair of glasses and a pair of contacts.

Add caption

You're welcome.


Peace

--Free


NOTE: For those who might wonder, Thought it might seem so, I do NOT get any affiliate benefits from the Amazon links I post. I simply like sharing info about items that I find and buy - whether on Amazon or elsewhere. 

Wednesday, December 02, 2020

Trying to Make Artisan Wheat (I think)

 Okay, so this is my first time doing bread in the Dutch oven. I'm not even sure if what I am doing can be called "artisan". Because of the type of flour I'm using, I'm not sure if I can call it a true "wheat" bread.


It is wheat, so...

Here's the thing though, I felt so good while preparing the dough. I've been really wiped out lately and with trying to change my diet (again), it's been a drain. This recipe was one of the easier ones because it's a "no-knead" type. I don't have to knead it because it has to sit for 8 to 24 hours to rise.

I didn't take a Before photo. It was after 9 at night and, yeah. But here is what it looked like this morning:


That did better than I expected. The dough is really damp and was just one big odd-looking lump when I went to bed. This morning's dough was puffed and kind of yummy-looking. Before I had to push out the air and get it ready for the 2nd rise.


I changed a couple of things about the recipe, but here is the video I used.


I like this dude. He gets to the point and is very clear with instructions. If this bread is messed up, it's totally going to be on me. 

Like I said, I made changes. I didn't have sesame seeds and I didn't have the flax in seed form. I used pumpkin and sunflower seeds. I literally picked up the cheap packs of seeds at the corner grocery. I do have ground flax and since this is all about a high-fiber diet, I added that. Without measuring. Yikes. I didn't measure the seeds either. I figured the more the merrier and just went for it.

One thing that I really did want to add but held back was some brown sugar or blackstrap molasses. Or vanilla extract. Restraint is the word of the day. I played around the rules enough. I can always test adding things the next time.

As I was writing this, I was waiting for the bread to finish baking. Nervous! But, it turned out to look a lot like the one in the video. I am impressed with myself.


I am pleased! It smells amazing and none of the seeds burned. I am nervous about cutting into it, but... 


It turned out awesome and really could do with another 5 or 6 minutes in the oven (I'm putting it back in).  I am trying to remember what Paul Hollywood says about the seeds not distributing throughout the bake... Still, I am kinda happy.

The one thing I am really disappointed in is that I didn't follow my instincts and add something sweet - sugar, syrup, honey - the bread tastes like organic store-bought bread that is slightly salty.

Okay. So now I know. I will be making more and this time, I am going to add sugar, syrup, or honey. This would be the best thing ever with some sweetness to it.

Peace

--Free


Saturday, November 28, 2020

Bread, Bread, Bread for Life

  I rarely toot the horn of a site if I haven't used their services but I'm going to make an exception. Recently, I found this site and I'm kind of excited. I have been checking out their blog also. 

The only reason I ever found Food to Live (FTL) was because my doctor has warned me to get a bit more serious about eating healthier things. I'm not eating super-junky stuff but I need to go harder at the fiber and nutrients than I have been.

The first change I made was to cut out the sliced garlic and herb turkey deli meat I so love for sandwiches. I switched up and kept everything else except for the meat and bread. Yeah. I now use high-fiber bread instead of brioche or Italian white bread and I just enjoy it with the avocado, tomato, and yellow onion. It's a tasty sandwich. Because of the delicious bread and the avocado, I almost don't miss the turkey.

This Aldi's Ancient Grains is the bread I started to fall in love with:


I need to be able to control
that sodium level...


It's pricey though. Like around 5 a loaf. I wanted to try Ezekiel Bread or Dave's Killer Bread but their prices make the Ancient Grains look like nothing.

I've switched over to eating a lot of cabbage and other greens, white meat, and using good oils. When I was going over my budget, I realized I need to find a way to afford really nutritious bread. So...

My family has asked what I want for Christmas. My answer: bread machine. I picked out one that will let me add nuts and seeds or just prep the dough so I can finish the rest myself. Then, while looking for affordable seeds and grains, I found Food to Live.

FTL recipes are heavily vegan and I am not interested. I just want to be able to make my own sprouted grains and seeded bread. It has to be less expensive than keeping Killer Dave in business. Those prices!...

Normally, I am not a big eater of bread. However, I would rather get full from eating a highly nutritious bread than eating a ton of veggies and fruits. I can only take so much of salad and chicken. With the right bread - seeded with tasty nuts - I could go from breakfast to dinner on just that with some butter.

In case any of you are interested, here are some links I have found to recipes. Enjoy.

I was happy to see that The Prepared Pantry had this helpful write-up on designing whole grain bread recipes. That will go up on my fridge.

This all has me very excited to get my hands on that bread machine! In the meantime, I am going to start trying some of these recipes by hand. Pictures (good or bad) will be coming up...

Peace
--Free

Saturday, November 14, 2020

**REVIEW** Pantene's Butter Crème Hair Treatment with Argan Oil

 Pantene has been showing up and showing out for me the past year or so.

I never paid much attention to the Pantene brand before last year, but I loved a sample of their foam conditioner I got in some sub box or the other. I loved it so much that I actually bought some and still use it on an alternating basis with another conditioner. But I never thought of shopping Pantene specifically for my kinky-curly hair needs. Then I happened to see this pop up on Amazon:


Yeah. There's a whole lineup of products in that Gold Series

Pricewise, most of the products run about $7 to $9 each if bought individually. I see that there are some sets of products for sale. I am happy with the shampoo I use and I already sometimes use Pantene's foaming conditioner so I don't need to go broke buying an entire line of products. What I always need though is daily moisture. So I gave this a try:


That's the Hydrating Butter Creme. It's "infused with argan oil" and supposed to have moisture that lasts 17 hours. I wanted to see about that.


The texture is a creamy oil that has a slightly 
watery melt-down.

I haven't tried it on my freshly washed and conditioned hair but I did test it out today. My hair is 3 days post-wash/condition/twist. It's decent but was still a bit dried out from not being wrapped every night. Also, I ran out of the Hydrasteam products that were so good for my hair. 

Anyway.

This morning, my hair was dry - not crunchy-dry but in that thirsty-need-some-moisture-quick kind of mood. I've been using other products very lightly every day but it's that time of year when the air is getting drier and cooler. My hair always has trouble adjusting to seasonal changes.


Just so I wasn't applying this product to bone-dry hair, I fine-misted it with some water beforehand. I applied about a teaspoon's worth of product to each of four sections of my hair. 

First impressions - immediate impression? This stuff smells SO good. It smells a tiny bit like the Marrakesh oil that is so popular. Not as sensual but it has that slightly amber scent that gets stronger with any kind of warmth. Most of the smell abates quickly, but my hair still has a really pleasant scent for anyone who gets close.

The next impression is that this is very moisturizing. Once I tried just running a small amount through the sections of my hair, I knew I was going to want to use it the next time I twist my hair. So... I did.

That's water-spritzed & the product

It takes an amount of about half the size of a dime for each twist. The tube is a nice 6.8 ounces so that's fine. 

Basically, yes, this does a fabulous job of moisturizing very dry hair. Because of that, I don't care about anything else, but some people will be happy to hear that it is "sulfate-free". 

Best of all, it produced a nice twist-out that was moisturized without being greasy.

Girl, yasss...

I have to admit that this just makes my hair feel better than the Shea Moisture I had been using. My hair felt smoother and had some shine - and shine is not something my hair easily does. But I think that everyone's hair is different and responds differently to products. This just happens to be something that my hair likes apparently.

I started writing this post, as always, several days ago. The update is that my hair does love this. It dried out a bit after a couple of days but I was able to twist again with just a water-spritz and, voila, the moisture revived. Remember what I said about the size of the tube? That's going to last longer than expected because some water will re-boost the first application.

Since I can afford this so much better than I can the HydraSteam products, I will probably use this as a staple and use the HydraSteam when I can.

Peace

--Free

Wednesday, November 04, 2020

**REVIEW** Cascara (aka: Coffee Fruit Tea)

**UPDATE** I have CKD stage 3b. I have learned that that I have to be careful using this coffee product. As always, you should check with your medical care team before adding or trying anything new in your diet. Every healthy thing is not healthy for everyone. 


So, way back about this time last year, I was talking about coffee and some of the brands I like drinking black and sugar-free. Luzianne was my favorite for that but I haven't been able to find it lately. Well, I can find it all over Amazon but only if I want to use my entire grocery budget to pay for it.

Anyway. I'm not here to talk about regular coffee.

I might have mentioned it in that coffee post or in another of my rambles but the product I am talking about today is cascara - also known as coffee fruit and coffee fruit tea. So, coffee but not coffee the way most of us are used to it. Actually, cascara is the husk of the coffee bean. It kind of looks like extra-dry raisins.


It's an interesting thing, cascara. Nothing like coffee and nothing like any tea I've had. The taste of it is more of a fruity-syrupy-tasting beverage. As a matter of fact, I just realized that the taste reminds me a bit of raisin. Hmmm.

Hot or cold, the taste is about the same but I do prefer it cold. If I drink it hot, I am tempted to add honey to it for some reason.

As a beverage, it's referred to as cascara tea. Odd, right? Since it's the husk of the coffee bean. The husk is actually considered a "waste" product. Eat Cultured is more concise and precise, saying:

"Cascara, which translates as "husk" or "peel" in Spanish, refers to the outer husk of the coffee cherry that wraps around coffee beans. Since it's essentially the "fruit" of the coffee tree, it's also a valuable source of fiber and antioxidants." (source)

I am drinking the tea because of those antioxidants. I've been talking about ORAC values again recently and I am happy to say that cascara tea is the best-tasting thing I've tried from that list. 

By the way, this happens to be the brand I am trying. I ordered from Amazon but the coffee is from Twin Engine Coffee


They do have a Facebook page and they were super-responsive to questions and requests for info.

I think it's a shame that cascara has been getting tossed away all this time. We all ingest a lot of silly foods and beverages and we've been trashing something as ORAC-packed as cascara. Makes me wonder what all else has been going to needless waste...

Anyway, I have been replacing about half the daily coffee I drink with the cascara. I will either drink it cold and solo or add it to one of my sparkling waters. Last week I had a dry night-time throat so I sipped on some of the hot tea with raw honey before bed. It didn't keep me awake and it was soothing to my throat. 

One of the benefits I heard the tea offers is a mild laxative effect. I have not found myself with a huge change to my, er, movements but I do feel a bit more regular. I also pee a lot. That's because I tend to drink a lot of clear or sparkling water with the tea or after having some. I've read reviews where other people feel more of an energy boost.

I am always fairly fatigued, even on the best of my days, and I haven't noticed a prolonged boost of energy but I do seem to be a little more focused for a few hours after drinking a couple cups of tea. 

Now that I am used to having the tea as a staple, I am learning that the best way to prepare it is by soaking some beans overnight so that I have the drink on hand for the next day. This is not a brew-and-go tea. Even when steeping in hot water, it takes a while to get a decent cup. It's just easier for me to always have some soaking and ready to either heat up or drink cold.


It didn't come in that tacky jar.
I just wanted to show what it looks like

If I start noticing any better energy effects over time, I will update this post. Keep in mind that the drink might be more energizing to someone with more normal health.

The price of the tea is reasonable and I am sure that as I shop around, I will find even better prices. One thing I plan to do is to dry the remains of the used husks and dry grinding them to add to smoothies. I want to get every last bit of use from the tea.

Until I have an update, that's it for now.

Peace

--Free


P.S.: Since I wrote the draft of this post a few weeks ago, I do have an update. I have been baking a lot of bread and have a couple of times added the liquid from the tea in place of water. Results are not bad.

I hope the post makes sense. I went back in and added a little info and photos just now so. Please forgive any errors.

Monday, November 02, 2020

Bake Away The Blues (Bread & Water Roux)

 When I get stressed, baking helps calm me. Stress seems to send signals to my sarc to join the party so my brain might not be functioning well enough to do anything complicated. But I can almost always bake.

October was not good for my life. As if 2020 doesn't suck hard enough, it doesn't want to go out without dragging down as much joy as it can... Can I get an amen?

Anyway.

I spent about 3 days on the couch, not able to move or care. I watched YouTube videos hour after hour after hour. When I started getting sore from laying there, I decided to get up and maybe bake something - bread or rolls from scratch. Then, at some point, I got it into my head that I wanted to find a video on how to make brioche. 

Most videos on making brioche are either too talky. All I wanted was a recipe. I found one and... What a mess. I basically wasted a lot of flour, butter, eggs, and sugar. I should have looked at the comments before trying the recipe because there were a lot of people wondering just what the heck the baker was doing.

Also, I don't have a stand mixer. That seemed to be a must-have for kneading brioche dough. I was discouraged until I found the more awesome YouTube channel ever for baking recipes. The. Most. Awesome. Ever. 

The host/baker/cook in the Savor Easy videos ticks all the boxes for making great instructional videos. The entire focus is on the ingredients and procedure. Tomorrow, I will be trying a new batch of brioche.


Isn't that the best baking video? No frill, no life stories told, just right-to-the-point instructions. I need to learn from her! I'm hoping she has a recipe for babka. I've been wanting to bake one of those since forever.

I don't have the energy to start baking yet. I'm still mostly confined to the couch because, on top of everything else (cue the violins), I have a cold I can't shake. 

But -

Until I can get on my feet long enough to bake, I have been enjoying the Culinary Boot Camp videos from Chef Jacob Burton's channel

Like I said, baking/cooking is a stress reliever. I go through cycles of liking either baking or cooking, one more than the other. Winter seems to bring out my inner baker chick.  I don't like complicated baking challenges. You won't ever see me doing anything that involves preparing more than one dough or pastry for a finished product. I will never, ever qualify for The Great British Bakeoff. I like simple things that I can share with family or neighbors.

how satisfying is that?

There is nothing more simple in the baking world than bread, right? Well, I was always kind of terrified of making bread. A couple of years ago, I found a recipe from the Big Family Homestead channel and I made their recipe for Amish Sweet Bread. It was fun and easy and made the apartment smell fabulous. This is the recipe and it's actually called just "Amish White Bread". My bad. They actually have a good playlist of recipes very worth checking out.

I have talked about making Japanese Milk Bread for the longest. I just never felt comfortable with the recipes I found. Welp, Savor Easy has me covered. Theirs doesn't look the exact same as other recipes I've watched, but I think it will be good enough for me. I learned a while back that the secret to softer bread is to add a water roux. Say what??? 

The Water Roux Method

aka 

Tangzhong

Apparently this "water roux" is a bread starter known as Tangzhong and is what makes Hokkaido Milk Bread so yummy soft.


look how soft & fluffy...

The roux is a simple bread flour and water mix that is cooked to thickening. The tricky part is knowing ratios and when to add it. Here is a video I found that best explains the procedure and answers basic questions:


Her instructions are great but I still had questions, like what about how much to add to various recipe amounts? Thankfully, commenters had answers. This one is the most helpful of all:

"The Tangzhong roux should use 5% of the original recipe flour amount, by weight. The amount of water used should be 5 times the weight of the flour used in the Tanzhong roux. The water amount used in the Tanzhong roux should be taken from the original amount of water in the recipe. You are not adding an extra amount of water or flour to the recipe, just using some of the original ingredient amounts in a different way."

The same commenter also had this to say:

"I make the roux in a microwave. Use a pyrex cup. My microwave is 1100 watts. With room temperature water, 25 gm flour and 125 gm water I microwave for 20 seconds. Stir will with whisk. Take temp. Microwave 10 more seconds. Stir, take temp. Microwave a final 5 seconds. Stir and take temp. The roux is at about 65 C / 150 F. This is enough for a 450 gm / 1 lb loaf of bread. Cool to below 55 C / 130 F and add to bread maker."

Note: you can find conversions by asking Google or here is one site with chartsHere is a graphic. Also, here is a calculator site, if you don't mind accepting the cookies. Ironically.

The only answer I couldn't find anywhere is to the question of when to add the roux. I have decided that, since the roux can be stored for later use, I can add it to a dough before I prep it for the first proofing. I dunno. I will try it that way. As soon as I get back into the swing of things, I will be getting my Tang-zhong. Get it?

If any of you have used or plan to use the Tangzhong method, let me know how your bread turns out.

Peace

--Free

Wednesday, September 23, 2020

**REVIEW* Silicone Exfoliating Face Scrubber

 Those who have read this blog for a while know how careful I am about what I use on my face. Be it makeup, cleansers, toners - whatever. I have weirdly sensitive skin. It's resilient but moody. 

Anyway.

I have these little things on my nose that always looked like blackheads. They started appearing when I hit my 50's and, because I assumed they were blackheads, I would tweeze them out. Not good. For one thing, they aren't blackheads. They are sebaceous filaments. 

If you glance at the photos in that article, you might find out that your sebaceous filaments are visible like mine. By tweezing at these things for a couple of years, I was probably just making things worse. 

Since I refuse to "exfoliate" my face with anything that's the least bit abrasive, I started using those slightly painful sticky strips on my nose area. That helped but I was worried that it wasn't the best thing for my skin overall. For one thing, my skin was always reddish and irritated afterward. And the strips are so gross to look at!

Not long ago, I saw something like this and considered giving it a try- 


-but... that seems a little aggressive. I watched a couple of video reviews and still haven't decided whether I would try one or not.

The other day someone sent me 2 of these silicone scrubbers. 

This pink & a blue one

There are a lot of them all over Amazon but mine are the Etereauty  brand. I wasn't impressed at first because I always get these kinds of things - battery-operated facial tools and the like. I once got a  couple of weird little wooden things that seem slightly occultish. I threw those out and had my apartment blessed! LOL

I was really curious about these though. I like the way the feel - very soft and pliable. I started to think that they might be gentle enough to use on my face so I gave them a try. I wet my face and applied some cleaning oil and a tiny bit of gentle soap. Then I realized I had no idea what I was doing so I looked on Amazon for tips. 

I love the grip on it because it's so easy to hold it at angles so I am only scrubbing the area I want to.


After massaging just the nose area - where I have all those nasty little filaments - I rinsed and wiped my face down with a baby wipe. And, wow. I like, I like.

Since I don't have any Before photos, I won't bother with any but there is a very noticeable improvement. A highly visible improvement. I could tell right away by rubbing my finger over the area that it was lots smoother. Those little filaments really do a number on the face.

I can still see some of the little black dots if I use my "magic mirror". (Trust me, you have to steel yourself and be in a really good mood before you use one of those mirrors.) Mine looks exactly like this one and I once made the mistake of using it when I was a little bit down. Don't do that. 

I did try using this silicone scrubber on the rest of my face and I was very light-handed with it and it still was too irritating. I can use it on my neck and that oily nose area but that's it. I would love to get a bath mitt sized one though.

Anyway, I am going to start using this on my nose once every weekend until those filaments are done with. I suppose all I will need after that is upkeep.

So, if you have wondered about these, I would say to just know your skin before you use one. I personally love it.

I got two of these in the box that was sent to me. I use the blue one on my nose and the pink one on my neck. I am already checking out some of the larger ones to use on my torso.

If I do get up the nerve to try that spatula thing, I will do a review.

Peace

--Free

Tuesday, September 22, 2020

Homemade: Sugared Rolls & Mozzarella Buns

 My oh my oh me oh my!

When I was telling y'all about the Rhodes Rolls recently, I didn't tell you how much you can do with them. 


I was worried about gaining weight because I have been eating so many things made with the dough from these rolls. To be honest though, I am not gaining weight. I think it's because if you eat 2 or 3 of these rolls, you are full for the rest of the day. The past few days I've been having about 3 o these rolls (made as dinner rolls or as mozzarella buns) and a piece of salmon. I can have that one meal and I am done for the day.

Anyway. Here is what you need:

  • Rhodes Texas Dinner Rolls (or you can probably use the smaller yeast rolls)
  • (For the sugared rolls) Powdered sugar & whatever other seasonings you like. I use a little fresh nutmeg and some Ceylon cinnamon and regular cinnamon.
  • (For the mozzarella rolls) Mozzarella cheese. I prefer the large ball that I can easily chills and slice or the pre-cut logs that I can chill and cut down into smaller slices. I have not used shredded and I never use the low-fat, dry kind!
  • (For the mozzarella rolls) some savory seasoning to coat either the inner cheese or the outer part of the roll. I like using Lawry's and/or some Famous Dave's (either chicken or rib) seasoning.
  • A couple of baking pans to let the rolls rest/rise in prior to baking.
  • Enough oil or butter to lightly coat the pans.
  • Enough oil to over at least 2 to 3 inches of a skillet if you are going to fry the rolls.
  • Cling wrap to cover the rolls for rest/rising.
  • Something to drain the rolls after baking. I use my large splatter-guard & just lay it across a skillet for the oil to drain into.
Other than letting the dough rest/rise, it only takes about 1 minute for frying and about 12 minutes for baking.

If you start your dough and won't be able to fry or bake as soon as you thought, you can cover the rolls and put in the fridge to slow down the rise/proofing. This does, in my experience, make for a slightly drier bake. I notice that the bottoms of the baked goods get browner after refrigerating the dough.

Here are the ways I have been using the dough. 

For the Sugared Rolls (I couldn't think of a better name but these are like fried donut holes, sort of):

Basically, to start, you need to let the frozen rolls thaw just enough for the dough to be soft so you can cut or manipulate it. In my apartment's warm ambient temperature, that takes about 30 to 35 minutes. (You don't want the dough to start rising so you can thaw them in the fridge if your house is too warm.)

For making donut holes with the Texas rolls - which are touted to be "50% larger", you need to cut each roll into 4. Once these bad boys rise, even that will make a large roll.

Roll each piece between your palms or on a cutting board so it's as round as possible. (I have not yet figured out a non-messy way to add jelly to the centers...)

Put all the finished little balls onto a lightly oiled pan, cover with plastic wrap, and let them rise - or you could fry them without waiting. I don't know what those results are because I always let mine rise,

Fry them in hot oil (sorry, I don't know what temp; I just test a pinch of dough to check if it bobs quickly) and turn. T

Let them drain and then coat them in powdered sugar. (I use a blend of powdered sugar, a little grating of fresh nutmeg and some cinnamon in a bowl to toss & roll the dough in.)

For the Mozzarella Buns:

Same technique for prepping the dough except leave the dough whole or just cut in half - not in fourths.

I use whatever mozzarella is cheapest. I cut the cheese (see what I did there?) into small fingertip-size pieces and store in the freezer covered with wrap or in baggies. The frozen cheese is less likey to spill out during cooking. Or so I was informed by another website.

Put a little piece of the cheese in the center of a piece of dough and roll into a ball. Try pinching the dough closed first to seal in the cheese.

You can either dust the balls with seasoning (I like to use Lawry's Seasoning Salt) or you can season the cheese before you seal up the dough.

Fry the same as with the Sugared Rolls. I like to eat the "buns" dipped in Marinara sauce.

Keep in mind that the dough fries super fast! 

See how huge the sugared rolls turned out? The were the size of large marbles before I let them rise for about half an hour. Next time, I will have to make them much smaller!


I have seen a couple of recipes for making flattened fried bread using the Rhodes yeast rolls. I guess you could really get creative if you wanted to. Also, I am sure there are other brands of the dough out there, but Mama always used Rhodes.

And I am serious about these filling you up. I can have a couple of the mozzarella buns with some marinara sauce and all I will have the rest of the day is water and coffee. It's super-filling. I will be experimenting with adding some spinach and cream cheese to bake inside the rolls. Fingers crossed.

Peace

--Free

Tuesday, September 15, 2020

Benefits of Belief

 I usually put my Christian-themed posts on my Free & Faith blog, but I wanted to share this one here.

Recently, I published this on Free & Faith. It's basically about how people will believe in all sorts of silly and unfounded things while rejecting God. The better part of me prays for those people who reject God but... 

There is a part of my personality that is still under construction. As some people joke: God is still working on me. When I get annoyed or angry or have to deal with the supreme hatred of people, all I can think is that they better be glad that I believe in God. They better be glad that I'm not who I used to be.

Years ago, I was not a nice person. I mean, I was nice but I could go from nice to not-nice in the space of a heartbeat. I had a terrible temper and (I'm so ashamed to admit this now) I had a habit of slapping people. 

The fact that someone didn't beat my little then-narrow behind into a new reality is proof that God has always been watching over me. I was all of not quite a hundred pounds and thought that the universe revolved around my emotions. I ticked a lot of the boxes listed in Proverbs 6:16-19:


I quit counting after I hit on 4. Oh boy.

Not only was I a sometimes-awful person but I was also occasionally naive. As mean as I could be I did have a soft side and was incredibly trusting. I don't want to think back on how many times I could have been abducted or raped or even killed because of the situations I put myself in. I was (still am) a lightweight drinker and would be falling-down drunk after a couple of moderately strong drinks. I remember times that (and yes, I am VERY ashamed to admit this) rode with drunk drivers or fell asleep passed out in the back of a car parked in front of our house. 

A few years ago, I saw this image and laughed so hard I got hoarse.


But, all kidding done with, I know that God was looking over me. I have struggled with depression all my life and there were times when I really thought about ways to end my life. I was just too chicken to die. Now that I am saved, I am not afraid to die but I always say "it's not being dead that scares me but getting dead". Before I came to Christ, I was too stupid to be afraid of being dead.

So, there are benefits to belief. There is a poem by a woman named Carol Wimmer. I know nothing about her or her definitive beliefs but I feel like her words capture perfectly what so many Christians want to convey. I thank her for the beautiful poem. I will leave you with her words and hope they give you insight into the Christians in your life.

Peace

--Free


Sunday, September 13, 2020

Spammer's Delight

I don't know if spammers just think that if they submit enough comments that a blogger will think "You know what? This one is so persistent, he deserves to be noticed?"


Back in the day, I used to get a TON of comments on my blog posts, then G+ died and went away. Now I have to rely on the dreaded ~ugh~ Facebook to get any reader feedback and interaction. Once people started to get Insta-famous and Tube-fabulous, I think bloggers who didn't join the money-train lost traction. And I am okay with that. I never started blogging to monetize. I blog for my emotional health and because it's fun. I have some loyal readers and I love that part. I am not in a place in my life or abilities to deal with "monetizing" what I do for stress-relief.

Anyway.

This all is on my mind because I am SO tired of dealing with Spammy comments. It was a long time back (when a couple of those comments slipped through my net) that I started moderating all comments. It doesn't take long to glance through and see the ones that mention a product or include a link. Blogger makes it pretty easy to just run down the line and delete-delete-delete.

This latest is just one of the silly things I see via Blogger mail:


How obvious and smarmy, right? 


The thing is, I might actually be interested in some of the stuff the spammers have for sale - I mean, I do shop Amazon like someone with money... How crazy that spammers self-defeat by using this approach.

Anyway, this is to those annoying people who do this type of thing:

Back when G+ was a thing, I would have blocked and reported you. Right now, I am thinking of making a list of you all, searching you ought via Private browsing and then filling up your inbox with copies of your own comments. For now, just know that you might have something I would be interested in hearing about. It's just like stores who flood my snail-mail box with unwanted ads - I make a vow to never purchase anything from those places. 

The way I see it, if you are using spam, you must not have any product or service worth promoting in any other way.

I have gotten this kind of thing from people pitching vape products, cosmetics, household goodsm etc. I use all of those things and will consider taking a look them - but not from someone slimy enough to use spam.

So there. I just had to vent a little after rejecting about 12 spam comments and cleaning out my In-box of emails like that one.

Peace

--Free

Friday, September 11, 2020

Soothing My Emotions

 Nobody warned me about my feelings and emotions catching menopausal moments. Plenty of women warned me about hot flashes and night sweats. I was well-informed about mood swings. But mood swings are different from emotional bruising. Trust me, I am learning that now.

I am well past menopause. Mostly. I've gotten past the hot flashes and night sweats and I haven't just suddenly felt like committing the murder of innocent bystanders because of hormonal fluctuation. 

However...

My emotional swings in the past few years have been directed more inward. I can wake up feeling normal (you know, cranky without my coffee and ready for my days of the general craziness that is my life) and then, suddenly, without warning, I can feel so unloved and life-failing and bleak. For no reason. That is not a mood swing. That is a soul burp or an emotional crisis.

These random bruisings don't happen often. If they did, I might be used to them and better prepared to swim through. Nope. These nasty things creep up behind me and slap the back of my heart about once every maybe 6 to 8 months. Weird, right?

I swear, I sometimes feel like all life after 50 is one eternal crisis of self-examination. And I never pass when I get in a certain mindset.

So it was about 3 days ago that I had the latest attack of... whatever this weird sadness and soul-pain is called. I wasn't sick because I skipped my weekly injection. (It's rainy and cold and gray and I don't want to be med sick in this weather.) Because I was feeling fairly decent and my brain was in a good mood, I was cleaning and putting out laundry to do and making a grocery list for a rare actual trip to the store (instead of delivery). The rain broke for a moment and I was able to take out the garbage and scrub the kitchen floor. It was a great day. Glorious if you ignored the weather. And then, I just... I suddenly started thinking too much about the wrong things.

When I get in these - let's call them mental conniption fits - I immediately lose all energy and joy.

This sad state of - whatever - stayed with me for a full day and a half. I was tired but didn't want to sleep. I thought I might be hungry but didn't want to eat anything. I tried to read the Bible but just didn't have the strength. And then I even started having a moment of wondering why God doesn't love me. (Maybe I should have spent the past several days reading the Book of Job as part of my yearly reading plan?)

This morning, the fit finally broke. It left as fast as it came on. I woke up and make coffee and stripped the bed (because I never got around to all my laundry before) and was thinking about when I would do my morning Bible reading session and... I realized that I was not feeling like I had been during the downpour of sadness. Yeah. It was just like that.

I tell you what, I am so glad that I finished reading Job. I don't know if that had anything to do with it but maybe? Reading about Job's trials and sadness (no one expresses sadness like Job does!) made me think so much of my late sister and all she went through.

Anyway, I am better today. I am taking a break from housework and getting ready to eat something because I am really hungry now. Tonight, I will do more Bible reading (thank goodness Job is finished and I hope it's not wrong to say that) and then I will sit in the living room for a while with my fake fireplace.

Let me tell you about my "fireplace"!


Laugh if you want, you snobs, but I love this. I can turn off all the lights and turn up the sound to hear the crackling of the "fire" and almost feel warmer. I'm not for watching TV but I am so into this.

If you want a YouTube fire, the one I use is 10 hours long and is found here. I get my comfort where I can find it.

Peace

--Free

Wednesday, September 09, 2020

Them Dinner Rolls!

 Yes, I said, "Them dinner rolls". Aren't those bad boys just beautiful? 


There is a funny story about these rolls. Well, not the rolls in this photo. I made those rolls tonight but...

Years ago, every Thanksgiving and Christmas, my mother would make dinner rolls from scratch. They were the best rolls ever - all soft and salty-buttery on the inside and a nice brown top. So good. Mama would start making those rolls early the day before she wanted to serve them. At night, she would set the rolls up on top of a high cabinet to rise overnight. When we baked those rolls, neighbors a couple of houses down could smell them. My mother was family-famous for those rolls.

When mama started developing mild arthritis in her hands, my sister and I worried that she wouldn't be making dough from scratch anymore. She didn't make any more bread either except for Thanksgiving and Christmas. We still had those delicious dinner rolls. 

Now, my mother didn't really like anyone in the kitchen when she was fixing a big dinner. My sister and I and some of our female friends would do a lot of the prep - cutting up and hulling vegetables, peeling potatoes, and doing late-night store runs. But at a certain point, Mom would kick everyone out of the kitchen. She did a lot of her pies and bread early in the morning or late at night when everyone else was sleeping.

One year, Mama wasn't feeling well but she still did a lot of the cooking. That was the year that she started letting my sister in the kitchen with her all night and morning. I wasn't jealous then because I really wasn't interested in cooking. Those were my too-cute years. 

After Mama passed away, my sister took over all the major meal preparations. My nieces and their friends were old enough by then to help out with the odd duties. I never did get promoted to sous chef but I could wash dishes and clean a destroyed kitchen like nobody's business. Just like when Mama had been around, every year, we had those delicious dinner rolls. I was a little bit jealous that my sister had gotten that recipe... Not long after that, I did get the recipe. Seriously. This is how I was able to turn out that pan of the rolls tonight.


When the nieces were old enough to be cooking in their own homes, they still came around for some of the holiday meals. One of my nieces brought a long-time friend (just like a niece to us) to one of these dinners. The friend kept talking about how she had sure missed "Grammy's dinner rolls" and she told my sister that she wanted her to teach her how to make them one day. 

This girl ate a roll buttered. She ate one plain. She made a turkey and dressing sandwich with a roll. And she just would not stop talking about those rolls. After she ate almost a whole pan by herself, she just about begged my sister for the recipe.

My sister looked at me and I looked at her and she got up to get the recipe.

We always kept the recipe close at hand and in the freezer around the holidays. Here it is:


The girl and my niece's mouths fell open. They remembered Mama's homemade rolls and couldn't believe that the frozen ones tasted so good. They felt like we had been tricking them for a long time. Honestly, though, Rhodes Texas Rolls are the closest thing to Mama's homemade rolls. Mama's were always a bit larger and a smidge saltier but we remedy that by brushing a little salted butter on the frozen tops when we set them out to rise.

These in this red package rise up large and there are some in, I believe, a yellow package that is "regular" sized. We always try to match the size of Mama's homemade rolls so we get this red package.

These are so easy to make. You literally put them in an oiled pan (I use a 9-inch round cake pan); lightly baste the tops with butter (optional); cover them lightly with cling wrap that you have sprayed with a little oil; set them out of the way where they can rise (I set mine on a high cabinet where heat rises); they rise in as little as 4 hours in a warm house; then you pop them in an oven at 350 and they will take anywhere from 10 to 12 minutes to bake. If you do butter the tops, they will brown faster so let them stay in a bit longer to be completely done.

Best. Rolls. Ever. Well, other than Mama's from-scratch rolls. 

Now that the girls have the "recipe" they can have the rolls any time. I will get in a mood for them, like I did this time, and bake up a pan of 8 that might last a couple of 3 days. The best thing is, they keep well in a sealed baggie after they are cool. They stay soft and fresh-tasting for the next meal. I love to eat mine with butter and honey or with some gravy or just warm and plain.

Man, I miss that old-fashioned from-scratch cooking and baking but thanks to Rhodes Rolls, I can almost remember Mama's dinner rolls.

Peace

--Free