Translate this blog....

Showing posts with label baking. Show all posts

Saturday, December 17, 2022

RECIPE: Easiest Pizza Dough EVER (and baking tips)

 Mmmm... Pizza...

It was just a month ago that I was ranting about the Mama Cozzi's Pizza Dough that I was getting from Aldi's. One reason I like it is that it's cheap. But, still, the price was bouncing around from $1.50 some days to $1.95 other days. And the last time I got a bag delivered, it was really wet and soggy. Instacart did give me a refund but... That made me decide to stop being lazy and make my own. (It's about to be a new year and I'm working on scrimping even more than usual more to save money.)

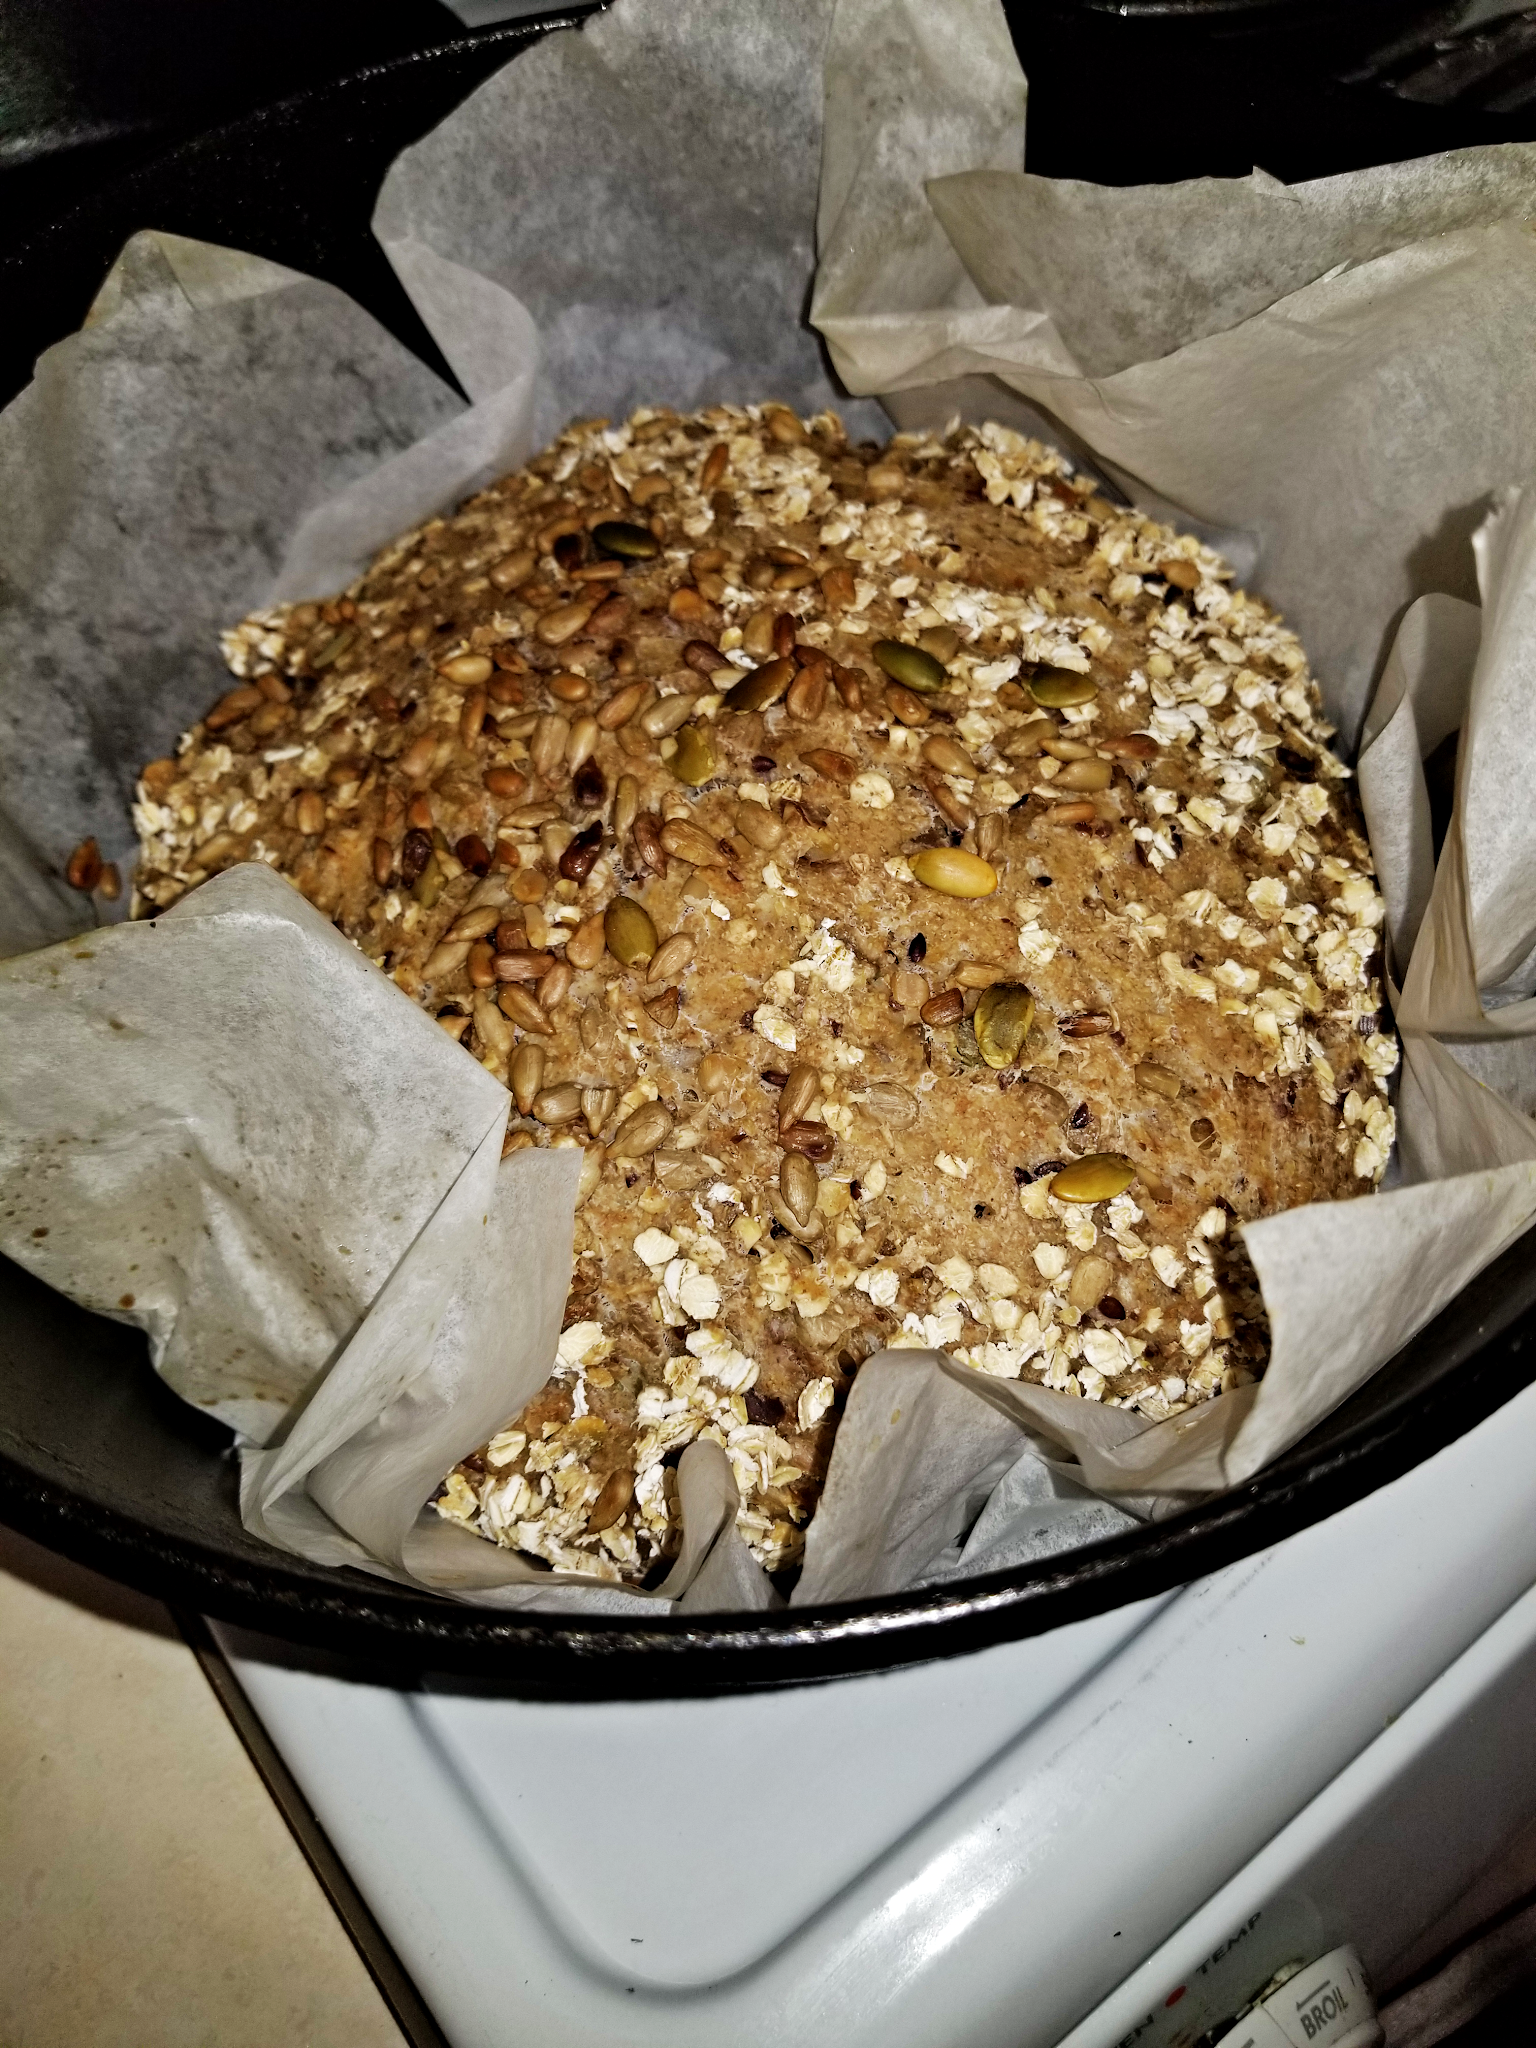
Use this recipe if you want a tasty and crispy dough that's good enough to eat by itself!

This recipe is from someone I've always kind of rolled my eyes at. That's just because I get so tired of everyone becoming a brand... In this case, it's The Pioneer Woman. Anyway, this recipe made me unroll my eyes and get to work. This is the link to the official recipe (and do check out her other recipes!) but I did make some modifications that I want to share. Also, I culled a nice tip from someone who also used the recipe. I suggest reading the tips before using the recipe. Just saying...

Make & Freeze Pizza Dough

from The Pioneer Woman


INGREDIENTS: (I added some helpful links)

4 1/2 tsp. quick-rise yeast

2 c. warm water (115F) (about the "wrist temp" of a baby bottle)

2 tsp. sugar

5 c. bread flour (600g per King Arthur Baking)*

1/4 c. olive oil

1 tsp. salt 

(*I prefer measuring large quantities of baking ingredients in Metric because it's more accurate than depending on the Imperial system of cup size, etc. Also, the King Arthur chart shows variances between types of flour.)

DIRECTIONS (don't forget to check the tips below)

  1. In the bowl of a stand mixer, combine yeast, warm water, and sugar, and let sit for 10 minutes. The liquid should be foamy and bubbly, indicating that the yeast is alive. 
  2. Add the bread flour, olive oil, and salt. Stir using the dough hook or a wooden spoon, until roughly combined (this means no loose flour pieces in the bottom of the bowl). Fit the bowl and the dough hook onto the stand mixer and knead on medium-low speed for 10 minutes, until smooth. Cover the bowl with plastic wrap and let rise for about 30 minutes, until the dough has doubled in size. 
  3. Remove the dough to a lightly floured surface and divide it into four even pieces. Shape each piece of dough into a ball. (You can weigh it on a scale. I just flattened my dough into a rectangle then eye-balled cutting into even pieces.)
  4. The dough is now ready to be rolled out and baked, or ready to be frozen. 
  5. To freeze the pizza dough: place the pizza dough balls into resealable plastic bags. Make sure that if you put multiple balls of dough in one bag, you use parchment paper or wax paper to keep them separated. 
  6. To thaw:  move the pizza dough from the freezer to the refrigerator the morning before you want to make dinner, then roll and bake as usual. I move mine to the fridge the night before. See tips for why that is.)
  7. To bake: preheat the oven to 500˚. (Yes, she means 500F) Roll the thawed (or freshly made) dough and bake each pizza for about 10 to 15 minutes. (For my smaller-diameter pizza, it was finished at 12 minutes on apprx. 450F.)
Tips & Modifications:
  • BEFORE YOU DO ANYTHING: If you are going to be freezing part of this, make sure that you have either resealable plastic bags (quart or gallon size) that seal tightly or a bag-sealing machine. You want to make sure to tightly seal these for freezing.
  • Because I don't have an oven light or proofing box, before I start Step 2, I turn on my oven (about 150-200F) to warm up. I set a timer to stop after about 5 minutes and I check with a thermometer that the oven is at a safe temp for the yeast in the dough. I learned from Knead Rise Bake that the ideal temp for this is 75-80F. The page also has tips for other ways to proof bread in the oven. Also, know that I have used a heating pad on Low underneath a pan to help the bread dough rise! It did work.
    • Also at Step 2, I was careful not to add all the flour at once. I held back about a cup and added it a little at a time. I find that it's easier to add flour to a dough than to add liquid. I ended up using all the flour & then having to use a bit more during the shaping process. Next time I know that I might need to add a few tablespoons more to the initial mix. 
    • When covering the dough to proof in the oven, make sure to a) lightly spray the plastic wrap with a bit of oil. I did not and my dough stuck to the wrap because it rose so well, and b) use a large enough bowl. My bowl was too small in the first place.
    • To make sure my dough is "roughly combined", I will use a spoon or spatula & check underneath to make sure to get all the raggedy bits of flour tucked into the dough. (My mixer doesn't always pick up and combine these loose bits on the bottom.)
  • At Step 3, when I removed my dough from the bowl, it was stickier than I liked. I just added a little more flour to the board until it was less sticky & hard to work with.
    • Also - when getting ready to divide your dough: the recipe suggests 4 pieces and that worked for me to make a pizza that was roughly 9.5 inches in diameter with a medium-thick crust. If you are feeding a family, you might want to divide the dough into 2 pieces. I guess it depends on how thick or thin of a pizza you want. 
  • For thawing, some users on the recipe page said the thawed dough wasn't rising well. Another user with the handle  tah3169 had this useful tip: "... when you take out the dough from freezer put in refrigerator overnight to defrost. Once defrosted put in a greased bowl and cover with wrap at least 2 hours before cooking." I have not thawed any of my dough but I will try this.
  • My dough did rise very well but I have just learned to eyeball when my dough is or isn't ready. I highly recommend the Chain Baker site and the YouTube channel for learning from someone who explains things well. I go directly to the Learning page on his site at least twice a week! (I try to donate a couple of dollars via YouTube because he's helped me so much.)
  • The 500 degrees seemed high to me but it is correct. The high temp is what makes the crust crispy. My oven tends to run high though so I went with 450. I also always oil the edges of my crust with olive oil. With this dough, I lightly oiled the baking pan with some of my garlic-infused olive oil. The crust was the best I've ever had on any pizza. I could have just eaten the crust with some dipping sauce!
  • By the way, I wondered why great cooks and bakers like mom and other kitchen pros always use wooden spoons. I learned that this is because wood is very sturdy and doesn't react badly with yeast and other ingredients. I actually think my mom just preferred wood spoons. If anyone else knows more about this, let me know.
This is what happens when you don't oil the plastic wrap for proofing. (The last thing I made was brioche so I forgot that other doughs rise so much!). The lesson: Use a larger bowl than I did to allow for the rise and oil the plastic wrap! I would also go ahead and lightly oil the bowl...

Bowl is too small and the wrap is too tight
These are my remaining 3 pieces of dough. I didn't weigh them but will do that next time and maybe remember to update this post with more pics.
You can tell I eye-balled the divisions
Now, remember, everyone's ovens and mixers, etc are not equal. My poor little almost-dead stand mixer did get through this dough (because I only had to use low speed!) but I think I could have done it by hand. That would be some serious work though. 

I'd suggest following the directions the first time you make this dough, then use your instincts next time. You know your kitchen and equipment better than anyone so you may want to modify the baking temp or add more or less flour to the dough, etc. 

More Helps & Guides:

By the way, as I mentioned, I have learned that it's easier (and more accurate) to measure using the metric system for large quantities. I have at least 3 sets of measuring cups. I have tested and found that each "cup" is a little off from the others. There are no big differences but for baking, it's better to be more exact. Here are some sites for looking up or converting  Imperial (U.S.) vs Metric:

  • The National Institute of Standards & Technology (NIST) seems to be the best starting place though the conversions are approximate. (BTW, the site also has this page for anyone wanting to learn how to actually do conversions. Uh, this is math and math gives me a headache but for those who dig that sort of thing, go knock yourselves out. I'll have Tylenol waiting when you finish!) Here is the chart for cooking:
  • Spruce Eats always has a helpful chart or two.
  • Baker Bettie (I just like the "Baker Bettie" handle!)
  • The android app US-Metric/Imperial Converter by MobiSys has an incredible 4.9-star rating. I've not yet downloaded it but added it because it's for more than cooking. (As with any phone app, if you use it, make sure to run it through your virus scanner!) And, no, I'm not sponsored by them nor am I promoting the app.
  • Better Homes & Gardens has a pretty complete chart
I have a perfectly good & highly accurate scale that I think I paid about $11 for a couple of years ago but I'm almost hoping it breaks down so that I can get this one

It's cheaper at Walmart than on Amazon.
Just saying...
LOL

Last tip: If you want to test your food scale for accuracy, try weighing something you bought that has the weight on it. I check my scale often by weighing packaged meat. 


UPDATE: I picked up some tips I want to add:
  • To make the dough easier to stretch (when preparing to use), set it out & let it come to room temp. This was a game-changer for me since I did have trouble stretching the dough.
  • Add a little flavored olive oil to the crust. I have oiled my crust but forgot to always use my garlic olive oil. 
  • After you spread the sauce and before you add toppings, sprinkle with oregano, garlic powder, parmesan, etc. I can't recall if I mentioned this or that I sometimes add real bacon bits.
  • Jazz up boring (or cheap) sauce by adding small pieces of diced fresh tomatoes or finely chopped garlic. 
  • If you want the pizza a little more done but are nervous about burning it (I have this dilemma with cast iron pans), turn off the oven and let the pie stay inside for a few more minutes. I know that my cast iron holds heat and will continue to cook the dish for several minutes. Don't forget to check every few minutes though.

Peace
--Free


P.S.: I can talk all the smack I want about The Pioneer Woman brand but, honey, they (the brand) have the cutest heart-shaped ceramic pie pans!!! I was gifted a set of small pan and a large one. So I love some of the stuff but I still hate all the branding and everyone going corporate. 

Monday, May 24, 2021

Amazon's Been Hiding (Bulk Buy) Stuff

 Katt Williams will understand me when I say that I am both happy and sad right now.

I just found out that Amazon has a bulk Bulk Food Supply department. I do probably 90% of my grocery, household, and personal goods shopping on Amazon. I actually once found their site directory. And that directory does not link to the Restaurant and Bulk Food Supply department I just discovered. By complete accident.

So I am happy that I stumbled onto the page but sad that I didn't know about it before.

Lately, I've been in bread-baking mode. I have refined my basic bread skills and am working on learning the Tangzhoung method for my yeast bread.  I love baking for two reasons: it's cheaper to bake it than to buy it (especially brioche or other specialty bread), and it's therapeutic. It's probably beneficial to brain function because I really have to focus and concentrate on each step. 

The smell of flour and yeast and eventually, fresh-baked bread is just a whole other level of aromatherapy. 

Yesterday, I made my first mostly-successful loaf of Japanese Milk Bread. Next time, I plan to get it just right. Because mine did not come out this nicely...


Anyway, I was going to buy more yeast in the little neighborhood market. A tiny set of packs - about a tablespoon each - was almost 2 dollars. The last jar I had - that has lasted me for a long while - was from a neighbor. Once when we were out and she lost her card, I gave her a tiny bit of money. I wouldn't let her return it so when she saw me baking one day, she ran home and came back with a brand new jar of yeast. She bought it thinking she needed it for a one-time recipe.

I checked all the groceries on Instacart and, yep, yeast is pricey. I decided to look for something in bulk. Nothing at Walmart, Target, or Amazon. At least, that's what I thought when I tried just using the Amazon search bar.

Where do most of us go searching online? Google. My search query? "online food supply".  Because I' lazy. Guess what came up right near the top of the search returns?


It's probably because the internet spies know me better than my own family. I wasn't surprised that Amazon was at the top. But I kinda was...

Normally, when I'm searching for food products and Amazon switches categories for me it's from "All Departments" to "Grocery & Gourmet Food". Not this:

Anyway.

Since I was there, I went about looking for some yeast in larger packages. I found this 1-pound package.


I like everything about it except that the package is not resealable. 


I had to put some in my old yeast jar in the fridge then seal the rest airtight to keep in the freezer. Every time I open the main package, I will risk spilling yeast everywhere. Annoying.

Back when I started this post, I had only been looking for things very basic bread-baking supplies. Recently, I have been looking into buying things to make seeded and sprouted grain bread. I will have to check out this Bulk section so I can do price comparisons. Another thing I find worth buying in bulk are paper plates, plastic utensils, and other household items I love as a single gal.

Anyway, there you have it. In case you were looking.


To summarize:

Buying in bulk saves money. You don't have to have a large family to buy in bulk. Amazon has competitive prices when buying in bulk. Compare prices. Get a food sealer. Do your research.

Peace

--Free

Thursday, January 07, 2021

Christmas Gifts & Better Nutrition

NOTE: Soon, I will be posting reviews

 of each of the appliances mentioned here.


Guess what I did? I thought I had posted about my Christmas gifts from my family and... The unfinished draft is still sitting on my blog list.

Well, here goes.

For Christmas, I got a stand mixer and a bread machine. Every year, my family asks what I want and I wanted a bread machine. They encouraged me to think of a second item so I asked for a stand mixer.

This is the stand mixer:


This is the bread machine:


I am in love with both of these appliances! I had not used a bread machine since my sister had one years ago. We only ever used ready-to-use bread mixes and I think we gave up buying them because of the prices. The bread wasn't even that good, come to think of it. Well, we have come a long way.

My stand mixer is perfect for my tiny kitchen. When I'm not using it, it fits right on top of the fridge next to the Instant Pot. I had to clean out a cabinet to store the bread machine!

Anyway, I made my first bread today and it came out so much better than I expected. It was slightly salty but that was from using the Food.com recipe. My instincts were to cut down on the salt and add some honey or brown sugar. Since this was my very first loaf, I didn't mess with the recipe, but now I am more confident. King Arthur Flour had a much better-sounding recipe but I wanted to try the simpler one. Bad decision. If you try it, I suggest cutting back on the salt and adding some honey. The bread I made works only because I have some honey butter made up to use on it.


Whole wheat flour/White bread flour mix with chia, sunflower & flax seeds;
turmeric powder and oatmeal

I was using the stand mixer from Day One. I mixed up a from-scratch cake and some frosting. Not very healthy, right? Well, for my next creation, I am going to attempt to make these whole wheat cookies - or rather sables. I will substitute the hemp hearts (which I don't have) for sunflower, chia, and flax seeds. 

My goal is to eventually make both some bread and cookies with some "ancient grains" added in. But I will save some of those ideas as I get money for ingredients.

By the way, for anyone who has considered getting either of these appliances but wanted more detail, go and read every review you can. My family basically let me pick out the ones I wanted and I sifted through a lot of info and reviews. The one thing I didn't find for either was how loud they run. 

The bread machine sounds like a very, very quiet washing machine and only makes noise when kneading. The beeping to signal ending and beginning of cycles was not very loud. I can run the kneading cycle at night and not disturb anyone sleeping 10 feet away in the bedroom with an open door.


The mixer is slightly louder but not annoying at all. I would only run it during the day though. It's not that it's really loud, but it's a more constant whirring than the bread mixer.


I will say that the only thing I wish for the bread machine is that the LED indicated which part of the cycle is currently happening. It's seriously easy to set the machine for bread type/crust shade/start but when I would check to see which kneading or proofing cycle it was on (1st, 2nd, or 3rd) so that I could remove the bread paddle before the last proof start. Other than that, it's perfect.

By the way, the helpful tips listed in the notes to this video are awesome. This is where I learned about removing the paddle so as not to have a hole in my finished bread! Big thanks to that channel.

So, while I hate making resolutions for the start of a year, I can say that I will be saving money and eating better. I whipped up my own version (kind of) of Ezekiel bread for about 40 cents (I'm guestimating here). And I do plan to learn more about ancient grains.

To my family, I want to say again how much I love that they love me!

Peace

--Free


Wednesday, December 02, 2020

Trying to Make Artisan Wheat (I think)

 Okay, so this is my first time doing bread in the Dutch oven. I'm not even sure if what I am doing can be called "artisan". Because of the type of flour I'm using, I'm not sure if I can call it a true "wheat" bread.


It is wheat, so...

Here's the thing though, I felt so good while preparing the dough. I've been really wiped out lately and with trying to change my diet (again), it's been a drain. This recipe was one of the easier ones because it's a "no-knead" type. I don't have to knead it because it has to sit for 8 to 24 hours to rise.

I didn't take a Before photo. It was after 9 at night and, yeah. But here is what it looked like this morning:


That did better than I expected. The dough is really damp and was just one big odd-looking lump when I went to bed. This morning's dough was puffed and kind of yummy-looking. Before I had to push out the air and get it ready for the 2nd rise.


I changed a couple of things about the recipe, but here is the video I used.


I like this dude. He gets to the point and is very clear with instructions. If this bread is messed up, it's totally going to be on me. 

Like I said, I made changes. I didn't have sesame seeds and I didn't have the flax in seed form. I used pumpkin and sunflower seeds. I literally picked up the cheap packs of seeds at the corner grocery. I do have ground flax and since this is all about a high-fiber diet, I added that. Without measuring. Yikes. I didn't measure the seeds either. I figured the more the merrier and just went for it.

One thing that I really did want to add but held back was some brown sugar or blackstrap molasses. Or vanilla extract. Restraint is the word of the day. I played around the rules enough. I can always test adding things the next time.

As I was writing this, I was waiting for the bread to finish baking. Nervous! But, it turned out to look a lot like the one in the video. I am impressed with myself.


I am pleased! It smells amazing and none of the seeds burned. I am nervous about cutting into it, but... 


It turned out awesome and really could do with another 5 or 6 minutes in the oven (I'm putting it back in).  I am trying to remember what Paul Hollywood says about the seeds not distributing throughout the bake... Still, I am kinda happy.

The one thing I am really disappointed in is that I didn't follow my instincts and add something sweet - sugar, syrup, honey - the bread tastes like organic store-bought bread that is slightly salty.

Okay. So now I know. I will be making more and this time, I am going to add sugar, syrup, or honey. This would be the best thing ever with some sweetness to it.

Peace

--Free


Monday, November 02, 2020

Bake Away The Blues (Bread & Water Roux)

 When I get stressed, baking helps calm me. Stress seems to send signals to my sarc to join the party so my brain might not be functioning well enough to do anything complicated. But I can almost always bake.

October was not good for my life. As if 2020 doesn't suck hard enough, it doesn't want to go out without dragging down as much joy as it can... Can I get an amen?

Anyway.

I spent about 3 days on the couch, not able to move or care. I watched YouTube videos hour after hour after hour. When I started getting sore from laying there, I decided to get up and maybe bake something - bread or rolls from scratch. Then, at some point, I got it into my head that I wanted to find a video on how to make brioche. 

Most videos on making brioche are either too talky. All I wanted was a recipe. I found one and... What a mess. I basically wasted a lot of flour, butter, eggs, and sugar. I should have looked at the comments before trying the recipe because there were a lot of people wondering just what the heck the baker was doing.

Also, I don't have a stand mixer. That seemed to be a must-have for kneading brioche dough. I was discouraged until I found the more awesome YouTube channel ever for baking recipes. The. Most. Awesome. Ever. 

The host/baker/cook in the Savor Easy videos ticks all the boxes for making great instructional videos. The entire focus is on the ingredients and procedure. Tomorrow, I will be trying a new batch of brioche.


Isn't that the best baking video? No frill, no life stories told, just right-to-the-point instructions. I need to learn from her! I'm hoping she has a recipe for babka. I've been wanting to bake one of those since forever.

I don't have the energy to start baking yet. I'm still mostly confined to the couch because, on top of everything else (cue the violins), I have a cold I can't shake. 

But -

Until I can get on my feet long enough to bake, I have been enjoying the Culinary Boot Camp videos from Chef Jacob Burton's channel

Like I said, baking/cooking is a stress reliever. I go through cycles of liking either baking or cooking, one more than the other. Winter seems to bring out my inner baker chick.  I don't like complicated baking challenges. You won't ever see me doing anything that involves preparing more than one dough or pastry for a finished product. I will never, ever qualify for The Great British Bakeoff. I like simple things that I can share with family or neighbors.

how satisfying is that?

There is nothing more simple in the baking world than bread, right? Well, I was always kind of terrified of making bread. A couple of years ago, I found a recipe from the Big Family Homestead channel and I made their recipe for Amish Sweet Bread. It was fun and easy and made the apartment smell fabulous. This is the recipe and it's actually called just "Amish White Bread". My bad. They actually have a good playlist of recipes very worth checking out.

I have talked about making Japanese Milk Bread for the longest. I just never felt comfortable with the recipes I found. Welp, Savor Easy has me covered. Theirs doesn't look the exact same as other recipes I've watched, but I think it will be good enough for me. I learned a while back that the secret to softer bread is to add a water roux. Say what??? 

The Water Roux Method

aka 

Tangzhong

Apparently this "water roux" is a bread starter known as Tangzhong and is what makes Hokkaido Milk Bread so yummy soft.


look how soft & fluffy...

The roux is a simple bread flour and water mix that is cooked to thickening. The tricky part is knowing ratios and when to add it. Here is a video I found that best explains the procedure and answers basic questions:


Her instructions are great but I still had questions, like what about how much to add to various recipe amounts? Thankfully, commenters had answers. This one is the most helpful of all:

"The Tangzhong roux should use 5% of the original recipe flour amount, by weight. The amount of water used should be 5 times the weight of the flour used in the Tanzhong roux. The water amount used in the Tanzhong roux should be taken from the original amount of water in the recipe. You are not adding an extra amount of water or flour to the recipe, just using some of the original ingredient amounts in a different way."

The same commenter also had this to say:

"I make the roux in a microwave. Use a pyrex cup. My microwave is 1100 watts. With room temperature water, 25 gm flour and 125 gm water I microwave for 20 seconds. Stir will with whisk. Take temp. Microwave 10 more seconds. Stir, take temp. Microwave a final 5 seconds. Stir and take temp. The roux is at about 65 C / 150 F. This is enough for a 450 gm / 1 lb loaf of bread. Cool to below 55 C / 130 F and add to bread maker."

Note: you can find conversions by asking Google or here is one site with chartsHere is a graphic. Also, here is a calculator site, if you don't mind accepting the cookies. Ironically.

The only answer I couldn't find anywhere is to the question of when to add the roux. I have decided that, since the roux can be stored for later use, I can add it to a dough before I prep it for the first proofing. I dunno. I will try it that way. As soon as I get back into the swing of things, I will be getting my Tang-zhong. Get it?

If any of you have used or plan to use the Tangzhong method, let me know how your bread turns out.

Peace

--Free

Wednesday, September 09, 2020

Them Dinner Rolls!

 Yes, I said, "Them dinner rolls". Aren't those bad boys just beautiful? 


There is a funny story about these rolls. Well, not the rolls in this photo. I made those rolls tonight but...

Years ago, every Thanksgiving and Christmas, my mother would make dinner rolls from scratch. They were the best rolls ever - all soft and salty-buttery on the inside and a nice brown top. So good. Mama would start making those rolls early the day before she wanted to serve them. At night, she would set the rolls up on top of a high cabinet to rise overnight. When we baked those rolls, neighbors a couple of houses down could smell them. My mother was family-famous for those rolls.

When mama started developing mild arthritis in her hands, my sister and I worried that she wouldn't be making dough from scratch anymore. She didn't make any more bread either except for Thanksgiving and Christmas. We still had those delicious dinner rolls. 

Now, my mother didn't really like anyone in the kitchen when she was fixing a big dinner. My sister and I and some of our female friends would do a lot of the prep - cutting up and hulling vegetables, peeling potatoes, and doing late-night store runs. But at a certain point, Mom would kick everyone out of the kitchen. She did a lot of her pies and bread early in the morning or late at night when everyone else was sleeping.

One year, Mama wasn't feeling well but she still did a lot of the cooking. That was the year that she started letting my sister in the kitchen with her all night and morning. I wasn't jealous then because I really wasn't interested in cooking. Those were my too-cute years. 

After Mama passed away, my sister took over all the major meal preparations. My nieces and their friends were old enough by then to help out with the odd duties. I never did get promoted to sous chef but I could wash dishes and clean a destroyed kitchen like nobody's business. Just like when Mama had been around, every year, we had those delicious dinner rolls. I was a little bit jealous that my sister had gotten that recipe... Not long after that, I did get the recipe. Seriously. This is how I was able to turn out that pan of the rolls tonight.


When the nieces were old enough to be cooking in their own homes, they still came around for some of the holiday meals. One of my nieces brought a long-time friend (just like a niece to us) to one of these dinners. The friend kept talking about how she had sure missed "Grammy's dinner rolls" and she told my sister that she wanted her to teach her how to make them one day. 

This girl ate a roll buttered. She ate one plain. She made a turkey and dressing sandwich with a roll. And she just would not stop talking about those rolls. After she ate almost a whole pan by herself, she just about begged my sister for the recipe.

My sister looked at me and I looked at her and she got up to get the recipe.

We always kept the recipe close at hand and in the freezer around the holidays. Here it is:


The girl and my niece's mouths fell open. They remembered Mama's homemade rolls and couldn't believe that the frozen ones tasted so good. They felt like we had been tricking them for a long time. Honestly, though, Rhodes Texas Rolls are the closest thing to Mama's homemade rolls. Mama's were always a bit larger and a smidge saltier but we remedy that by brushing a little salted butter on the frozen tops when we set them out to rise.

These in this red package rise up large and there are some in, I believe, a yellow package that is "regular" sized. We always try to match the size of Mama's homemade rolls so we get this red package.

These are so easy to make. You literally put them in an oiled pan (I use a 9-inch round cake pan); lightly baste the tops with butter (optional); cover them lightly with cling wrap that you have sprayed with a little oil; set them out of the way where they can rise (I set mine on a high cabinet where heat rises); they rise in as little as 4 hours in a warm house; then you pop them in an oven at 350 and they will take anywhere from 10 to 12 minutes to bake. If you do butter the tops, they will brown faster so let them stay in a bit longer to be completely done.

Best. Rolls. Ever. Well, other than Mama's from-scratch rolls. 

Now that the girls have the "recipe" they can have the rolls any time. I will get in a mood for them, like I did this time, and bake up a pan of 8 that might last a couple of 3 days. The best thing is, they keep well in a sealed baggie after they are cool. They stay soft and fresh-tasting for the next meal. I love to eat mine with butter and honey or with some gravy or just warm and plain.

Man, I miss that old-fashioned from-scratch cooking and baking but thanks to Rhodes Rolls, I can almost remember Mama's dinner rolls.

Peace

--Free

Friday, October 25, 2019

**REVIEW** Fresh Nutmeg & Mace

Going way too far...
That time of year is coming when I most enjoy baking. The only thing I hate about this time of year is how pumpkin-spice-crazy people get. I avoid Starbucks and all the other places that push the pumpkin theme. This is silly in a way because I do love pumpkin - to an extent - and pumpkin pie is actually a year-round favorite of mine.


But I love the humor!


I was making a pie a few weeks ago and realized that I never reviewed this fresh nutmeg that I have fallen in love with.


They look a bit
like very pale pecans, huh?


That is some whole India-produced nutmeg I got from the Amazon seller Simply Beautiful (**).

There's a range of sizes in the bag I got
My mother always used fresh spices whenever she could. At the least, she changed out her canned spices and extracts often and she was picky about brands. I have mainly used ground spices in cans that I keep for years and store in the hottest part of my kitchen - in a cabinet right near the stove... My mother would keep her canned spices away from the stove and she kept the fresh items tightly sealed in jars and in a cooler spot. The older I get, the more I want to be like my mom. This is why I am starting to cook with fresher and whole ingredients when possible.

I asked the Amazon seller (Simply Beautiful) about sourcing for more fresh spices and they referred me to the Spicy World of USA website.  (The site comes up in my browser as not being secure, by the way.) I think that a simple web search though would lead anyone to some good sources for spices and extracts. Amazon has quite a selection of reputable sellers I have used in the past for various items. Do your research because finding and using the good stuff is worth it.

For anyone who has not used fresh nutmeg, I can't stress enough what a difference it makes. Making a pumpkin pie always makes a house smell amazing but with fresh nutmeg, the fragrance is next-level lovely. As part of my new calorie-conscious lifestyle, I will sometimes just eat chilled canned pumpkin mixed into some Greek yogurt with a little brown sugar, cinnamon, and nutmeg. Or I will warm some pumpkin pie mix (that already has spices included) and eat it plain. It's not only low-cal, but it's also a tasty and soothing snack any time of day.


Click on the labels to see just how nutritious the pumpkin and pumpkin mix can be. 


Another way I have used the fresh nutmeg is to grate a little bit into a shallow pan of simmering water with a couple drops of cooking oil. It's a cheap way to make the house smell nice in a hurry.

Long before I got the fresh nutmeg, I had gotten hold of another spice called mace (which you can learn about here). I love using the mace in puddings and cakes and in my coffee. I had first heard of it from a neighbor years ago while living in England. What I did not know until I bought some here is that mace is the outer coating of the shell that houses nutmeg. Talk about learning something new every day.


This is mace in the bag & freshly ground nutmeg on the plate

It's hard for me to detail the difference in the taste of nutmeg and mace except to say that the flavor of the mace is softer and milder. It's more subtle and I find that it has a sort of natural sweetness to it. Nutmeg seems to be a sharper and more pronounced flavor. But then again, I'm no culinary expert.

I can tell you that having fresh nutmeg around makes more sense to me. I don't use a lot of the spice every single day so my canned supply is bound to get a little stale no matter how well I store it. I keep my fresh nutmeg sealed in a mason jar in the door of the fridge. One shell lasts me a really long time - at least as far as I can grind it without hurting my fingers. I keep a few shells in a plastic baggie so I can pull out a little and grate it as needed.

My food sealer comes in handy
all the time.

You don't need anything super fancy to grate fresh nutmeg. I use one of those cheap little fine graters that I got at Dollar General for a buck. When the shell gets too small to safely grate that way, I grind it in a coffee grinder and just toss the residue in with my ground coffee. Someone suggested buying one of those cheap files used in pedicures would also a way to grate the nutmeg. The Dollar General grater works best for me, thanks

Smells SO good when grating it
You can probably tell that this one jar of nutmeg is full enough to last me for the best part of a year - if not longer. I don't even bother using my remaining canned nutmeg anymore. Now that I have gotten used to the fresh stuff, I plan to look around for some affordable fresh mace.


Just for kicks, here is a video talking about nutmeg and the mace. I even added it to my playlist of all things food and cooking:


By the way, I got the mace from Spice Jungle on Amazon (of course). I'm glad to have it and the nutmeg to use in my coffee and pies for the winter. Another seller on Amazon I have gotten spices from is Frontier Co-op. Their Ceylon cinnamon and chocolate are excellent. I will keep my eye open for more sources and update this post.

Peace
--Free


I don't know why, but I like to listen to some Patsy when I am baking. This is a fave.


(** I did not receive a free/discounted product. I mention the seller name for readers who might want to see their details on Amazon.)

Wednesday, December 26, 2018

**REVIEW** Flour Sack Towels (for the kitchen)

For anyone who likes to cook or bake, towels are essential. Towels for wiping up, towels for handling dishes, towels for covering foods, towels for - well, you get what I mean.

I have been getting by these past several months with towels from the Dollar General or the discount aisle at Walmart. You can find some decent kitchen towels at both places, but I never did. Also, I didn't want to spend a lot of money.

Since I've been doing so much baking lately, I decided to try out a couple of affordable brands of flour sack towels I've seen on Amazon.

This first set from Bosubari is just under $10 and is made of a fairly thick and durable spun cotton.


The next group is from Utopia Kitchen and came in a 12-pack of ring spun towels for about $16.


At first, I was going to review these towels as to which set was better. After using and laundering both, I can't really put one over the other. They had different qualities that I like. Let's look at the Bosubari set first.


Bosubari Towels Pros & Cons


PROS
  • Thick, sturdy and has a little weight
  • Good for covering dough during proofing
  • Can be tucked into the waistband and used for an apron


CONS
  • Not as good for cleaning messes & didn't launder as well as the Utopia Kitchen towels
I find that I use these more when I'm baking. Mostly I use them for covering doughs during proofing or for keeping finished bread from drying out. They were too thick for me to use as padding for a lid when steaming some bao buns recently.

Utopia Kitchen Towels Pros & Cons


PROS
  • The lighter weight makes them versatile
  • Thin enough for cleaning messes and spills
  • They launder better than the Bosbari towels
CONS
  • Some came out of laundry with irregular shaping/didn't square up

Overall Impression of Both Sets

These are the Utopia Kitchen towels, but
the Bosubari also had a cloth tie

I am happy with all the towels. Because of the general quality and usefulness, I would have saved money by buying these in the first place instead of getting all the cheaper towels. They have held up well under washing and using so I expect to have them for a while. 

I think of the Utopia towels as very "every day" and utilitarian. The heavier Bosubari towels are, in my opinion, more "chef-like".
The main test of a product is whether users would purchase again. Would I buy more? Absolutely. I decided a couple of months ago that I will only be giving the most useful things as gifts. These towels are on my list to give to the cooks and bakers in the family.

Peace
--Free

Tuesday, October 09, 2018

**RECIPES** Brown Sugar Bread & Lemon Tea Loaf

I've been vaping to quit cigarettes and haven't had an actual light-em-up smoke for over 2 months now. Of course, I put down the cigs and started picking up anything halfway edible. That had to stop. Alas, I love food, whether I smoke or not, so I had to start sticking to good, wholesome meals and find a couple of sweets that aren't overloaded with calories. Here are my two favorite bread recipes that fulfill my sweet tooth. They are really easy and quick to make and they are sooo good.

This first recipe is one that I found on a lifestyle blog by this lady. I want her to be my friend. Do check out the site because, well, yum!

 I modified the original to include chopped walnuts and that's my favorite way to have it. This is her recipe and nutrition info.

Brown Sugar Bread (from Julie Blanner)
INGREDIENTS
  • 2 c brown sugar
  • 4 c flour
  • 2 Tbsp baking powder
  • 1 tsp salt
  • 2 eggs
  • 2 c milk
  • 2/3 c vegetable oil

(I cut this recipe in half and add a tablespoon of organic chocolate powder and about 1/4 cup chopped walnuts)

DIRECTIONS
  • Grease 6 mini loaf pans and preheat oven to 350 degrees.
  • Combine brown sugar, flour, baking powder, and salt.
  • Beat eggs, milk, and oil.
  • Gradually add dry mixture to wet until just moist.
  • Pour batter into pans an inch below to compensate for rising. Optional: sprinkle sugar on top.
  • Bake 40 minutes.
Julie notes that you can also make this in 2 - 1 pound loaf pans or cut the recipe in half for just 1 loaf pan and bake 50 minutes. That's what I do unless I am sharing with my brother's family.

This is not an overly sweet bread and when I add the nuts, I find it to be very filling and satisfying. I like it so much that there are days when I eat nothing else but this bread. The last time I made some, I did a large loaf for my brother's house and 2 small loaves - one for me and one for my neighbor who is always bringing me juice and fruits.


Speaking of my brother (the youngest, I mean), his favorite treat is the Lemon Tea Loaf that I make. The recipe came from a set of recipes my brother's MIL gave to me over a year ago as a sort of housewarming gift. To keep it safe while I was setting up the rest of the apartment, I put it in the storage cubby. And forgot about it. Unfortunately, I can't refer you to the easytobake.com site because it's now dead. The link I will give is to a similar online recipe that I have tried, but recipe below is from the Easy To Bake card.


INGREDIENTS

  • 1 c sugar (for the cake)
  • 1/2 c (1 stick) butter, softened
  • 2 large eggs
  • 1 Tbsp grated lemon rind
  • 1 1/2 c all-purpose flour
  • 1 tsp baking powder
  • 1/4 tsp salt
  • 1/2 c milk
  • 3 Tbsp lemon juice
DIRECTIONS


  • Preheat oven to 350
  • Oil & flour (lightly) 3 5 3/4-inch x 3-inch pans 
  • Combine sugar and butter in large bowl and beat with mixer until light and fluffy (about 2 minutes on medium speed). Stir in eggs and lemon rind and beat 1 minute. 
  • Combine flour, baking powder, and salt in a medium bowl. Stir this flour mixture and the milk into the sugar/butter mixture.
  • Pour batter into pans and bake until a toothpick comes out clean (35-40 minutes).
  • Set pans aside to cool slightly. Pierce tops of loaves several times with skewer (or piece of spaghetti!)
  • Combine the powdered sugar and lemon juice and drizzle slowly over the loaves (and holes) until all the liquid has been absorbed. Let cool another 10 minutes or so and remove from pans to cool completely.
I modified this recipe slightly by adding some lemon flavoring to the batter and then using much more glaze than indicated. My brother likes the tanginess of the lemon so, yeah.

I also made this once and then put a twist on the serving method. I sliced the loaves very thinly then made sandwiches with a filling of cream cheese that I whipped with some lemon and sugar. My neighbor and I ate them before I took photos so... Guess I will have to make more and do an update!


This is what a loaf looks like. Next time I make some, I want to try freezing them for later. We will see how that turns out.


Peace
--Free

Tuesday, March 17, 2015

**RECIPE** Cool Whip & Jello Rainbow Cake (and bragging)

This was one of my mother's and my sister's favorite recipes. All the chicks in the family learned to make it except for me. Until the other day. My first one was a disaster because I made a couple of rookie mistakes. My niece, +Gabrielle B (who should have her own bake & crafts shop!) walked me through it over the phone and I finally #nailedit.


Here is the recipe (with notes from my own experience):

Ingredients:

  1. 2 boxes white cake mix
  2. 2 (or more) different colors of Jello gelatin
  3. Big tub of Cool Whip
Also needed
  1. 2 cake pans - each large enough to hold a full cake mix*
  2. Parchment paper (to line bottom of each cake pan for baking)
  3. Enough extra oil and some flour (to dust the pans)
  4. Coffee straws (for poking holes in cake)
  5. Skewers (or toothpick-like items to anchor the cake for frosting)
  6. A children's medicine squirter, if you have one. 
  7. Make sure to have room cleared in fridge to hold cake pans later.
  8. Make sure the fridge is very, very cold.
  9. Leave your Cool Whip in fridge (not the freezer). Makes it easy to use later.
  10. Have a plate ready for later. The cake is tall, so...
Instructions:
  1. Mix and bake cake (one box for each of the 2 pans). Don't forget to line bottom with paper.
  2. Once cakes cool to normal, put them in fridge for AT LEAST 8 hours.
  3. Just prior to removing cake pans from fridge, mix your Jello, keeping colors separate. (My mother would use half the water required for making the Jello. Give more intense flavor.)
  4. You're going to leave the Jello in its liquid state. Set it aside.
  5. Take out your cakes (and leave them in the pan). Poke holes in the cakes from top to bottom. This is where you are going to be injecting the Jello. (You want to space the holes so that your Jello colors won't glob together, and you don't want to make any too near the edge of the cake.)
  6. Use your medicine squirter to inject your different colors of Jello into the holes. (Don't put the same colors close together; spread them around for a pretty effect when the cake is sliced.)
  7. Put the cakes (still in the pan) back in the fridge. Try to wait at least several hours. I left mine in for about 8 hours.
  8. Remove one of the cakes from its pan and put onto cake plate. This is the bottom layer. Duh.
  9. Frost the top of this bottom layer of the cake with your Cool Whip. You will want to go heavy with the frosting here. Don't worry about the sides of the cake yet.
  10. Remove your other cake from it's pan and place on top of the first layer.
  11. Use something to anchor the two layers. I had a problem with the top layer sliding when I tried frosting it. Also, this will help steady the cake later when you're cutting slices. (Trust me, anchor the cake!)
  12. Frost the rest of the cake. (I like to go heavy with the Cool Whip.)
  13. For extra prettiness, you can run lines through the frosting across the top of the cake and down the sides. Add a little of the Jello and let it run down the lines.
The cake needs to be kept in the fridge in between servings (if it lasts that long!).

It's a pretty easy and inexpensive cake to make. Plus, you can use the leftover Jello and Cool Whip for more snacking later.

By the way, this is what happens if you don't get the right size skewers & they stick up too high:


But that's better than when you don't have a cold enough fridge, get impatient about letting the cake set overnight, and make all the other mistakes I did with the first one:


And this is what happens when you're a baking queen like my niece!


And I'm not kidding when I call Gabby the Queen of All Creative... Here are some of what she has done - while holding down a full-time job and going for her Masters... Stiff competition in the family to pursue your dreams. (Gabby lives in the Dallas Texas area, and she is available for custom cakes and creations of all kinds for parties, baby showers, etc. #pluggingmyretirementplan!)


Everything has a function


Jazzing up some plain chairs

Nintendo cookies for a family birthday

fiesta hats

Our uncle's M & M birthday cake

DJ's tractor construction cake


Peace
--Free