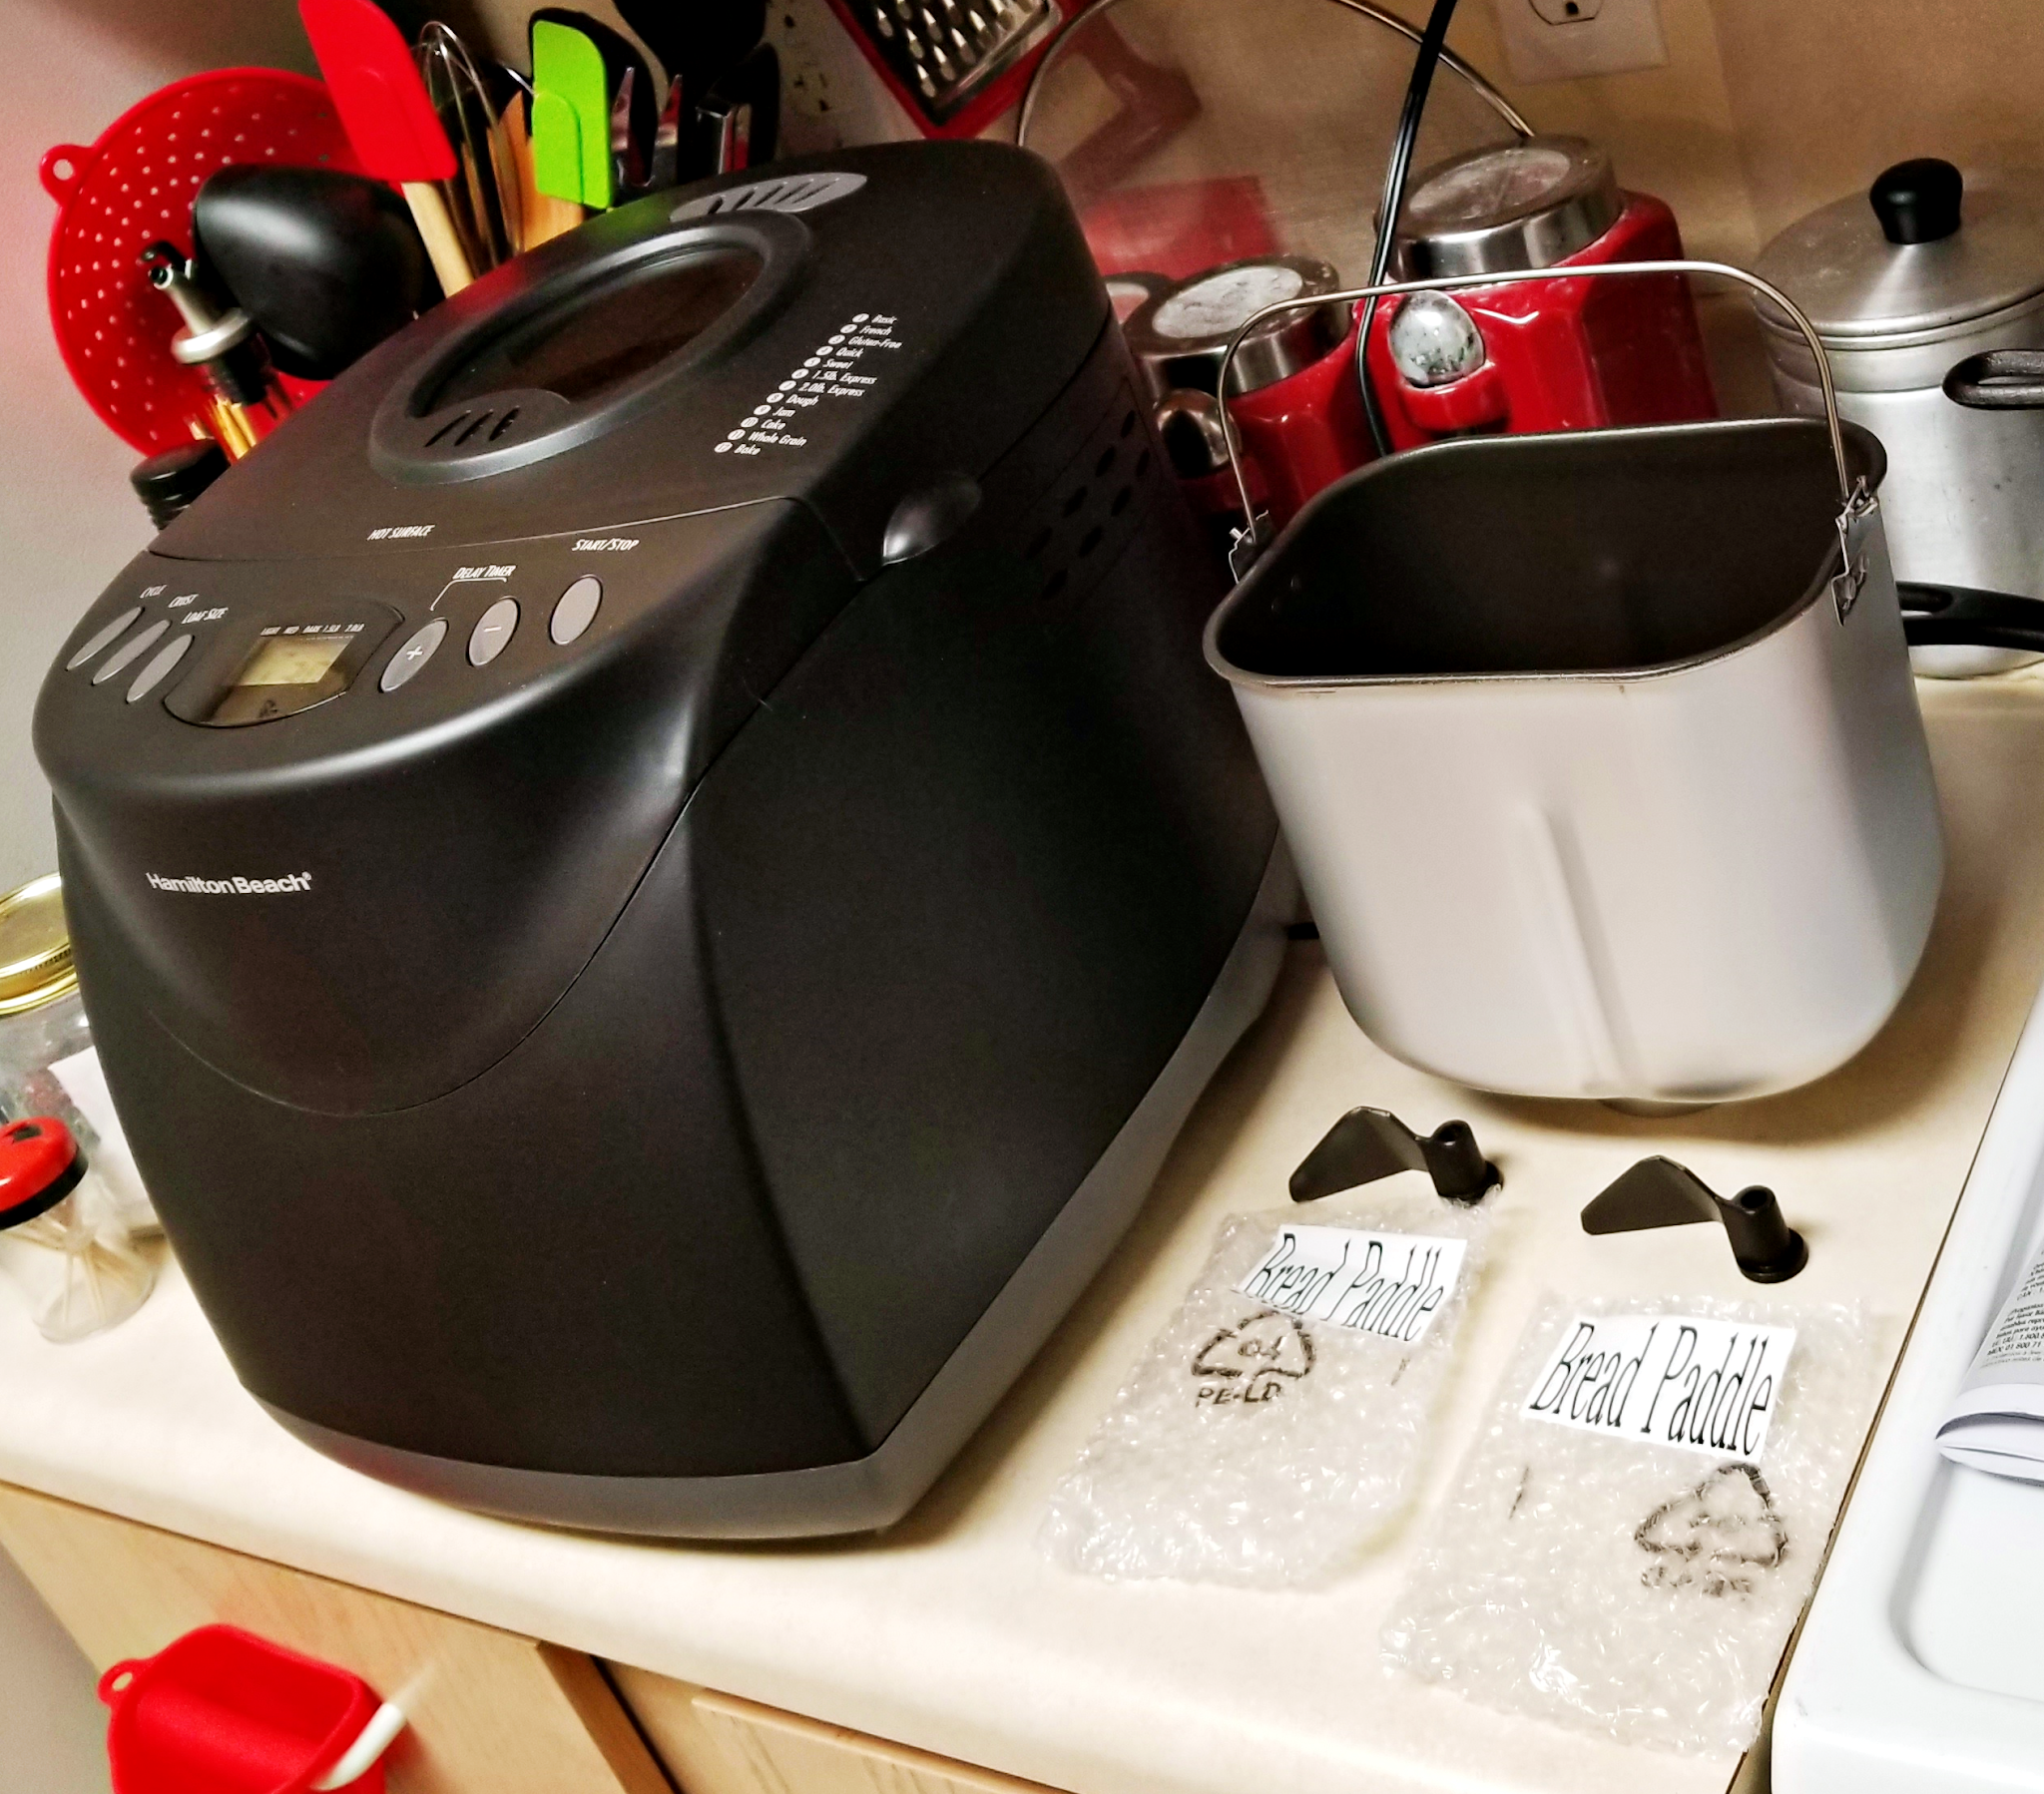
You can see the controls beside the LED and 12 usage options along the top left side
I chose this one after looking at a bunch of others because:
The features, especially being programmable and being able to make a variety of items.
The price was reasonable & I didn't want or need the fanciest, priciest machine from my family.
Things mentioned in less-than-glowing reviews didn't really put me off.
It looked easy to clean.
Now that I have the machine and have used it, I'm really pleased with my choice. I can add these to the positives:
Incredibly easy to use. I was sweating and stressing but as soon as I started, it was a snap.
Even though it's quite large and my kitchen is small, I have found a counter for leaving it out on and a space for storing it away. And, believe, me, my kitchen is almost too small to cuss a cat in.
It's very quiet. I have one annoying and noisy neighbor who I always complain about. I didn't want a machine that made me look bad. I can use this thing at night and it wouldn't wake anyone in the apartment.
There are some things I wish were better, but they don't ruin my experience. These include:
The LED display doesn't show where in the breadmaking cycle the machine is at. I have to pay attention to the alerting beeps if I want to add seeds/nuts or remove the prepared dough for baking in the oven. (I sometimes want a loaf made in the cast iron or fixed into a particular shape.) I also like to remove the bread after the last kneading so that I can remove the paddle. That way, I don't end up with that hold at the bottom of my finished bread.
Since my recipes include a lot of seed/nuts and mixed flours, I do have to open the machine sometimes. I do this to see if I need to scrape down the ingredients. For my thinner doughs, I have not had to do this.
Hamilton Beach does not have one of the silicone-scraper kneading paddles. As a matter or fact, there are no accessories for this machine as far as I know.
Not much to complain about there. Also, the beeping is fairly loud so I can listen for when to add things or remove the paddle.
As I said, this is a pretty quiet machine. Here is what it sounds like (and you can see that I am standing right above it filming):
Basically, I can run this machine in the kitchen and just barely hear it from the bedroom about 12 feet away with the door open. Tiny apartment living can be challenging so this is a Plus.
Here is one of my first loaves of bread because I ate the 2nd loaf without getting photos!
Whole wheat & white flour; turmeric, chia seeds, sunflower seeds, and flax (seed and ground).
My play on an Ezekiel Bread type of loaf. With a twist!
I got the basic recipe online. and added the turmeric.
Now that I have gotten comfortable, I will be modifying all recipes with nuts, ancient grain flours, and as much healthy stuff as I can think of. I don't want to live by bread alone, but I want to enjoy every piece of bread I eat.
I have not even thought about how to use all of the functions yet but here are the choices:
Glad the option is there but I won't be using the gluten-free...
The Basic cycle is what I used to make my first loaves of bread. I plan to try doing a Brioche-style loaf soon though. But the thing I am most excited about is that Jam setting.
I first thought that the Jam setting is the one I would never use (I mean, after the Gluten-free option), but I have watched videos showing how easy it is to make jam in these things. Of all the methods I watched, the easiest recipe was this one:
Fruit (fresh or frozen but I am going to use unsweetened canned pineapple)
Sugar (anywhere from 1 to 4 cups. Apparently, sugar thickens the outcome if you aren't using pectin)
Lemon juice.
I have seen some recipe videos where people acted pectin to thicken the jam. Since I plan to make very small batches, and I don't want a lot of sugar, I will use either no pectin or a sugar-free version. Also, I am cutting way back on sugar - which is why I'll use pectin at all. This lady here had the most no-nonsense recipe for beginners, in my opinion.
One of the best marmalades I ever had was one I found back home in Anchorage. It was a pineapple-orange marmalade that I've never found yet in Iowa stores.
Oh, and this machine makes both jam and jelly...
Thanks to Spruce Eats, I understand the differences between jam, jelly, and marmalade:
The more you know...
So that's is all about this amazing bread machine.
The price has been swinging all over the place for the past year. I started looking at this one about 6 months ago when the price seemed to hover between 80 to 90 dollars. When I sent my family the link, the price was around 90 bucks. I almost changed my mind and when I made the final decision, the price was down to 80 and some change. Not bad, right? Well, when I just now went over to grab the link for this post, the price was sitting at 70 dollars. Crazy.
Still, it is worth what it cost. If I was able to buy it for myself, I would not have been mad about paying $100. If you have priced Ezekiel Bread (or any other good quality bread) lately, you will see how fast the machine pays for itself. And with the jam? Shut UP!
Next time, I will be reviewing the Stand Mixer that was my second gift.
With all the talk I did about not falling into the trap of New Year resolutions before I dive into this review, I have to explain that I'm not being a hypocrite. I had been planning on and saving up for this purchase for about 3 months now. By the way, this right here is what I'm talking about:
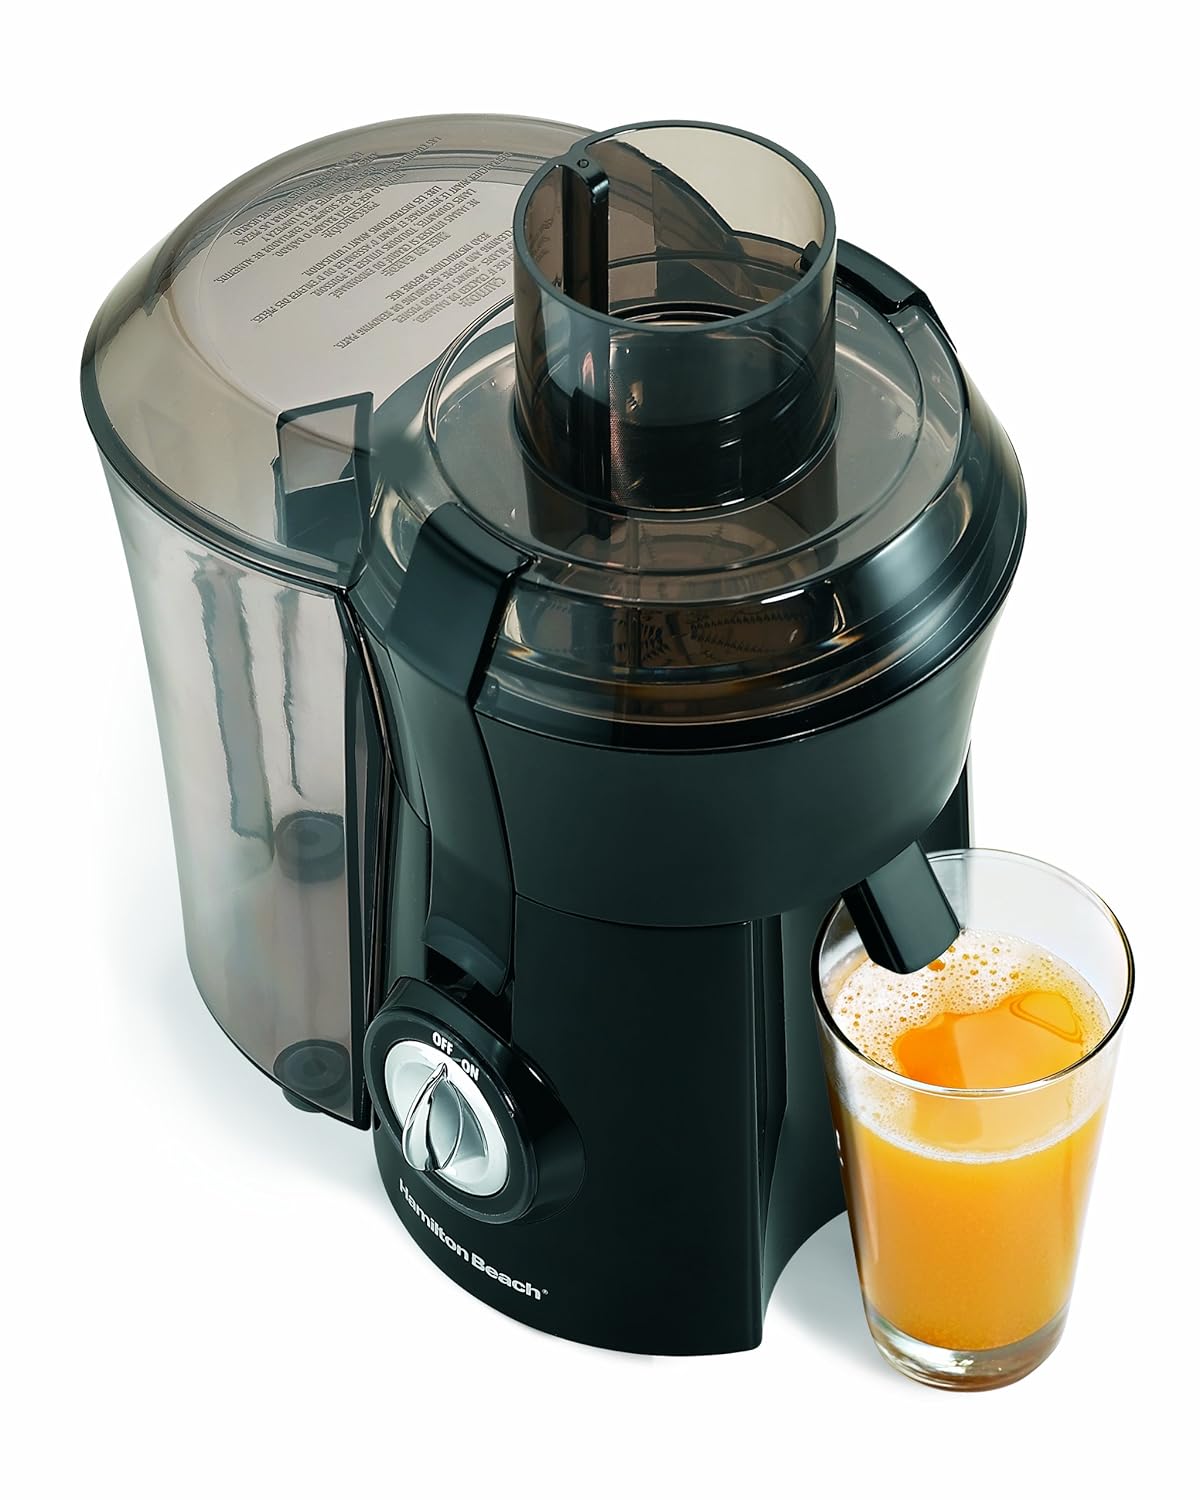
That's the Hamilton Beach Big Mouth Juice Extractor (model 67601A). It clocked in at $55 and was just smack dab on budget for me. I started saving back in the middle of September when I realized I was not eating as well as I could be. Also, I was buying my juices from Hyvee at crazy prices. It's not easy to find a good variety of healthy juices around here but it is fairly easy to find fresh fruits and vegetables, even in the dead of winter. Hurray for living in the Food Belt of the country. Anyway, let's talk about this HBBME.
When I started looking for the juicer, I wasn't stuck on getting a juicer. I thought about getting a good blender. I mean, I could see the benefit of doing juices or smoothies. What finally tipped it for getting a juicer is that I can do juices or smoothies with the HBBM. All I need to do is add back some of the pulp or use my stick blender to emulsify some fruit and veggies to add to the juice. (And I have to brag a little about the Ovente blender I got about 5 years ago from Walmart. That thing is a workhorse. I have used it almost every day since I got it and it has never given me trouble.)
Once I decided on a juicer, I had to find one that fit my "wants" and my budget. I wanted something with a decent motor and a large chute. It would be great if it wasn't too loud since I do live in an apartment. My budget meant that I would need to stay under a reasonable dollar amount if I wanted to actually make the purchase sometime in the next 6 months or so.
The HBBM fit all the wants but quite a few reviewers said that it was loud. I kept looking and kept coming back to the HBBM. Finally, I decided to take a chance because it was the only one I could finally afford that wasn't refurbished. I figured that as long as it didn't sound like a small aircraft taking off, I would be okay and just use it before too late in the evening.
So far, I am really happy with the juicer. It is nowhere near as loud as I expected from some of the reviews I read. I learned that if I put a padded placemat underneath while running it, the sound really isn't any louder than a large blender. As for everything else, I am super happy.
I hate raw celery. Easier to drink it than chew it.
I have been juicing celery, carrots, and beets with the HBBM. It works fast and it really juices well. When I empty the pulp after carrots, I notice that it's basically dry as sawdust. The celery pulp was a little wetter and I experimented with running the pulp back through the juicer. I got a little more juice but nothing significant enough to warrant the hassle. The first thing I tested it with was a little orange that was about as old as Methuselah and the HBBM got about a quarter cup of juice out of it. Oranges, however, are not my thing. I can always buy orange juice but beet juice is not something I can find around here so easily. Would the HBBM be able to handle that? The product page indicated that it could but I needed to know for sure.
When I grocery shopped, I only got a couple of stalks of beets. They aren't too expensive but they aren't something I would use outside of juicing. If the HBBM let me down, I didn't want to be stuck with messy, clothes-staining vegetables. Now I wish I had gotten a few more stalks. That juicer didn't even change gears when I threw in pieces of the beet.
Another thing I like about this juicer: it is really easy to clean. Okay, that mesh bowl is a little bit of a pain to clean but it helps that a brush came with the HBBM. I basically just soak that part in warm and soapy water while I'm rinsing the other pieces.
As far a the size of the juicer, it's not tiny but once you detach everything from the base, it's easy enough to store on top of a fridge or in a small-ish pantry. Mine is currently in the dishwasher so here is the diagram from the manual showing how the HBBM breaks down.
I have to say that, so far, I am more than happy with this juicer. It was at the bottom as far as prices for one with an 800-watt motor. I would not have been surprised if it had been a loser. Thank goodness it's not. If this last me more than a year, I will be more than happy.
Right now, I have some fresh celery and carrot juice to blend in with some of the apple juice I made the other day. I can also add in a little coconut milk and monk fruit sweetener if I want.
By the way, I am vac-sealing and freezing juices. I understand that this is the best way to keep them fresh for the longest period of time and I have to buy when things are on sale.
I contacted the company again about the response they initially gave (a copy/paste type response) and they got in touch.
I also made a comment on video and the comment got a response from a Next-Shine rep. They advised me to contact them again, which I did.
They were very courteous and apologized for sounding as if they hadn't cared the first time. They offered me both a refund and a replacement machine. I accepted and the replacement arrived yesterday. I still have not seen the credit for the refund on any card or site accounts. At least I do have a new unit. I only wish I had not bought a replacement so maybe I will send that one back for a refund.
At any rate, I wanted to share with you that, while it may take some patience and a second contact, Next-Shine does try to attend to customers' problems.
2nd Update *Critical*
On December 17, 2018 - just about up to 6 months into owning and using this item, it stopped. It didn't slow up and stop or wind down and stop. It just stopped cold. I was about to vac-seal a bag of snack sausage and when I hit the button, the light flickered on then off and nothing else happened. Oddly enough, I am still able to seal things but I can't vac-seal and I can't use the accessory function.
My Amazon return period has passed so I contacted the seller to ask if this was a common or known issue and if they could tell me how to fix it. Their response was prompt and courteous but basically unhelpful. And it's the same one I see given to other customers in comments on the Amazon page of reviews. This is a copy/paste of the response: We want to know it has problem when you use it first time? Or stopped working after using many times? And may i know you usually use it to vacuum and seal what kind of food? Would you mind take a video for this itme? You can tell us details by this video, that can help us to solve the problem asap. How can I video anything when the machine simply does not turn on? Do I video that?
In their favor, they did ask for my Order Number. Maybe they will be looking into replacing the unit for me. I have not heard back.
I let them know that I have already purchased a second unit - this time with a protection plan (there goes the Christmas money my family sent) and that I will be documenting the use and potential problems and posting it on this blog. I will keep you guys informed.
**UPDATE is at the bottom of this original posting**
July 16th is the date of the 2018 Prime Day. I'm not too excited because I really can't afford to go shopping crazy. However, I'm happy that I snagged one of the earlier "lightning deals". It was for this Food Sealer from Next Shine and I caught it in the last 3 minutes of the deal.
This is the machine straight out of the box:
And this is what it looks like once it's all plugged in and ready to go:
I feel like I hit a little jackpot. Don't get me wrong; it's not as if I saved a huge amount of money during the deal. Despite the "list price" of $65.00 that was shown, I really only saved about $14 off the usual Amazon posted price of about $37. Still, since I really have been needing (and looking for) a decent food sealer, I think I came out okay.
(Side note: last year I did get a handheld vac sealer from Moyeah. It worked for the short term, but I don't have the hand strength to use it much. Also, it is only for very small jobs.)
One of the reasons I have wanted a sealer is because of my solo lifestyle. Coming out of a big family and being around a lot of people all the time, it's been an adjustment for me to cook for one. It's can also be more costly in some ways. Gone are my days of buying certain things in bulk. Fruit and veggies spoil before I can eat them up. Until I started buying shelf-stable dairy, I threw out more half-containers of milk than I care to think about.
The Next Shine Sealer
in action
Another reason a sealer is so useful for me is that I fast between 18 and (usually) 20 hours a day. Yes, every day. Since on most days I only have a few hours to eat, I like having my meals mostly ready to go. Meaning, I want to be able to heat and eat. Fasting is no longer difficult for me but it's no fun to spend time preparing food that you have to wait so long to eat.
I realized that I will be able to make some complete meals in advance, seal and store them, then take out and heat in boiling water or the microwave. Of course, it all depends on what your heating, but you get the idea. The Healthy Maven has some good meal ideas.
I got started straight away taking care of some groceries.
On IF I can have lots of meats and cheeses. Without bread.
I've learned to drink my coffee black. Most of the time.
So. Now I can buy larger quantities of food that is healthier for me. I love greens like kale and collards. I also enjoy snacking on grapes and melon and lunch meats. It's so much cheaper and easier to get at least a few bunches of these things in a single shopping trip than to trot back and forth to the stores. And keep in mind, I don't have a vehicle of my own.
Now, let me stop yakking about my life and tell you about this sealer.
PROS of the machine & capabilities:
Functions as a vacuum sealer as well as a plain sealer. I can even half-vac some items and stop to seal them without fully compressing the bag.
Works quickly and fairly quietly. Is it silent? No. It's not loud enough to be annoying or even for a neighbor to hear from outside the front door (which is very near the kitchen).
Has an Accessory function and came with a tube for that. I have ordered a jar sealer pump (about $9) to use this with so that I can seal mason/bell jars. There are YouTub videos that show how this can be done without the jar sealer pumps. I will leave that to you more adventurous types!
The size was perfect for storing the machine away on top of the fridge. It will also fit with pans under the cabinet. Some reviewers thought it was too big but I found it lightweight and easy to store.
Works to seal more than foods. You can seal phones, cameras, cosmetics, etc for safer travel packing. I personally will definitely seal any lotions, oils and/or spillable cosmetics the next time I pack.
Using the vac-seal function definitely shrinks things down in size. This is great, depending on the food or item type and can save storage room.
Works with just about any type of bag. Once again, there are YouTubers who show how to use even the cheapest "regular" bags with the sealer. By the way, I prefer using the rolls of sealing material over the pre-cut/pre-sized bags.
You can re-use bags after cutting them open. It will depend on how much room you leave to seal the lip of the bag. Also, you might have to wash and dry the used bags.
This particular model came with 10 (quart size) bags.
CONS:
The buttons for sealing, vac, etc. are marked black on black. This makes them hard to read, but I'm going to use some white out to re-label them.
Prices for sealing bags and accessories vary wildly. You will need to do a lot of comparing to find the best price. I found that Walmart had better prices than most other places. Again, I prefer the rolls over bags.
You have to be very careful working with liquids or foods that are very wet. It's suggested that you freeze such items first. YouTubers come to the rescue again and show various methods for vac-sealing liquids/wets without freezing. I think I will stick to jars for liquids or just freeze them first.
So, yeah. There aren't that many negatives to this so far. If this machine lasts me a year, I will have gotten an excellent bargain. I've already saved some return trips to the store. I got my greens, cheeses, and meats in larger quantities.
I thought the little storage guides included in the manual was nice.
For the freezer
For the fridge
Now, I don't know how this particular make of food sealer stacks up against others. I've watched several videos and read a ton of reviews for other ones that cost more. This one makes sense for me because of the price and functions. I don't need anything any heavier duty. In my opinion (and that's all I can give), this is a good buy for a typical household of one or two people. Even if this wipes out on me after four or five months, I'll have gotten my money's worth. That doesn't mean I won't be getting in touch with the seller, but... By the way, this only has 4 reviews as I type this, but they are all 4 and 5 stars. I gave it 5 stars. When I get the jar sealer, I will come back and update this. For now, I will leave you with some links to some info on different ways to put a food sealer to use.
The jar sealers came and I was able to better seal the melon rinds I have pickling. I also am able to store things that I tend to use a lot of on this IF diet: heavy creams, coconut milk, organic sauces and flavorings, and oils that I've been infusing with my fresh herbs. That last one is really nice because, for some reason, my herb plants are wearing out and withering away. I'm so happy that I got to fix some oils with them.
Okay, now here is the thing that you need to know if you do get these jars sealers: not every hose attachment seems to fit this brand of jar sealer. I guess the Food Saver is a very popular brand of sealer, but The accessory hose tip from the Next Shine did not fit the Food Saver jar sealers, which meant I couldn't get enough suction. This is where I had to get a little creative.
Remember, I had that little handheld Moyeah sealer? Well, that thing has a suction tip on it. I was able to easily remove the Moyeah suction tip and attach it to the hose from the Next Shine.
By putting the Moyeah suction cup over the holes on the Food Saver jar sealer, I was able to get vac seal my jars.
I would not have known to do that before I watched a video by North Carolina Prepper. Now, I wouldn't attempt to use his method for storing things in plastic bottles, but what he did to the hose at mark 1:13 was genius.
Thanks, dude.
At any rate, that is one thing I didn't expect to have to do and was lucky that I had that old handheld around to steal a part from. I'm going to mention this little detail in my review on Amazon.
As with sealing things in the bag, the jar system is going to be great for me. I have thrown out as lots of half-used sauces - spaghetti, tomato, pizza - and other canned goods.
If you are interested in knowing which items I personally purchased, they are the wide jar sealer (approx $8), regular jar sealer (approx $9), and food vac bags (approx $17 for 2 rolls of 8-inch wide x 50 ft long). The bags from Walmart were more expensive at approx $7 for 1 roll of 11-inch wide x 16 ft long. Also, Walmart online had rolls at the same price but there is a shipping charge unless your cart total is at least $35. I couldn't find the jar sealers at the brick and mortar store in my town.
It sounds as if I spent quite a bit of money to get started with this food storage system, but it not when you consider the amount of food I won't be throwing out. Then there's the cost of gas for repeat trips to the store. Most important of all is my health. I am down 15 pounds since I started the IF diet. That is 15 pounds solid - not the up-and-down weight that I hate. If I count the seesaw weight, I am down 22 pounds.