Translate this blog....

Saturday, December 17, 2022

RECIPE: Easiest Pizza Dough EVER (and baking tips)

 Mmmm... Pizza...

It was just a month ago that I was ranting about the Mama Cozzi's Pizza Dough that I was getting from Aldi's. One reason I like it is that it's cheap. But, still, the price was bouncing around from $1.50 some days to $1.95 other days. And the last time I got a bag delivered, it was really wet and soggy. Instacart did give me a refund but... That made me decide to stop being lazy and make my own. (It's about to be a new year and I'm working on scrimping even more than usual more to save money.)

Use this recipe if you want a tasty and crispy dough that's good enough to eat by itself!

This recipe is from someone I've always kind of rolled my eyes at. That's just because I get so tired of everyone becoming a brand... In this case, it's The Pioneer Woman. Anyway, this recipe made me unroll my eyes and get to work. This is the link to the official recipe (and do check out her other recipes!) but I did make some modifications that I want to share. Also, I culled a nice tip from someone who also used the recipe. I suggest reading the tips before using the recipe. Just saying...

Make & Freeze Pizza Dough

from The Pioneer Woman


INGREDIENTS: (I added some helpful links)

4 1/2 tsp. quick-rise yeast

2 c. warm water (115F) (about the "wrist temp" of a baby bottle)

2 tsp. sugar

5 c. bread flour (600g per King Arthur Baking)*

1/4 c. olive oil

1 tsp. salt 

(*I prefer measuring large quantities of baking ingredients in Metric because it's more accurate than depending on the Imperial system of cup size, etc. Also, the King Arthur chart shows variances between types of flour.)

DIRECTIONS (don't forget to check the tips below)

  1. In the bowl of a stand mixer, combine yeast, warm water, and sugar, and let sit for 10 minutes. The liquid should be foamy and bubbly, indicating that the yeast is alive. 
  2. Add the bread flour, olive oil, and salt. Stir using the dough hook or a wooden spoon, until roughly combined (this means no loose flour pieces in the bottom of the bowl). Fit the bowl and the dough hook onto the stand mixer and knead on medium-low speed for 10 minutes, until smooth. Cover the bowl with plastic wrap and let rise for about 30 minutes, until the dough has doubled in size. 
  3. Remove the dough to a lightly floured surface and divide it into four even pieces. Shape each piece of dough into a ball. (You can weigh it on a scale. I just flattened my dough into a rectangle then eye-balled cutting into even pieces.)
  4. The dough is now ready to be rolled out and baked, or ready to be frozen. 
  5. To freeze the pizza dough: place the pizza dough balls into resealable plastic bags. Make sure that if you put multiple balls of dough in one bag, you use parchment paper or wax paper to keep them separated. 
  6. To thaw:  move the pizza dough from the freezer to the refrigerator the morning before you want to make dinner, then roll and bake as usual. I move mine to the fridge the night before. See tips for why that is.)
  7. To bake: preheat the oven to 500˚. (Yes, she means 500F) Roll the thawed (or freshly made) dough and bake each pizza for about 10 to 15 minutes. (For my smaller-diameter pizza, it was finished at 12 minutes on apprx. 450F.)
Tips & Modifications:
  • BEFORE YOU DO ANYTHING: If you are going to be freezing part of this, make sure that you have either resealable plastic bags (quart or gallon size) that seal tightly or a bag-sealing machine. You want to make sure to tightly seal these for freezing.
  • Because I don't have an oven light or proofing box, before I start Step 2, I turn on my oven (about 150-200F) to warm up. I set a timer to stop after about 5 minutes and I check with a thermometer that the oven is at a safe temp for the yeast in the dough. I learned from Knead Rise Bake that the ideal temp for this is 75-80F. The page also has tips for other ways to proof bread in the oven. Also, know that I have used a heating pad on Low underneath a pan to help the bread dough rise! It did work.
    • Also at Step 2, I was careful not to add all the flour at once. I held back about a cup and added it a little at a time. I find that it's easier to add flour to a dough than to add liquid. I ended up using all the flour & then having to use a bit more during the shaping process. Next time I know that I might need to add a few tablespoons more to the initial mix. 
    • When covering the dough to proof in the oven, make sure to a) lightly spray the plastic wrap with a bit of oil. I did not and my dough stuck to the wrap because it rose so well, and b) use a large enough bowl. My bowl was too small in the first place.
    • To make sure my dough is "roughly combined", I will use a spoon or spatula & check underneath to make sure to get all the raggedy bits of flour tucked into the dough. (My mixer doesn't always pick up and combine these loose bits on the bottom.)
  • At Step 3, when I removed my dough from the bowl, it was stickier than I liked. I just added a little more flour to the board until it was less sticky & hard to work with.
    • Also - when getting ready to divide your dough: the recipe suggests 4 pieces and that worked for me to make a pizza that was roughly 9.5 inches in diameter with a medium-thick crust. If you are feeding a family, you might want to divide the dough into 2 pieces. I guess it depends on how thick or thin of a pizza you want. 
  • For thawing, some users on the recipe page said the thawed dough wasn't rising well. Another user with the handle  tah3169 had this useful tip: "... when you take out the dough from freezer put in refrigerator overnight to defrost. Once defrosted put in a greased bowl and cover with wrap at least 2 hours before cooking." I have not thawed any of my dough but I will try this.
  • My dough did rise very well but I have just learned to eyeball when my dough is or isn't ready. I highly recommend the Chain Baker site and the YouTube channel for learning from someone who explains things well. I go directly to the Learning page on his site at least twice a week! (I try to donate a couple of dollars via YouTube because he's helped me so much.)
  • The 500 degrees seemed high to me but it is correct. The high temp is what makes the crust crispy. My oven tends to run high though so I went with 450. I also always oil the edges of my crust with olive oil. With this dough, I lightly oiled the baking pan with some of my garlic-infused olive oil. The crust was the best I've ever had on any pizza. I could have just eaten the crust with some dipping sauce!
  • By the way, I wondered why great cooks and bakers like mom and other kitchen pros always use wooden spoons. I learned that this is because wood is very sturdy and doesn't react badly with yeast and other ingredients. I actually think my mom just preferred wood spoons. If anyone else knows more about this, let me know.
This is what happens when you don't oil the plastic wrap for proofing. (The last thing I made was brioche so I forgot that other doughs rise so much!). The lesson: Use a larger bowl than I did to allow for the rise and oil the plastic wrap! I would also go ahead and lightly oil the bowl...

Bowl is too small and the wrap is too tight
These are my remaining 3 pieces of dough. I didn't weigh them but will do that next time and maybe remember to update this post with more pics.
You can tell I eye-balled the divisions
Now, remember, everyone's ovens and mixers, etc are not equal. My poor little almost-dead stand mixer did get through this dough (because I only had to use low speed!) but I think I could have done it by hand. That would be some serious work though. 

I'd suggest following the directions the first time you make this dough, then use your instincts next time. You know your kitchen and equipment better than anyone so you may want to modify the baking temp or add more or less flour to the dough, etc. 

More Helps & Guides:

By the way, as I mentioned, I have learned that it's easier (and more accurate) to measure using the metric system for large quantities. I have at least 3 sets of measuring cups. I have tested and found that each "cup" is a little off from the others. There are no big differences but for baking, it's better to be more exact. Here are some sites for looking up or converting  Imperial (U.S.) vs Metric:

  • The National Institute of Standards & Technology (NIST) seems to be the best starting place though the conversions are approximate. (BTW, the site also has this page for anyone wanting to learn how to actually do conversions. Uh, this is math and math gives me a headache but for those who dig that sort of thing, go knock yourselves out. I'll have Tylenol waiting when you finish!) Here is the chart for cooking:
  • Spruce Eats always has a helpful chart or two.
  • Baker Bettie (I just like the "Baker Bettie" handle!)
  • The android app US-Metric/Imperial Converter by MobiSys has an incredible 4.9-star rating. I've not yet downloaded it but added it because it's for more than cooking. (As with any phone app, if you use it, make sure to run it through your virus scanner!) And, no, I'm not sponsored by them nor am I promoting the app.
  • Better Homes & Gardens has a pretty complete chart
I have a perfectly good & highly accurate scale that I think I paid about $11 for a couple of years ago but I'm almost hoping it breaks down so that I can get this one

It's cheaper at Walmart than on Amazon.
Just saying...
LOL

Last tip: If you want to test your food scale for accuracy, try weighing something you bought that has the weight on it. I check my scale often by weighing packaged meat. 


UPDATE: I picked up some tips I want to add:
  • To make the dough easier to stretch (when preparing to use), set it out & let it come to room temp. This was a game-changer for me since I did have trouble stretching the dough.
  • Add a little flavored olive oil to the crust. I have oiled my crust but forgot to always use my garlic olive oil. 
  • After you spread the sauce and before you add toppings, sprinkle with oregano, garlic powder, parmesan, etc. I can't recall if I mentioned this or that I sometimes add real bacon bits.
  • Jazz up boring (or cheap) sauce by adding small pieces of diced fresh tomatoes or finely chopped garlic. 
  • If you want the pizza a little more done but are nervous about burning it (I have this dilemma with cast iron pans), turn off the oven and let the pie stay inside for a few more minutes. I know that my cast iron holds heat and will continue to cook the dish for several minutes. Don't forget to check every few minutes though.

Peace
--Free


P.S.: I can talk all the smack I want about The Pioneer Woman brand but, honey, they (the brand) have the cutest heart-shaped ceramic pie pans!!! I was gifted a set of small pan and a large one. So I love some of the stuff but I still hate all the branding and everyone going corporate. 

Thursday, December 15, 2022

Using Powdered Goat Milk for Beauty Is… Different

 As always, I have been trying something new with my hair. I've been keeping it cut short because it's so much easier to take care of but there's a problem.  It seems so much drier than when it was longer.

After using all my old standby products that used to work for keeping my hair soft and moisturized, I had to get a little radical. I am now adding powdered goat milk to some rinse-out conditioners. 

I got the idea after seeing that so many hair and skin products include goat milk in the ingredients. The thing is, most of those products tend to be pricier than similar products (face creams, curl creams, body lotions, etc.) so... what's up with that? I searched around to see why goat milk is supposed to be so awesome when used topically.

Goat milk? Really?

Hmmm...

I was really intrigued so looked at several more goat milk hair products and skin products. I was really interested in the hair products but the prices got higher and higher so I decided to copy Curly Nikki. Kind of.

Curly Nikki is a genius and you can see how she did a whole from-scratch thing with her conditioner. She also had access to fresh goat milk. Me? I had to go off in a little bit of a different direction.

I don't have access to fresh goat milk. I mean, I might could get some (because I do live in Iowa) but it's much easier to get the powdered product from a reliable source. I also don't have the patience or brain energy to put together a bunch of the ingredients Curly Nikki used.

What I did was use some powdered (but 100% and whole-fat) goat milk from Hoosier Hill Farm. I already use and trust that brand for other dairy products to save money and cut back on waste. 

Separated into 1 & 2 oz bags and vac-sealed 
before storing in the freezer

To make a rinse-out conditioner, I put together some of the 3 store-bought conditioners that I already have on hand. I didn't really do a lot of measuring. I just put equal parts of the conditioners into a glass pump bottle and mixed up about 2 tablespoons of goat milk made with filtered water to add to that. I mixed the goat milk and water in my milk frother before adding it to the conditioner then I did the shake, shake, shake dance and called it good. There was enough of that first mix for 2 conditioning masks.

I got in the shower, washed my hair with my usual shampoo, then applied my goat milk conditioner and let it stay on for about 3 or 4 minutes. I noticed immediate softening as I was massaging it into my hair. It made my hair feel really soft and easy to detangle - so much more so than when using just regular conditioner. Looking into the shower mirror, I could see that my curls were popping! Normally, my wet hair is very blah, flattened, and kind of scraggly looking. It's not until after I towel-dry and start adding my products that my curls perk up. And my hair was just so freaking SOFT!

As I rinsed, I was just amazed at how nice my hair felt. As I said, it was also much easier to detangle it with my fingers. It was after I applied a little bit of oil and some curl cream and let my hair completely dry that I was convinced that the goat milk had done something. I went very light on the oil and cream because I wanted to check the lasting effects of the goat milk.

For TWO hours or so after my hair was dry, I kept waiting for it to start feeling the way it does if I don't soak it with creams and moisturizers. Still good. Three hours, and it was still good. By the time I went to bed, I was totally convinced that I'd been missing out.

Now, come the morning, my hair had lost a lot of the initial softness but it was not nearly as dry as usual. I used some more of my regular curl creams and moisturizers but really wanted to get back to the initial softening from the goat milk. (As the day wore on, my hair got drier and drier. I realized that I should have done the usual sealing and heavy moisturizing after using the goat milk. I know for next time!)

I went online and checked up on how long goat milk stays "good". The powder (which I vac-seal and freeze in small quantities) keeps for longer than I will ever need it to. Once it's made into a liquid, it's to be refrigerated - just like any kind of dairy.

Hmmm...

My plan is to experiment with adding goat milk to some of my curl creams. My hair did retain a lot of the curl definition from when I used the conditioner. I'm just concerned with contamination. I suppose I can try the goat milk in a small amount of one of my cheaper leave-ins and keep the concoction in the fridge. I will have to think about it for a while. In the meantime, I did play around with some tiny amounts of the milk to see how it works as a face cleanser and lip scrub. (I'm too cheap to go wild using up the milk powder!)

For a lip scrub, I added a tiny bit of the powder (sans water) into some apricot oil. The powder is slightly gritty (but a lot more gentle-feeling than salt or sugar) so it did exfoliate my lips. The oil worked well with the powder. I didn't even have to rinse the scrub away because it came 
 off with a baby wipe.
 

I also made a highly diluted face wash using filtered water, a teeny-tiny bit of goat milk, a gentle soap, and some oil. I'm not one to use soap on my face because I find it very drying. After using this DIY face wash I have to say that it was a nice change from just using oil and baby wipes. I won't need to use the face wash often - maybe after wearing makeup? - but it was refreshing for a really deep clean.

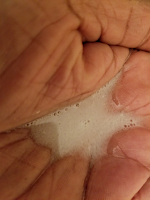
You can see the texture of the lip scrub on my finger and spread onto the back of my hand - slightly gritty but so mild.

By the way, I wish I could find some of those tiny empty round containers in glass. These plastic ones came in a pack of (I think) 20 and have lasted me for about 2 years. I fill them with petroleum jelly, colored cosmetic powders, and pigments that I get from Making Cosmetics (to customize my makeup). I got the jars from Amazon but see that these particular ones are no longer available. There are several similar ones though. I want glass ones for the goat milk scrub but... glass ones are much more expensive than the 6 bucks I paid for 20 or 25 of the plastic version! LOL

Anyway. I don't mind having the tiny amounts of lip scrub (in plastic) even though I can use up a jar in a week. 

Of course, after success with the conditioner and the lip scrub, my crazy brain was buzzing with ideas for how else to use the powder. For body scrubs, foot soaks, scalp exfoliations, oh my! However, I am restraining from all that. Right now, I am happy enough to have a good conditioner. Maybe one day I will figure out a way to incorporate the powder with some leave-in hair products - but all that will require some research and possibly getting some preservatives over at Making Cosmetics. and...

...Yeah, Nah. I'm trying to save money, not find new ways to spend it! For now, the conditioner is good. At the most, I will see about doing a light leave-in rinse of conditioner/goat milk. The one good thing about this particular goat milk powder is that it does not stink. I've heard horror stories of goat milk funk and I'm not trying to get into that. As for this, dry or watered, it has a very mild, fresh, and oddly sweet scent. I like the smell.

As a beverage, I didn't think I'd like it but I did try a bit by itself as milk and added (just the powder) to my hot tea. I haven't had cow milk in so long that I can't really compare this. I can say that this is pleasant to drink (if you are into dairy) but it is different from cow milk. I'll say that is closer to slightly sweet soy milk. It's touted as being more nutritious (and easier for some people to digest) but it also has more fat and calories than cow milk. It's certainly more expensive in the grocery store. Pros and cons, people, pros and cons. 

Speaking of the pros and cons, there is a ton of debate about whether cow or goat milk is better. This is just one page I picked of the many thousands that came up in search results. (As a CKD patient, I notice that goat milk has a lot more of the stuff I need to monitor - phosphorus and potassium - so there's that.)

But back to the topical uses. If I do get around to trying this in some other way - for my hair or body or feet - I will surely do an update. In the meantime, I've got to think of a way to do a leave-in rinse!

Peace

--Free


P.S.: The price of the goat milk powder I get from Amazon varies wildly. It has gone up by at least $1.50 since I got it. I don't know why but you should shop around for goat milk. Prices vary for powder, liquid, canned, etc. Check the big box stores but don't forget to look for sales at local grocery stores.

Sunday, December 11, 2022

INCIdecoder (Decoding Product Ingredients)

I didn't realize how many people are unaware of a useful site called INCIdecoder. It's where you can "decode ingredient lists like a pro". (INCI stands for International Nomenclature of Cosmetic Ingredients.)

The site is so helpful - especially for people with allergies or who just want to know what's in their products and how those ingredients work in that product. Not only can you check ingredient lists but you can learn how to read basic them. But there are pros and cons.

PROS:

  • You can just copy/paste the entire ingredient list for a product into the search bar to start. 
  • I have at times, seen included on the info page, other products with "similar ingredients". That's useful.
  • Not only can you search for products/ingredients but you can submit additions to be considered. 
  • For products/ingredients you like (or dislike), you can find similar ones.
  • You can search by copying/pasting the ingredient list of an item from one place (ex: Amazon, Walmart, etc) and pasting it into the search or by uploading a photo of the list (which is helpful when you have an actual product on hand).
  • You can get a quick "skim through" of a product's ingredients rating showing what's considered good, best, and worst (aka: "Goodie", Superstar", and "Icky"!)
  • With a login, you can save products you find to lists you create.
CONS:
  • Searching by a product brand/label name can be tricky. I prefer to search by ingredients.
  • Even when you create a login, there's no way to see your history (except by searching your own browser history).
  • Quite a few common items (at least since I've used the site) are not yet in the database. However, this is why it's good to submit additions.
  • I had to actually go off the site and Google to find where on the INCI irritancy level explanation. So they definitely need a good site map put together. 
The pros outweigh the cons and I love using the site - which I do mainly for cosmetics and other personal care products.

Pictures work better than words so, as an example of how the site works, I will share what is shown on a page for a random product. I picked Beauty of Joseon Ginseng Essence Water, which I use and love, by the way.

Notice that this one 
was an upload from an INCI user

"Trying Out" is 1 of my
custom lists
On the below Overview, clicking on the circled i will give bring up a thumbnail of info about the product
With options to Save, Compare,
Add Photo, etc.


In the pic below, the next-to-last column rates the level of irritancy (explained here). The last column shows the rating of 


As you can see, you can go deeper and deeper into explanations of ingredients by clicking on their links. Notice that for the Ginseng Water, there is no info for the root water, but it does give alternate names (also-called) for it that you might see on labels.


And, because so many of us gals are not already product junkies... LOL


It was nice to be able to click on "Skin-identical" and learn more about that type of ingredient. 


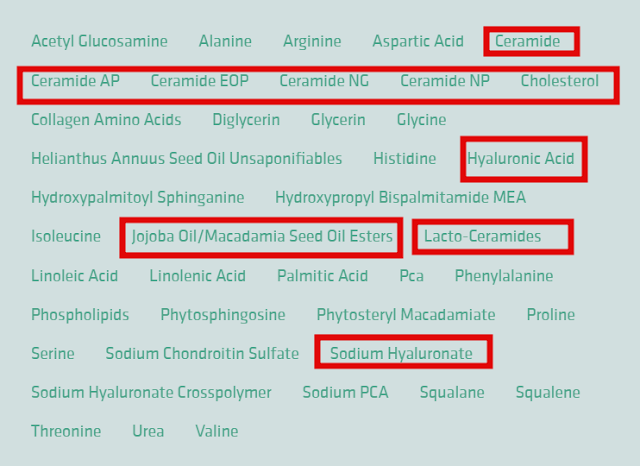
In case I wanted to know what some other skin-identical ingredients are, there's a list. I circled ingredients that I tend to really like. I am surprised that more natural oils aren't listed but this might not be a near-complete list.


Tips and Tricks:
  • If you can't find a product by name, Google to find a list of the ingredients to copy/paste into INCI. The ingredients are the main thing you probably want to know about. Also, there are a lot of copy-cats of name-brand products so, again, it's about the ingredients.
  • You can also Google the product + "INCI decoder" to see if a direct link comes up.
  • When you find a product that you like, save it to a custom list so you can refer back for more products with (or without) certain ingredients.
  • You might be able to find cheaper versions of products that you like and that work for you. I do this with hair care. Most of my favorites can be spendy so if I can find a copycat or something at least similar, then I'm willing to try it.
And know that this is not just for beauty and cosmetics - that's just all I ever used it for. When I was writing this post, I did a quick search and found things like household cleaners. I couldn't find Mr. Clean but found a Mrs. Meyers product! I found a list of Mr. Clean's ingredients online and did a copy/paste and got some info anyway.

My hope is that, with more and more people not only using the site but taking the time to submit products, INCI will become more complete. I'd love to see info on more cleaning products and afro-hair products and just more of everything.

Peace
--Free


P.S.: Apologies for any incoherence. I'm really worn out & didn't spend a lot of time editing this post so... Enjoy it anyway.


Wednesday, December 07, 2022

**Adventures In Baking** The Thing About Brioche

 I woke up the night before last with a sudden anxiety attack. I haven't been able to calm down since. Today, I tried to soothe myself by baking. My anxiety abated only to be replaced with extreme frustration. The good thing is, I was finally able to laugh. But I didn't know what I was laughing about. (Does laughing about nothing make sense? I don't know.) Since I felt like I might be losing a little bit of my mind, I decided to try some baking therapy.

My goal was to make my first brioche loaves. The general plan was to make one plain - maybe with some sesame seeds on top - and the other with a lemony cream cheese swirl throughout. That sounded a little bit ambitious - plus, every recipe I found calls for a lot of eggs. I decided to just start with plain brioche.

The recipe I found via a YouTube video was simple enough. And I had all the tools and ingredients needed. 

Six eggs, people. SIX!

Leave it to me to screw up a simple recipe.

First issue:

The video cook obviously has a really nice stand mixer - or at least one with a really good motor. I have a very decent 4-quart Hamilton Beach with a 300-watt motor. It's a nice little mixer, no doubt about it. I have never had trouble doing any of the cakes and basic bread dough that I am familiar with. However, brioche is not your "basic" dough and I am not familiar with it.

Brioche is a very wet and sticky dough that requires a LOT of kneading. The video cook warned about that, saying not to attempt using anything but a stand mixer (and one day I'm going to look into how brioche was made before people had good mixers). Her directions are to knead at "low" speed for anywhere from 10 up to as long as 20 minutes, depending. Let's focus on the words "low" and "depending".

On my mixer, the bread hook is to be used on "low" - meaning Speed 1. That made sense to me so that is what I used. And used and used and used. For almost an hour. My dough never did pass the "window pane" test. Since my mixer was starting to feel very warm, I decided to be happy with the dough pulling easily away from the sides of the bowl. For another 10 minutes (past the hour mark), I ran the mixer at speeds somewhere between 2.5 and 3 - which is the speed I should have been using from the start (or not). By the time the dough was easily pulling away from the sides, my poor mixer was straining like the little engine that couldn't.

Now, I guess "depending" means depending on whether or not you have a mixer with a motor stronger than 300 watts. I'm not sure how strong a motor has to be to properly work this kind of dough. 

Just a little less wet & sticky than
cake batter!
For the first proof - the "warm proof" - my still-sticky dough went into an oiled bowl for an hour. Because I always keep my apartment on the cool side, I put the dough in the oven at what some people call the "light-on point". My oven doesn't have an actual light so I just turned the knob until I heard the first little click. That means my oven is on and will warm slightly but not (hopefully) get hot enough to damage the yeast.

Second issue:

When I checked the proofing at 30 minutes, I thought that my yeast must have gone bad.

An hour into the proofing, my dough looked as if it had only risen the very slightest amount. Was that right? I don't know because this is my first brioche. I went and scanned the internet, got overwhelmed, then I called my brother. I'm kind of irritated that my brother knew that brioche doesn't rise like "regular" dough. I have no idea what that means but at this point, I am not messing around anymore with this damned dough.

I punched down the dough (which did not seem necessary), and put it into the fridge for the second rise - the long, "cold-proof".

Can I just say that I do not understand cold-proofing dough? The only time I've ever put any dough in the fridge is when I want to slow down the proofing. So at this point, I am frustrated and very confused on top of which I feel really stupid. The only reason I kept going is that I'd had to use 6 eggs and eggs are extremely expensive right now. People, my head hurt so badly and I felt like an idiot. I just knew that I was screwing up this recipe. And I'd used my last 6 eggs.

Anyway.

When it was time to take the dough out of the fridge I realized something. I keep my fridge cold. Very cold. I went to pull the dough out of the bowl to shape 12 pieces and realized how freaking cold it was. I was pretty sure that I'd almost frozen it. But, once my fingers warmed it during shaping, it was still slightly sticky!

Boy, boy, boy...

At this point, I'm too far in to quit. I go ahead and shape the dough and layer it in the loaf pans to proof them for two and a half hours. I set a timer for 30 minutes so I can check on the proofing.

After thirty minutes, I realize that my kitchen may be too cool for the dough to proof. I didn't want to turn up my heat or run the oven so I was trying to think of a different (and more cost-effective) way to generate some warmth. First thought: heat some water in the Ninja to add to hot tap water. I could set the pans over the sinkful of warm water. That sounded like a lot of hassle and I was worn out from this whole ordeal. 

Now, here is where I have to pat myself on the back. As dumb as I often feel these days, I have flashes of real ingenuity. This is what I came up with.


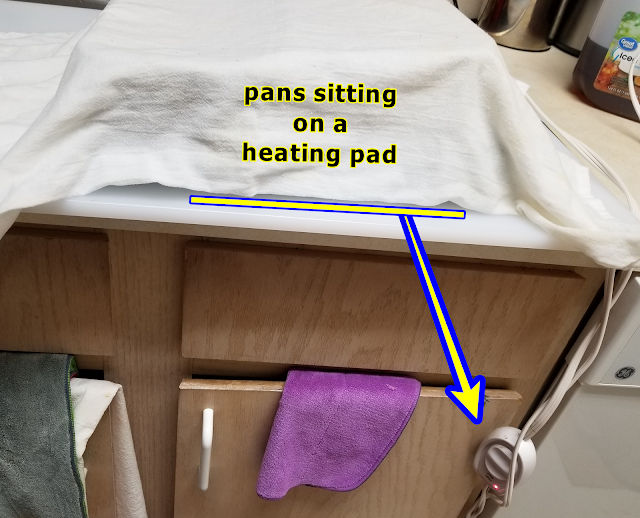
Those are my loaf pans sitting on a heating pad ( set to Low) and under a damp kitchen towel. Genius, I tell you.

So after two and half hours -

Gawl-lee!

- my loaves had risen wonderfully. Well, at least, better than I'd expected them to rise...

Man! I was so happy. I was thinking that, even if my brioche doesn't turn out awesome this first time, I am learning so much about the dough.

I added some toasted  white sesame seeds

Now here is something about brioche and timing: decide how late you want to be up dealing with the dough. I should have started the process much earlier (or later) in the day. Or just late enough that I could fridge-proof the dough overnight. As it turned out, I didn't want the dough to be in the fridge for too long so I kept going and wasn't able to get the bread into the oven until after eleven. But I have insomnia anyway so...

Well, how did the bread come out? Not bad at all, my friends!


At this point, my apartment smells amazing and some of my anxiety has gone away. I am so proud of this bread that I could cry. The only thing is I am not supposed to eat anything until in the morning because I am doing IF. But... I might have to cheat and have just a taste of the bread before I seal it up for freezing. I will be back to finish this post once I've had my first taste.

NEXT DAY...

... I did have a taste because I was so excited for one of my neighbors to try it. It's nothing like the super-soft and buttery brioche I buy from Aldi but it wasn't awful. It was more bread-like than I thought it should be. My neighbor (who is more honest and unfiltered than a 5-year-old) said that it had a "beautiful" taste but was a little bit dry. As they say on the GBBO, I'll take that. 

I am ashamed to admit that I showed off some pictures to friends and family on Facebook. I decided that I would save my beautiful-tasting "but a little bit dry" brioche to better use as the base for bread pudding.

Yay! I did it. I made brioche and I didn't totally screw it up. I will try to make a lemon cream cheese-filled version next time. I still owe my little brother a birthday treat anyway.

Peace

--Free

P.S.: Since I first wrote this post, I did attempt the filled version. It did not go well because my poor mixer died during the kneading process. One minute, it was chugging right along and the next minute it began to sound like it had developed emphysema. The bread hook was barely turning. I tried to finish kneading by hand (impossible to do, by the way) and just ended up going through the rest of the process with the dough as it was. Result? It smelled great but it was barely proofed. I couldn't really work with the dough during the shaping process and... after baking, half the dough was a melted mess of ick.

When my niece called me, I told her that I'd changed my Christmas gift wish. Hopefully, I get a replacement (but stronger) mixer this year...

Monday, December 05, 2022

**REVIEW** COFFEE - Lavazza Gran Selezione Dark Roast

 I'm still trying to find my regular coffee groove. Lavazza is a brand I've been seeing on Amazon for almost as long as I've had a membership. Finally, I broke down and gave the Gran Selezione a try.

"Intense and chocolaty"
their description

The coffee is not bad at all and the price is great. It comes in a 12-ounce bag and at $0.53/oz is less than 7 bucks a pop on a Subscribe and Save plan. I tend to write really detailed Amazon reviews but I kept this one short:

"This is a great price so I'm not mad. The flavor is not as "dark" as I'd like but it is good coffee. I do make it "Euro-style" (measuring by grams and milliliters instead of tablespoons & cups) and that helps boost the flavor.

I can smell them but only taste a little bit of the chocolate notes. The price, the price, the price is what will have me buying this again. I mix it with some of my other coffee that is more expensive to add flavor & save money."

Y'all know I am long-winded so for me to do such a short review kind of says it all. The coffee had me at hello with the price but I wasn't sure at first about a long-term relationship. I might end up doing a subscription just because I am tired of looking for something affordable...

Anyway.

I have been drinking the Lavazza every day for about 2 weeks now and it's growing on me. It is kind of  "chocolaty" but not that "intense". However, every time I look at the prices of other coffee, this one looks better and better. I have one more coffee to try before I give up. The next coffee I'll be trying was bought with a gift card but the non-discounted price is $1.18 an ounce so... that's going to have to be some really good coffee to win me over.

The thing with the Lavazza is that I really do have to measure the coffee out at 2 tablespoons (24 grams) for every 2 Ninja-size cups (or 360-370 milligrams) of water to get the best flavor. The bag doesn't last long at the rate that I drink coffee. This is why I need something at a better price.

When I get the Lavazza made perfectly, it's really good. It has some of the dark chocolate "bite" to it that I love in a dark roast. It's just not a true dark roast if that makes sense. It's like the Kid & Play of coffee where I prefer some Public Enemy strength java.

Unless I love (and can afford) the next coffee, the Lavazza will be my steady while I cheat every now and then with Jim's Sweet Love. They're both Subscribe and Save items so I can get the Lavazza monthly and the Jim's every three or four months.

I've already got plans for when I decide on a regular coffee. Every year, the nieces & nephews ask what I want for Christmas. I was going to ask for one of those little Bissell carpet cleaners. Instead, I'm asking for a set of airtight coffee canisters. 

What does that tell you about my priorities?

Coffee snobs will laugh but what I wish is that I could find Yuban Dark Roast on a regular basis.

Yuban survived the Civil War

The Yuban I've found lately is not the lovely Yuban it used to be (or the lovely Canadian Yuban of today?) but, if I make it just right, it is still the best coffee for the price. And I'm not exaggerating when I say that I have some 2-year-old Yuban vacuum-sealed in 1/2 cup amounts and stored away that still tastes great. I always open up one of the little pouches of it when I'm waiting for my other coffee to ship.

When I try my gift-card coffee, I will, of course, write up a review here.

Peace

--Free

Wednesday, November 30, 2022

**REVIEW** ProFoot Original Miracle Insole


This is the short version of this review for Profoot Original Miracle Insole:

Pros: 

  • Very lightweight & thin. Won't cramp your toes or alter the fit of the shoe as much.
  • Good for heavier-weight people (I can testify to that!)
  • Affordable. Around $10 when I got them on Amazon. Might be cheaper at Walmart.
  • Work to make the hardest-soled shoes comfortable & great for combat-style or workboots.
  • Size variety (with trimming) are for U.S. women's size 6-10 & men's 8-13. (If men need smaller, just get the women's version.)
Cons:

  • None that I know of after a week but I don't know how long they last.


Now, my long-winded rant and the review!

I needed new winter boots. I bought new winter boots. The boots are cute. They are exactly the right color and style I was looking for. And they were very affordable. These are the boots.


Everything about these boots is all that I love in a boot. Except for the insole.

The minute I tried these on, I knew I had a problem. The insoles made it feel as if I was walking barefoot on concrete. 

Like with apparel or footwear that I get from Amazon, I chose the Try Before You Buy option. I'm really awful at shopping for clothes and shoes online. Nothing ever fits the way I expect. The sellers' ideas of sizing vary so much. I've sent back more clothing than I have ever owned. I think out of the past 3 years, I've only kept two items. These boots were NOT going to be the third.

But I really really liked the boots and I could actually afford them. I decided to see if I could make this work out for me so I went hunting for a good insole option.

In the past, I've usually gone with Dr. Scholl's or one of the other brands of insoles that I could easily find. This time, I wanted to be sure to get the best without going broke. Finally, I found these:


The insoles cost around $10 and I was mad at those boots because I was out more money. Then when I took the insoles out of the package, I was even madder. They look so thin. And they have a cheap and papery feel to them. I just knew I was now going to be returning both the boots and these insoles. 

Still, I figured, it wouldn't hurt to try them out. I decided that between the built-in insoles and these, maybe, just maybe, I would be able to wear the boots without being in pain. So I gave it a try. I didn't have to do any trimming because I'd gotten the boots in the size 9 (women's U.S.) that Amazon suggested. I normally wear an 8.5 but, like I said, you can never really tell how things will really fit.

Anyway. I took a walk around the living room. Then I took a long walk down the hallway outside my door. Both those surfaces are carpeted though because I wanted to be able to return the boots if I needed to. But I wanted to see how they would feel on hard surfaces so I went down one of our halls that has hardwood flooring (it was freshly mopped and pretty clean). The verdict:

Let me tell you something! These insoles are a-ma-zing.


My boots now felt like they should have in the first place. I have a pair of more expensive and better-made boots (that I save for better occasions) and these cheap, man-made boots now felt just as good.

The thinness of the insoles that I'd been so worried about is actually a bonus. Most insoles that have worked for me in the past take up too much room in the footwear. These just cushion the foot without cramping the toes. It probably helps that I got these in a 9 but they had already fit with my winter socks (and I got these for winter so I don't ruin my better boots). 

The big test of these insoles - now that I'd decided to keep the boots - was when my SIL and I went grocery shopping and ran some other errands. We did some lightly iced-over concert parking lots, we did wet concrete, and we did those hard floors in Walmart and a couple of other grocery stores. The comfort level was great. 

So, there you go. If you need some good insoles, I can suggest these. 

As for the boots, I don't think that I would buy more from this brand unless I was totally in love with the look. For one thing, when you pull these up in the Amazon search, they show the vegan materials as "leather". That's a blatant and bald-faced lie. Vegan materials are not leather and should be described accurately as being man-made. On the other hand, you probably can know that boots in a certain price range are not authentic leather. But it's a matter of product honesty. Also, if all their boots are as uncomfortable as these were, I can't trust their "Memory Foam Insoles" claim any more than I can trust their claims of the shoe being "leather". But this pair is super cute.


Pro-tip: If you find boots online that are out of your price range, do an image search and try to find those boots on Poshmark or Mercari, or eBay. I found the leather pair that I originally wanted on both Poshmark and eBay - just not in the size I needed or the color that I wanted. 

Peace

--Free


Monday, November 28, 2022

**REVIEW** Thirteen Chefs Cutting Board/Space Maker

If you have a tiny kitchen (as I do) or live in a camper, van, etc., and need to make more counter space, you must check out the Thirteen Chefs Cutting Board

My kitchen is, as my Mama would say, too small to cuss a cat in. I have no idea where Mama got the saying but it means really, really small, aka, my kitchen.

I looked, off and on, for over a year and just couldn't find anything (affordable) to give myself more cabinet space. Most good cutting boards are pricey and the extra-large ones are ridiculous. Except for this one:

30 x 18 x 0.5
I just wanted to show how it fits across the double sink area.
(Excuse my messing baking area in the photo!)

The boards come in 4 sizes and there are up to 6 color choices - depending on which size board you select. At the time I ordered mine, the size I wanted only came in white, which I like for the kitchen. With white, you can see how clean or dirty something is. 

I don't use this as a cutting board. I use mine as a space maker for when I'm baking. I can place the board across my double sink (as shown) and that gives me room for kneading and rolling out dough.

It is really sturdy. I keep it from sliding around by putting a damp dishcloth under the sides. The board holds up even when I'm kneading dough or slamming it down on the board. My neighbors probably hate me when I do that, but that board holds up like a champ!

I can push crumbs and things right into the sink

Later, when I'm washing up a ton of pots, pans, and bowls, I place the board across the stove to use as a dish-drying rack. Mostly, I use it when I'm baking. Before, I had to put my mixing bowls and baking tools on the dining table (which is in my carpeted dining-slash-living room) so that I could use the kitchen for the hot pans and the stand mixer. Such a hassle. With the board, I get 30 x 18 more inches of space without having to run from the kitchen to the living room and back.

The board is also great for use as a cooling rack because it's "heat resistant" up to 180F. I never put scorching hot just-out-of-the-oven bread pans directly on the board but I do use it to hold other cooling racks. 

It's not as hard to wash and clean as I worried about. Although it doesn't fit in my sink, I can hold it up and at a slant in order to scrub it down with soap and rinse it. It's not that much of a hassle. The only hassle I had was with finding somewhere to store it...

When I'm not going to be baking for a while, I keep it on top of the overhead cupboards. No problem. However, when I'm in a baking mood and making something every several days or so, I have to keep it behind the bookcase that I made into a pot/accessories storage.

It's resting on a thick piece of 
plastic
Taking it from behind the case and washing it down is a hassle but not as much hassle as using my dining table.

Now, here is the very best thing about the board: it was only $35 when I bought it a few months ago and is worth every copper penny. I see that the jumbo size I got is not currently available - probably it sold out during holiday sales. When I was looking, any decent size over 20 inches was running from $60 to over $100. I don't even remember how I stumbled over this one.

Anyway, if you are looking to make more counter space, this is a great buy. And, nope, I am not being compensated for this review. I just like sharing when I run across exceptionally good buys.

Peace

--Free

Wednesday, November 23, 2022

**CROSSPOST** Evolution? #ELIF - Part One (Chicken and Egg)

  Q: Which came first - the protein or the DNA? (I think of this like I do "which came first, the chicken or the egg?")

My answer is that protein and DNA were created together when God created man. 

As Chuck Missler points out in one of his Bible study sessions on the Book of Genesis (specifically this video), you can't have DNA without protein and you can't have protein without DNA. So how else does one solve that dilemma?

If the video is removed, you 
can search for and or part of
 Chuck Missler Genesis Session 06 Ch 1 20 23 Day Five

As far as the chicken and the egg, the chicken came first. God created the animals and those animals began to reproduce. The same would go for parents and children.

And God said, "Let the land produce living creatures according to their kinds: livestock, creatures that move along the ground, and wild animals, each according to its kind." And it was so.

God made the wild animals according to their kinds, the livestock according to their kinds, and all the creatures that move along the ground according to their kinds. And God saw that it was good.

Then God said, "Let us make man in our image, in our likeness, and let them rule over the fish of the sea and the birds of the air, over the livestock, over all the earth, [2] and over all the creatures that move along the ground."

So God created man in his own image, in the image of God he created him; male and female he created them.

God blessed them and said to them, "Be fruitful and increase in number; fill the earth and subdue it. Rule over the fish of the sea and the birds of the air and over every living creature that moves on the ground."

Evolutionists, explain to me what you believe and why.

Peace

--Free

Tuesday, November 22, 2022

Weird, Fun & Random Childhood Memories

 Blame this one on Reddit. I saw a post about weird soda beverages and had a flashback to my younger days.

Whenever we kids visited my grandparents in Arkansas, I loved going to the corner store. It was a really old-fashioned family-run place. As bad as my memory is sometimes, I close my eyes right now and remember details about that store (except what it was called!)

On the counter, there was a huge carboy-style jar of dill pickles on one end. There was a big basket of lemons and little jars of fat peppermint sticks. One of my cousins and I would each get a peppermint stick. I would get a lemon and my cousin would get a pickle. We'd insert our peppermints in the center of the sour treats and suck the pickle or lemon juice that was sweetened by the candy. 

I also remember that this store had a little of everything. We'd pick up things for my grandma - borax soap flakes, butter, milk, and eggs, cleaning rags, liniment, aspirin powders, etc. For us kids there was candy and soda like I never saw in Alaska: Black Jack and Beeman's chewing gum, flavored wax (in the shape of lips), candy cigarettes, and little packs of black, licorice-flavored chewing tar. The sodas were the most amazing, in flavors like chocolate, peach, and apple. 

It's a wonder I had such good teeth (well, until I hit 60!). When I think of being young and dusty-kneed, I mostly remember the candy and treats. Laffy Taffy, string necklaces made of sugary candy, rock candy suckers, Tootsie Rolls, plastic rings with huge candy "stones", and - one of my favorites - little cloth bags filled with little "gold nuggets" of candy-coated gum.

One of my older brothers has always had a sweet tooth and when he and my other brothers and I went back for my dad's funeral, he made sure to stop at that corner store on the way out of town. He loaded up on sodas - chocolate, grape, and peach -  peanut patties, and honey buns for the long drive back to the airport. I got a stomach ache just watching him. This is pre-9-11 so he could pack his carry-on with all his goodies. Speaking of my dad, he loved those cinnamon toothpicks from his youth. He somehow always managed to find a place to buy them, no matter where we were stationed.

For a long time, I thought I would never be able to enjoy those treats from my childhood. Then along came the internet. Over the past 8 or 9 years, I have been able to track down most of those things.

Really, for just about any "retro" items you can think of can be found on Amazon or one of those other sites.

Since Christmas is soon to be here, I might have to find something retro and edible for my brother with a sweet tooth. Give him a map to a walk down memory lane.

Peace

--Free

Monday, November 21, 2022

**CROSSPOST** Evolution? #ELIF Explain Like I'm Five

 **This is from a series I will be posting on my other blog Free & Faith. Thanks to Reddit for the hashtag idea.**


When I talk to most people who don't believe in God, it's because they think the Bible is a book of fables and myths. 

I've heard all the usual things from non-believers about God. They call Him "the old man in the sky" or refer to Him as mean and unloving and unjust. 

When checking Twitter recently - mainly to see if the rumors of its demise were possibly true - I saw this:


Many, many agnostics and atheists present arguments to do with people being "good" or "bad", poor, sick, sad, etc. They wonder how a loving God could "allow" such situations as the rich getting away with things or the poor being mistreated. 

The main argument I hear from some people right in my own family has to do with sexuality. "Why does a loving God hate gays?" is one I've heard several times. One person I am close to has decided that their gay lifestyle is just fine with God.

Probably the main thing I hear from people in online forums has to do with evolution. A lot of people can't bring themselves to even consider the idea of a Creator God. They can easier believe in the "Big Bang".

I can talk about all those other things another time but, I want to deal with evolution in the next few (or more) posts. In my opinion, evolution is harder to believe in than anything. To me, evolution is almost a ridiculous theory. Even when I was in school, hearing about a Creator God in church and being taught evolution in school, neither idea seemed to outweigh the other. Of course, I was young and had never thought critically about either belief.

This is what I want to hear from people who believe in evolution to do: Explain like I'm five (thanks Reddit) why you believe in evolution. Or why you don't believe in a Creator God? And I want details.

I've said before, here and elsewhere, that my faith is not blind. I don't believe based on feelings or emotions. I do feel joyful that I have come to believe in God. Without that belief, I would have no hope outside of living this life here on earth. It's not been a really bad life, but if this is all there is to be, how sad that would make me.

So the next posts will all be some of my questions and some of my opinions.

Peace

--Free

Saturday, November 19, 2022

**REVIEW** Zinus 12 Inch Green Tea Memory Foam Mattress

 Since I cannot update the Amazon review for this, I figured I'd make this post.

I got this bed over 5 years ago when I moved here. It's the best mattress I have ever slept on - better than in any luxury hotel or some wealthy person's home I've spent time in. This thing is still as firm (not hard) as when it was brand new. It's a green tea memory foam mattress.

It actually did arrive like this! The instructions were to unroll it and let it "decompress" for 1 to 3 days. Yeah, well, I'd been sleeping on a pallet of blankets for over a week. I let this sit open for about 16 hours before I had my family set it up on the frame!!!

The Zinus frame 
now costs as much as the bed did.
I paid about $90 at the time.

By the way, I really do love this frame. It's minimalist and sturdy. And sits high enough that the bed linens don't (usually) touch the floor. One of my nephews even made up the bed for my first night in it...

I don't think I just went to sleep. It was more like I lapsed into a kind of semi-comatose state of bliss.

Every now and then, I will take a peek at what other queen-sized mattresses cost and the prices are ridiculous. This one was a steal at under $200 (lightning deal or something) and is still a great deal at the current price of around $350.

A couple of things about this mattress:

  • You can't flip it - well, you can but you're not meant to. The mattress is encased in a nice, thick zip enclosure that is not meant to be removed and is made to sort of velcro to the frame. The flipside is much more firm (almost too firm) and I know because I tested that out. At any rate, I don't need to flip it. I simply rotate it every now and then because I tend to sleep to one side of the center. #singlelifeprivileges
  • At 62.5 pounds, it's much heavier than any "regular" mattress I've owned. Every time I rotate it, I count it as 2 days' worth of exercise.
  • I learned from experience that the mattress has good "motion isolation". Other than sleeping, I do almost every stationary thing sitting on my bed - writing, reading, and watching videos. I have a wooden bed table where I sit my computer and cup of coffee. I can almost jump on the bed without spilling that coffee.
  • The foam definitely has good bounce-back or shape recovery. After sitting on one side for a couple of months, I can rotate the mattress and the "worn spot" recovers its original shape and firmness.
  • The "tea" part truly does work to keep the mattress fresh. I'm not a stinky person but a regular mattress will hold odors from normal night sweats and other normal body residues. 
  • I'm not sure if I buy into the claims that the green tea infusion helps sleep. I think I rest better overnight because of my comfort level on this mattress. Who really knows?
I spent more money on the mattress and bed frame than any other furnishing when I moved here - and I got them both on a huge sale. I mean, people, I have a futon sofa sleeper! Cheap, cheap, cheap. But like I said, I use my bed more than any other furniture. This was such a worthwhile purchase. When I got them, as I said, I'm sure they were on sale so I paid under $300 for both. I don't know if it will qualify as #BIFL (buy it for life) but it's definitely a buy it, buy it, buy it.

If God is willing and I'm living in another 5 years, I will do an update.

Peace
--Free

P.S.: No, I am not being paid for this review. I wish!