Translate this blog....

Tuesday, January 12, 2021

**REVIEW** Hamilton Beach 2 Lb Digital Bread Maker

 As mentioned in a prior post, here is my review of the breadmaker that I got for Christmas.


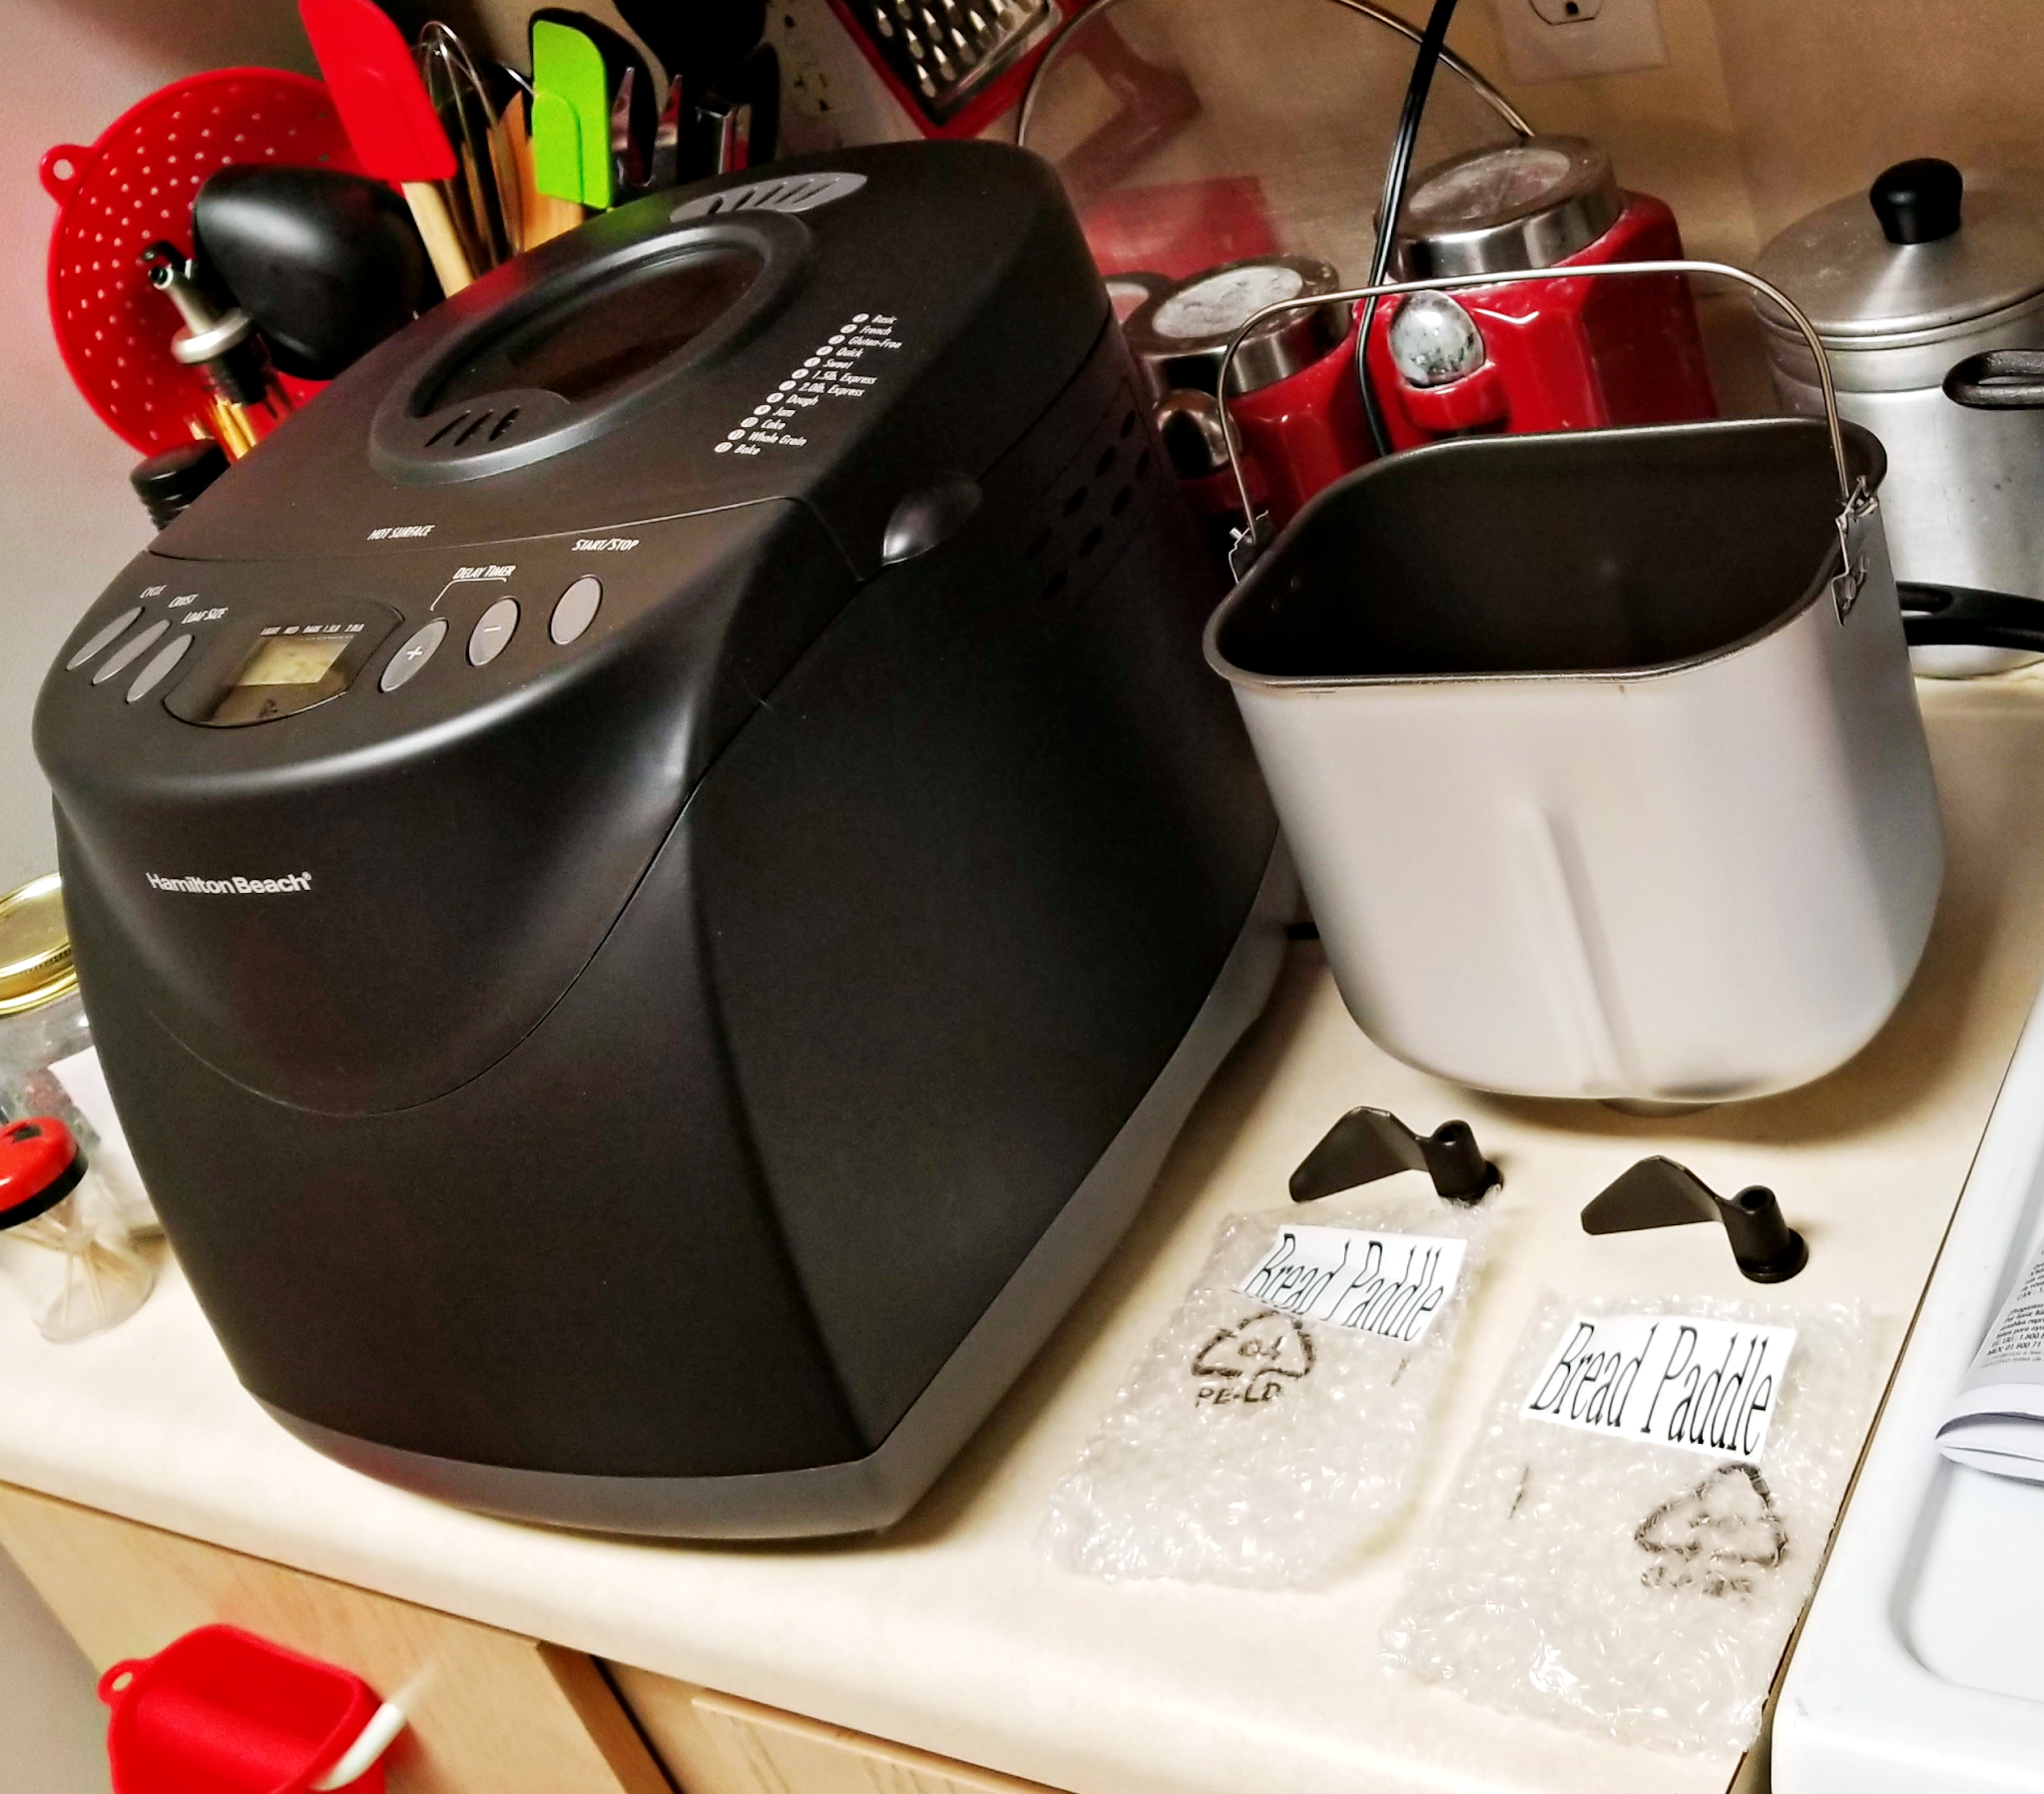
The machine, the bread pan and
2 kneading paddles

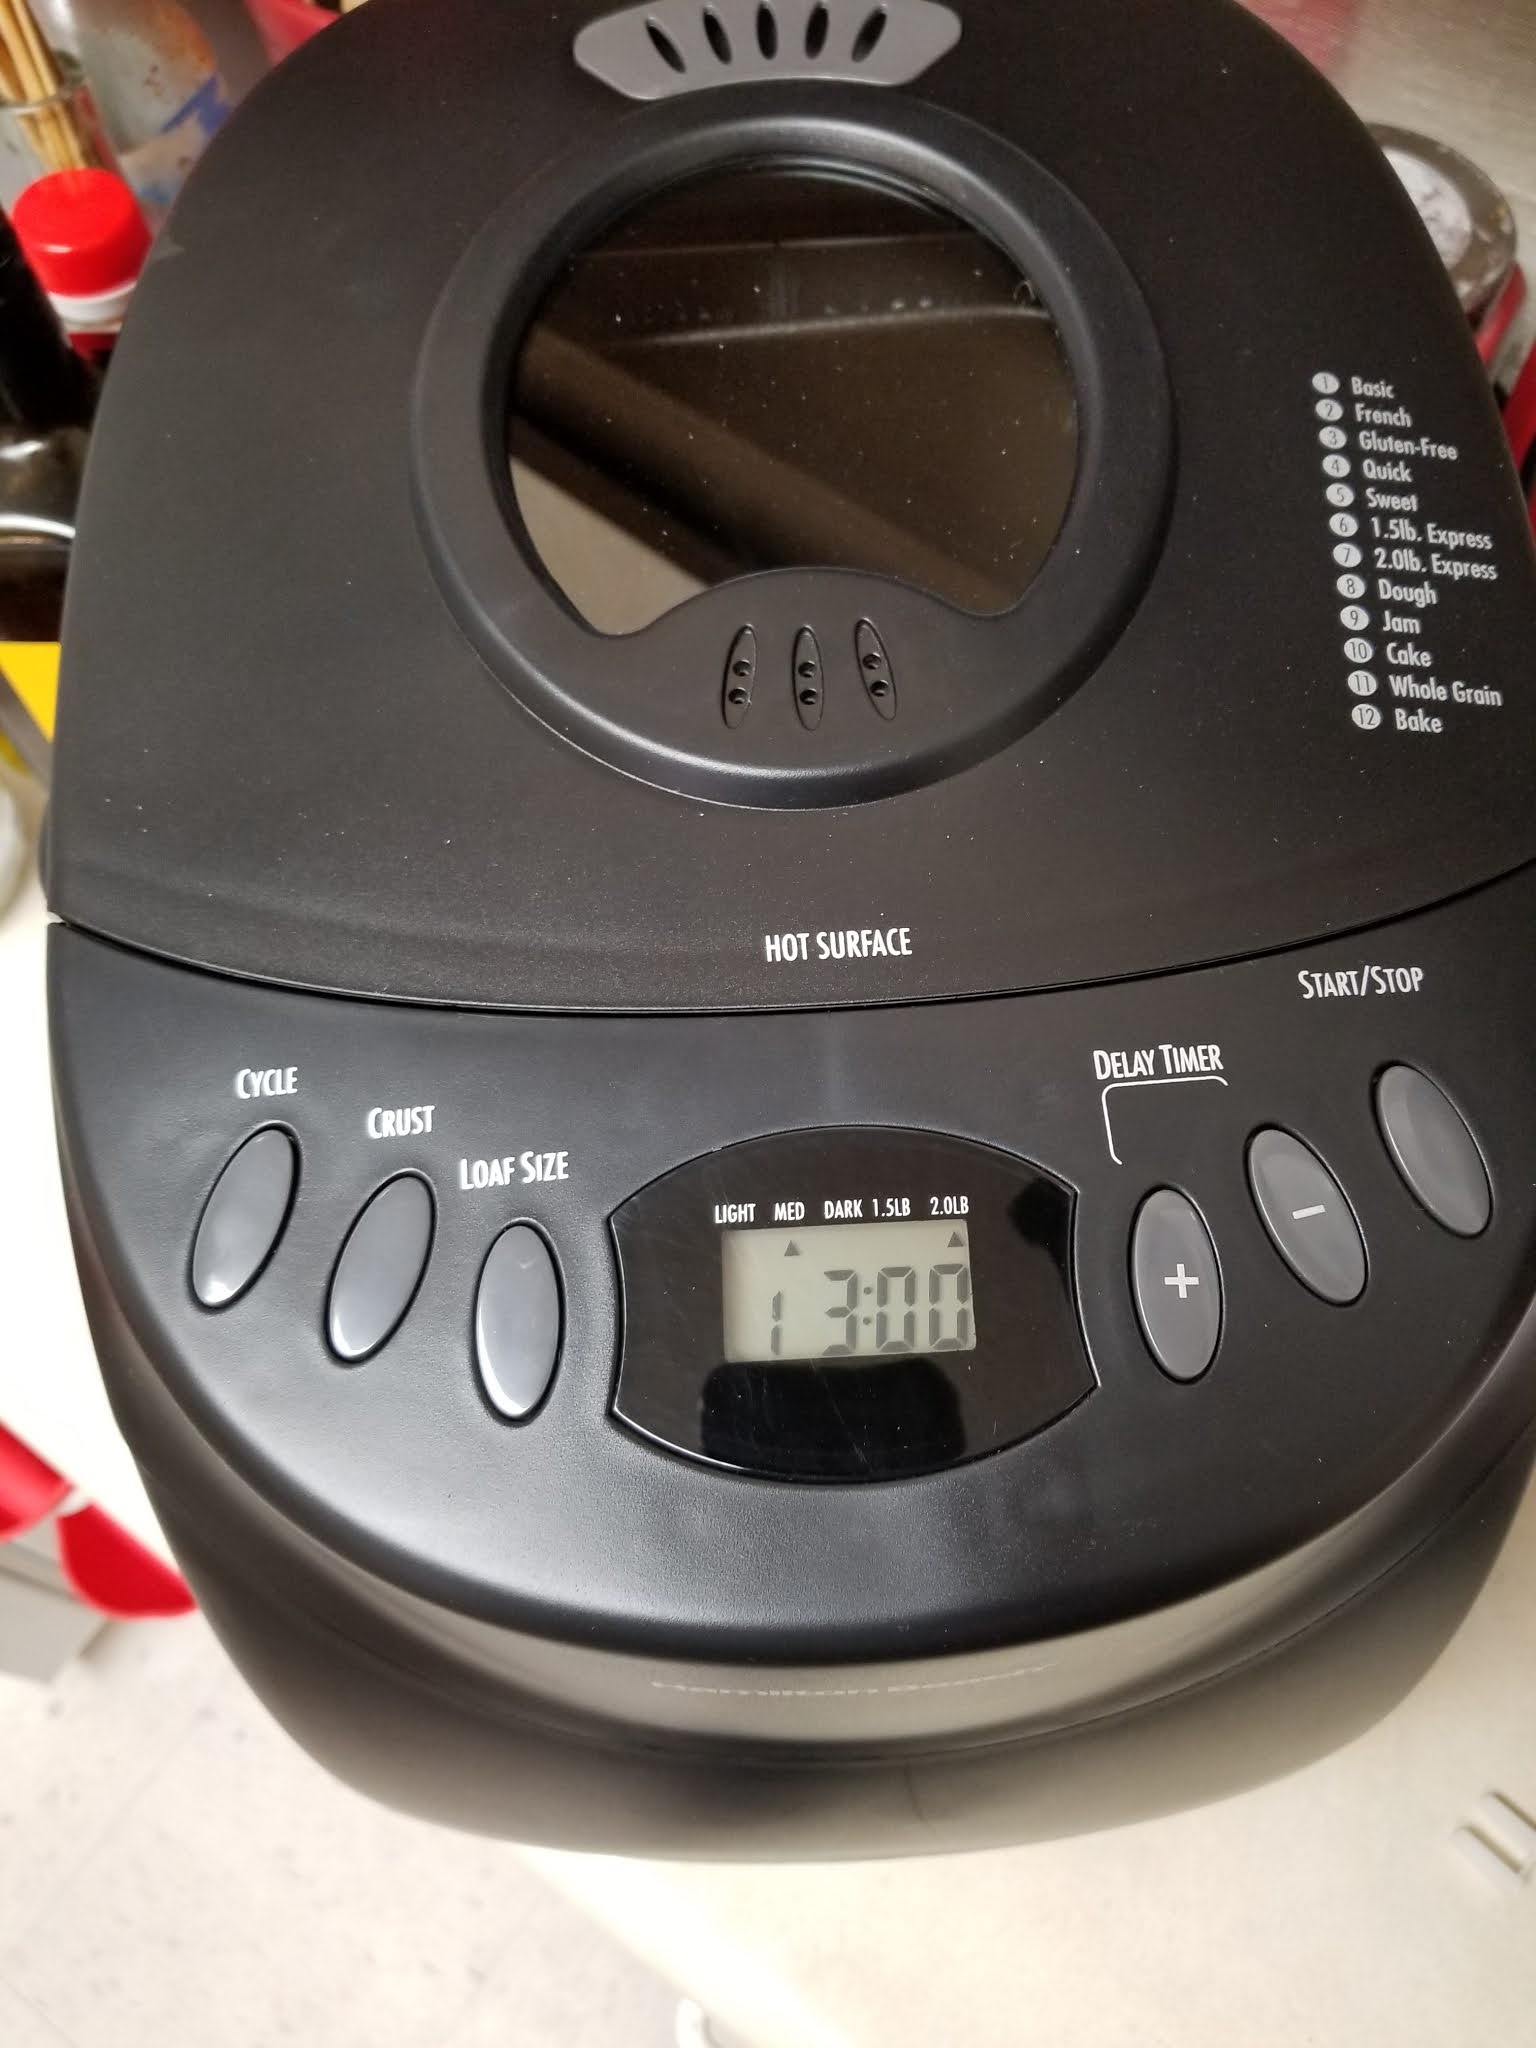
You can see the controls beside the LED
and 12 usage options along the 
top left side

I chose this one after looking at a bunch of others because:

  • The features, especially being programmable and being able to make a variety of items.
  • The price was reasonable & I didn't want or need the fanciest, priciest machine from my family.
  • Things mentioned in less-than-glowing reviews didn't really put me off.
  • It looked easy to clean.
Now that I have the machine and have used it, I'm really pleased with my choice. I can add these to the positives:
  • Incredibly easy to use. I was sweating and stressing but as soon as I started, it was a snap.
  • Even though it's quite large and my kitchen is small, I have found a counter for leaving it out on and a space for storing it away. And, believe, me, my kitchen is almost too small to cuss a cat in.
  • It's very quiet. I have one annoying and noisy neighbor who I always complain about. I didn't want a machine that made me look bad. I can use this thing at night and it wouldn't wake anyone in the apartment.
There are some things I wish were better, but they don't ruin my experience. These include:
  • The LED display doesn't show where in the breadmaking cycle the machine is at. I have to pay attention to the alerting beeps if I want to add seeds/nuts or remove the prepared dough for baking in the oven. (I sometimes want a loaf made in the cast iron or fixed into a particular shape.) I also like to remove the bread after the last kneading so that I can remove the paddle. That way, I don't end up with that hold at the bottom of my finished bread.
  • Since my recipes include a lot of seed/nuts and mixed flours, I do have to open the machine sometimes. I do this to see if I need to scrape down the ingredients. For my thinner doughs, I have not had to do this.
  • Hamilton Beach does not have one of the silicone-scraper kneading paddles. As a matter or fact, there are no accessories for this machine as far as I know.
Not much to complain about there. Also, the beeping is fairly loud so I can listen for when to add things or remove the paddle.

As I said, this is a pretty quiet machine. Here is what it sounds like (and you can see that I am standing right above it filming):


Basically, I can run this machine in the kitchen and just barely hear it from the bedroom about 12 feet away with the door open. Tiny apartment living can be challenging so this is a Plus.

Here is one of my first loaves of bread because I ate the 2nd loaf without getting photos!


Whole wheat & white flour; turmeric, chia seeds, sunflower seeds, 
and flax (seed and ground).

My play on an Ezekiel Bread type of loaf. With a twist!


I got the basic recipe online. and added the turmeric.

 Now that I have gotten comfortable, I will be modifying all recipes with nuts, ancient grain flours, and as much healthy stuff as I can think of. I don't want to live by bread alone, but I want to enjoy every piece of bread I eat.

I have not even thought about how to use all of the functions yet but here are the choices:


Glad the option is there but I 
won't be using the gluten-free...


The Basic cycle is what I used to make my first loaves of bread. I plan to try doing a Brioche-style loaf soon though. But the thing I am most excited about is that Jam setting. 

I first thought that the Jam setting is the one I would never use (I mean, after the Gluten-free option), but I have watched videos showing how easy it is to make jam in these things. Of all the methods I watched, the easiest recipe was this one:
  • Fruit (fresh or frozen but I am going to use unsweetened canned pineapple)
  • Sugar (anywhere from 1 to 4 cups. Apparently, sugar thickens the outcome if you aren't using pectin)
  • Lemon juice. 
I have seen some recipe videos where people acted pectin to thicken the jam. Since I plan to make very small batches, and I don't want a lot of sugar, I will use either no pectin or a sugar-free version. Also, I am cutting way back on sugar - which is why I'll use pectin at all. This lady here had the most no-nonsense recipe for beginners, in my opinion.

One of the best marmalades I ever had was one I found back home in Anchorage. It was a pineapple-orange marmalade that I've never found yet in Iowa stores. 

Oh, and this machine makes both jam and jelly...

Thanks to Spruce Eats, I understand the differences between jam, jelly, and marmalade:


The more you know...

So that's is all about this amazing bread machine.

The price has been swinging all over the place for the past year. I started looking at this one about 6 months ago when the price seemed to hover between 80 to 90 dollars. When I sent my family the link, the price was around 90 bucks.  I almost changed my mind and when I made the final decision, the price was down to 80 and some change. Not bad, right? Well, when I just now went over to grab the link for this post, the price was sitting at 70 dollars. Crazy.

Still, it is worth what it cost. If I was able to buy it for myself, I would not have been mad about paying $100. If you have priced Ezekiel Bread (or any other good quality bread) lately, you will see how fast the machine pays for itself. And with the jam? Shut UP!

Next time, I will be reviewing the Stand Mixer that was my second gift.

Peace
--Free

Thursday, January 07, 2021

Christmas Gifts & Better Nutrition

NOTE: Soon, I will be posting reviews

 of each of the appliances mentioned here.


Guess what I did? I thought I had posted about my Christmas gifts from my family and... The unfinished draft is still sitting on my blog list.

Well, here goes.

For Christmas, I got a stand mixer and a bread machine. Every year, my family asks what I want and I wanted a bread machine. They encouraged me to think of a second item so I asked for a stand mixer.

This is the stand mixer:


This is the bread machine:


I am in love with both of these appliances! I had not used a bread machine since my sister had one years ago. We only ever used ready-to-use bread mixes and I think we gave up buying them because of the prices. The bread wasn't even that good, come to think of it. Well, we have come a long way.

My stand mixer is perfect for my tiny kitchen. When I'm not using it, it fits right on top of the fridge next to the Instant Pot. I had to clean out a cabinet to store the bread machine!

Anyway, I made my first bread today and it came out so much better than I expected. It was slightly salty but that was from using the Food.com recipe. My instincts were to cut down on the salt and add some honey or brown sugar. Since this was my very first loaf, I didn't mess with the recipe, but now I am more confident. King Arthur Flour had a much better-sounding recipe but I wanted to try the simpler one. Bad decision. If you try it, I suggest cutting back on the salt and adding some honey. The bread I made works only because I have some honey butter made up to use on it.


Whole wheat flour/White bread flour mix with chia, sunflower & flax seeds;
turmeric powder and oatmeal

I was using the stand mixer from Day One. I mixed up a from-scratch cake and some frosting. Not very healthy, right? Well, for my next creation, I am going to attempt to make these whole wheat cookies - or rather sables. I will substitute the hemp hearts (which I don't have) for sunflower, chia, and flax seeds. 

My goal is to eventually make both some bread and cookies with some "ancient grains" added in. But I will save some of those ideas as I get money for ingredients.

By the way, for anyone who has considered getting either of these appliances but wanted more detail, go and read every review you can. My family basically let me pick out the ones I wanted and I sifted through a lot of info and reviews. The one thing I didn't find for either was how loud they run. 

The bread machine sounds like a very, very quiet washing machine and only makes noise when kneading. The beeping to signal ending and beginning of cycles was not very loud. I can run the kneading cycle at night and not disturb anyone sleeping 10 feet away in the bedroom with an open door.


The mixer is slightly louder but not annoying at all. I would only run it during the day though. It's not that it's really loud, but it's a more constant whirring than the bread mixer.


I will say that the only thing I wish for the bread machine is that the LED indicated which part of the cycle is currently happening. It's seriously easy to set the machine for bread type/crust shade/start but when I would check to see which kneading or proofing cycle it was on (1st, 2nd, or 3rd) so that I could remove the bread paddle before the last proof start. Other than that, it's perfect.

By the way, the helpful tips listed in the notes to this video are awesome. This is where I learned about removing the paddle so as not to have a hole in my finished bread! Big thanks to that channel.

So, while I hate making resolutions for the start of a year, I can say that I will be saving money and eating better. I whipped up my own version (kind of) of Ezekiel bread for about 40 cents (I'm guestimating here). And I do plan to learn more about ancient grains.

To my family, I want to say again how much I love that they love me!

Peace

--Free


Wednesday, January 06, 2021

Nutrition Confusion

 Just wanted to post this in case someone can enlighten me.

I have 2 different brands of Pinto Beans. The cheaper, local store brand beans have a much higher fiber content and are darker in color. They also seem just a bit smaller. The other brand I got from Walmart has less fiber and are lighter in color.

Once I noticed the fiber, I looked closer and saw the there are wild differences in fat, sodium, calcium, and potassium. There are smaller differences in some of the other listings.

1/4 cup serving size for both

The color difference is seriously obvious

I did read somewhere a while back that darker beans are "older". Still, I couldn't find anything on the nutritional differences. I have put out feelers on Reddit.

If anyone can clear this up for me, please do. It's times like this when I really miss Google Plus. There were such helpful people in the communities there. Facebook is more... ya know, self-centered.


Peace

--Free

Tuesday, January 05, 2021

Thursday, December 24, 2020

Part One - Beans, Beans, and More Beans (and some recipes)

 In all my talk about upping my daily fiber intake, I think I've only really mentioned bread. Every eating regime needs variety and it's literally true that man cannot live by bread alone. Or, at least, this woman can't.

(Speaking of bread, though: I anxiously await my bread machine (thanks, oh family of mine!) and cannot wait to start exploring recipes.)

As I try moving more toward a 90/10 plant-based regimen, I am trying different beans. I really do love beans but have limited myself to pinto and navy beans for the most part. I don't like dry-tasting beans and I can live without black-eyed peas. Thankfully, there are a lot of varieties of beans to try. 

The first "new" beans I tried were the black beans from Faraon. (I read lots of info about the benefits of black beans.)When I soaked these overnight (as I tend to do with all my beans), I was shocked at the deep purple/black of the water. I wondered if I had gotten sham beans that had been dyed to indicated a healthier color! Nope. That is common for these beans. For as much of the color that washed off in the soak, there was still a deep black color to the soup that cooked off the beans. The color actually adds to the appeal. It's certainly not boring.

Here is the nutritional label on the Faraon Beans I got from Amazon.


Here is the recipe for the way I cooked the beans (pretty much the same as I cook pinto beans):

BLACK BEANS

  1. Soak beans overnight (at least 10 hours) in cold water (in the fridge)
  2. Drain the water, put the beans in a pot with fresh water (at least 3 inches above the beans).
  3. Do NOT add salt or salty seasonings until beans have cooked at least an hour or almost finished cooking. Apparently, adding salt slows the softening of the beans.
  4. Let the beans boil for a few minutes, then turn them down to just a strong simmer, checking every half an hour. (NOTE: I keep a second, smaller pot of water heated on low to add to the beans if they start drying out.)
  5. Once the beans are on simmer, add a little bit of olive oil (I add about a teaspoon for every dry cup I'm cooking) and add onions and garlic pieces.  Some people use different seasonings like bay leaves, thyme, etc.
  6. Check the water level and texture of the beans about every 30 minutes. Add the other hot water as needed. Don't add too much at a time; you don't want the finished beans to be too watery. They will take anywhere from 2 hours to 2 1/2 hours to cook. (The longer they have been pre-soaked, the sooner they will finish cooking.) 
  7. Don't forget to add any salty seasonings when they are near finished.


Black beans with onion & garlic


(The next time I make them, I will add the things I use in my pinto beans: diced, stewed tomatoes, a little tomato paste, and on some occasions, ground beef that's been cooked and seasonings.)

The taste of the black beans is so nice. They have the creamy tasted I read about when looking up information. Creamy and smooth. I was able to eat these beans with cornbread just the same as I do with pinto beans. Yummy and extremely filling. I can see why people like eating these beans with rice, but I don't want to add any more starch to my diet if I can help it.

Here's my basic cornbread recipe as remembered from how my mom used to make it:

BASIC CORNBREAD

  1. Using a cast-iron or oven-safe skillet or baking pan (I use a 9.5-inch cast iron skillet), add a tablespoon of butter to the skillet or pan. Either use melted butter or let it melt by sitting the pan on a low-heat stove. Heat stove to 450 degrees.
  2. In a bowl, mix the dry ingredients:
    1. 1 1/2 cup of yellow cornmeal
    2. 1 cup all-purpose flour
    3. 2 tsp of baking powder
    4. 1 tsp table salt
    5. 1 1/2 Tbl of sugar
  3. Add to the dry ingredients and just mix enough to combine everything (I like to mix cornbread with a wooden spoon):
    1. 1 cup of milk (I use whole milk) 
    2. A lightly beaten egg
    3. 1/4 cup of oil (I use vegetable or canola)
  4. Pour the batter into the center of the skillet, then using a spoon, scoop some of the butter from the sides onto the center of the batter.
  5. Depending on the size and depth of the pan, bake from 15 to 25 minutes, until a toothpick comes out of the center cleanly. Edges might be very brown.

Oven-baked cornbread in 
a cast-iron skillet

By the way, this odd-looking thing on the pot of beans is one of those "spill-stopper" lids


PureGenius boil-over 
spill-stopper lid

Even though I had low expectations, I have to say that I am thrilled with the way this one works. It really did save me from a nasty spill-over when I got yakking on the phone and forgot to check the beans. Thanks to the contrast of colors on the lid, you can easily see the black of the bean juice.

Next time, I will talk about the small red beans and pink beans. I have no idea what to expect from the pink beans!

Peace

--Free

Tuesday, December 08, 2020

Not All Fiber Works The Same

 Okay. This is going to get a little bit personal. Today, I am going to be talking about my fiber regimen. Not too personal but... real personal.

I told you recently about my need to change up my daily nutritional habits. My kidneys are being crazy and my energy is dropping more than usual. I have been advised to seriously up my fiber intake, lower my intake of preservatives, and drink SO much more water. I feel like I am participating in a water challenge with fiber thrown in for extra credit.


Before now, if I needed it, I would take an OTC stool softener - Dulcalax was my go-to - and that always worked. Eventually. I remember once taking one Dulcalax every eight hours for a couple of days with no result. Until there were results. Results of sudden and horrific proportions.  After that, I stuck to things like Benefiber and it's generic siblings and Psyllium supplements. Same result: they don't work until they suddenly do work too well. Or not, depending.

The past few days, I have been taking in nothing but vegetables (mostly tomato, avocado, onion, cabbage), water, and bread. Not just any bread though but only the most fiber-filled and nutritious kind. I've eaten whole-grain bread, seeded bread, sprouted grain, and sprouted seed bread. I even went near bankruptcy to buy a loaf of the famous Ezekiel bread. 

Here's the thing: not all fiber works the same. The stool softeners and the manufactured fiber supplements work slow and unpredictably. The fiber in the bread and the fiber in the vegetables... That is swift justice. Swift but not brutal.

Without going into more detail than necessary, I will just say that I can highly recommend the fiber found in food over the supplements and manufactured types. Results are more predictable and comfortable. And regular. Very regular.

Also, I feel better. My belly is a lot less bloated so my clothes fit better. I don't have that constant feeling of slight discomfort. My energy is not up as much as I would like but I think that might take more time.

I have learned that with taking in so much natural fiber, the real trick to results and comfort is to drink the water. Lots of water. It's as if the fiber is the wind-up and the water is the pitch. (Look at me talking in baseball lingo!)

Another benefit is that I am not eating as much food. I know that this is Fiber 101 because fiber is more filling than most other nutrients. Eating less means buying fewer groceries, That's awesome because I can only afford one loaf of Ezekiel bread every 3rd quarter of the fiscal year...

Do you know how thankful I am that my family is the best ever? They are getting me a bread machine for Christmas. The makers of Ezekiel bread (and Dave's Killer Bread) will not be seeing any more of my collected pennies once I get that machine. I love their concept and backstories (especially for Dave's), but I leave it to Gwen Paltrow and Oprah and friends to pick up the tab. I really don't see enough difference between Ezekiel Bread and some other choices to warrant spending all that extra moolah.

By the way, the Ezekiel bread is not bad but it's not as tasty (in my opinion) as some of the other grain bread. It's free of preservatives, which is a good thing, but that shortens the shelf-life. Also, I found it to be very dry. I can only eat it in nibbles or else I have to toast it. I keep it in the freezer and thaw it one piece at a time. I have to protect that investment.

I told you previously that I have found an affordable supplier of grains and seeds. I already found yeast in larger quantities so I think I can keep up this high fiber situation without going broke.

For anyone else looking for decent quality and nutritious bread, I can say (speaking with no credentials other than my taste buds and ability to read a label) that Aldi's Seedtastic and Ancient Grains breads are amazingly tasty.  They aren't cheap-cheap (around $3.25 to 3.85 a loaf, depending on the type), but they are so good


Ezekiel Bread
Ingredients

Again, I am no expert, so take everything I say the way you would an article in the Daily Mail. Do your own research. I have been checking info from papers/articles by dieticians and nutritionists (you know- doing my search-learning) and, so far, I think there are some rules of thumb to go by and some things I have learned:

  • High fiber is best with proper water intake. I wonder if it isn't even troublesome to not drink enough water if you are doing a high-fiber diet.
  • When choosing bread and cereals, etc, look for "sprouted" seeds and grains. I can't remember why this is even though I looked it up.
  • Avoiding preservatives as much as possible is great.
  • The first high-fiber day I had killed my cravings for "junk".
  • I have been eating at a different pace (see below) than before doing high-fiber.
A typical day's meals for me prior to this was something like this:
  • breakfast of coffee with creamer, white toasted bread with butter and jam.
  • lunch of white bread (or Brioche, or thick Italian loaf) sandwich of chicken patty or deli turkey and something sweet like a honey bun
  • snacks of honey bun, vanilla brioche loaf (Aldi's has the best), or some other sweet treat
  • dinner or vegetables (maybe), fish or chicken of, if I'm lazy or tired, another sandwich.
  • evening snack(s) PB&J sandwich or a bun or sweet bread and some hot tea with sweetened creamer.
A typical day recently:
  • breakfast of coffee & creamer, toasted bread (seeded, sprouted or something like that) either dry or with butter
  • lunch of sandwich of avocado, tomato, sweet onion, and maybe mini sweet peppers on seeded bread with mayo.
  • snack of bread, toasted or not, buttered or not.
  • dinner or baked fish or chicken with a side or avocado, tomatoes,onions seasoned with sweet and mild rice vinegar or just salt and pepper, a piece of bread - and you know what kind.
  • evening snack of a banana or a couple of dates or a piece of bread (toasted or raw, buttered or not).
I am planning to make small batches of honey butter* to put on my bread (as a snack). I have not yet made the trendy "avocado toast" and I refuse to. 

It will be fun to do an update on how I feel after a longer period of eating fiber-filled foods on a regular basis. I promise, but right now, I have to go to the Ladies Room...

Peace
--Free

Thursday, December 03, 2020

**REVIEW** Cute Contact Lens Carry Cases

This is going to be a quick post about something I picked up the other day.

My new contact lenses are - once again - a pain in the boot. I miss the days of having the same prescription for each eye. Too easy. However, I had to get a new case to carry spares in. My old one lasted over 4 years but... I think I damaged the hinges. The case will pop open if I move it or tip it. So I replaced it with what I thought was just another cheap case:


It cost around 6 bucks so I wasn't really expecting much. I was surprised. Several cases look (and probably function) the same, depending on color and shape preferences. I just picked this one and I guess I didn't read the description well enough (I only cared about a cheap price) and I got two cases, not one.


Getting 2 is certainly a reason to choose this particular case.

Each case comes with a bottle for carrying a bit of solution (always handy); a tiny set of rubber-tipped tweezers (learning to love them); and something called a "stick connection" (really a stick to place the lens in the eye). That's all on top of the cute little lens case. And a mirror. For under 7 bucks.

I've never used a "stick connection" and was a little nervous. Now I don't ever want to be without one. I always hate trying to balance a lens on the tip of my finger. I usually drop the lens and have to hope it didn't fall into my toothbrush holder.

My two favorite things though are the holder for the solution and the tweezers. Listen, there's nothing worse than trying to dump a lens out of a case onto your palm. Or trying to dig out the lens without turning it inside out. 

The only thing I don't like is that the cases are so glossy that the outsides are print magnets. On the other hand, they are so glossy that they can be used as mirrors. Speaking of mirrors: the ones inside each case are not useful for inserting lenses. The case is too small and difficult to prop anywhere. I might get better at using the mirror but for now, I just love the bottle, tweezers, and stick.

Like I said, you can find cases similar to these all over Amazon. I saw round ones, oval ones, gold- or silver- or copper-toned ones. There are even some with cartoon or pop culture characters on them. There are some for men and for teens. I even saw some that came in sets of 6.  

these are from here


these are from here


Better yet, I saw one set that holds a pair of glasses and a pair of contacts.

Add caption

You're welcome.


Peace

--Free


NOTE: For those who might wonder, Thought it might seem so, I do NOT get any affiliate benefits from the Amazon links I post. I simply like sharing info about items that I find and buy - whether on Amazon or elsewhere. 

Wednesday, December 02, 2020

Trying to Make Artisan Wheat (I think)

 Okay, so this is my first time doing bread in the Dutch oven. I'm not even sure if what I am doing can be called "artisan". Because of the type of flour I'm using, I'm not sure if I can call it a true "wheat" bread.


It is wheat, so...

Here's the thing though, I felt so good while preparing the dough. I've been really wiped out lately and with trying to change my diet (again), it's been a drain. This recipe was one of the easier ones because it's a "no-knead" type. I don't have to knead it because it has to sit for 8 to 24 hours to rise.

I didn't take a Before photo. It was after 9 at night and, yeah. But here is what it looked like this morning:


That did better than I expected. The dough is really damp and was just one big odd-looking lump when I went to bed. This morning's dough was puffed and kind of yummy-looking. Before I had to push out the air and get it ready for the 2nd rise.


I changed a couple of things about the recipe, but here is the video I used.


I like this dude. He gets to the point and is very clear with instructions. If this bread is messed up, it's totally going to be on me. 

Like I said, I made changes. I didn't have sesame seeds and I didn't have the flax in seed form. I used pumpkin and sunflower seeds. I literally picked up the cheap packs of seeds at the corner grocery. I do have ground flax and since this is all about a high-fiber diet, I added that. Without measuring. Yikes. I didn't measure the seeds either. I figured the more the merrier and just went for it.

One thing that I really did want to add but held back was some brown sugar or blackstrap molasses. Or vanilla extract. Restraint is the word of the day. I played around the rules enough. I can always test adding things the next time.

As I was writing this, I was waiting for the bread to finish baking. Nervous! But, it turned out to look a lot like the one in the video. I am impressed with myself.


I am pleased! It smells amazing and none of the seeds burned. I am nervous about cutting into it, but... 


It turned out awesome and really could do with another 5 or 6 minutes in the oven (I'm putting it back in).  I am trying to remember what Paul Hollywood says about the seeds not distributing throughout the bake... Still, I am kinda happy.

The one thing I am really disappointed in is that I didn't follow my instincts and add something sweet - sugar, syrup, honey - the bread tastes like organic store-bought bread that is slightly salty.

Okay. So now I know. I will be making more and this time, I am going to add sugar, syrup, or honey. This would be the best thing ever with some sweetness to it.

Peace

--Free


Saturday, November 28, 2020

Bread, Bread, Bread for Life

  I rarely toot the horn of a site if I haven't used their services but I'm going to make an exception. Recently, I found this site and I'm kind of excited. I have been checking out their blog also. 

The only reason I ever found Food to Live (FTL) was because my doctor has warned me to get a bit more serious about eating healthier things. I'm not eating super-junky stuff but I need to go harder at the fiber and nutrients than I have been.

The first change I made was to cut out the sliced garlic and herb turkey deli meat I so love for sandwiches. I switched up and kept everything else except for the meat and bread. Yeah. I now use high-fiber bread instead of brioche or Italian white bread and I just enjoy it with the avocado, tomato, and yellow onion. It's a tasty sandwich. Because of the delicious bread and the avocado, I almost don't miss the turkey.

This Aldi's Ancient Grains is the bread I started to fall in love with:


I need to be able to control
that sodium level...


It's pricey though. Like around 5 a loaf. I wanted to try Ezekiel Bread or Dave's Killer Bread but their prices make the Ancient Grains look like nothing.

I've switched over to eating a lot of cabbage and other greens, white meat, and using good oils. When I was going over my budget, I realized I need to find a way to afford really nutritious bread. So...

My family has asked what I want for Christmas. My answer: bread machine. I picked out one that will let me add nuts and seeds or just prep the dough so I can finish the rest myself. Then, while looking for affordable seeds and grains, I found Food to Live.

FTL recipes are heavily vegan and I am not interested. I just want to be able to make my own sprouted grains and seeded bread. It has to be less expensive than keeping Killer Dave in business. Those prices!...

Normally, I am not a big eater of bread. However, I would rather get full from eating a highly nutritious bread than eating a ton of veggies and fruits. I can only take so much of salad and chicken. With the right bread - seeded with tasty nuts - I could go from breakfast to dinner on just that with some butter.

In case any of you are interested, here are some links I have found to recipes. Enjoy.

I was happy to see that The Prepared Pantry had this helpful write-up on designing whole grain bread recipes. That will go up on my fridge.

This all has me very excited to get my hands on that bread machine! In the meantime, I am going to start trying some of these recipes by hand. Pictures (good or bad) will be coming up...

Peace
--Free

Saturday, November 14, 2020

**REVIEW** Pantene's Butter Crème Hair Treatment with Argan Oil

 Pantene has been showing up and showing out for me the past year or so.

I never paid much attention to the Pantene brand before last year, but I loved a sample of their foam conditioner I got in some sub box or the other. I loved it so much that I actually bought some and still use it on an alternating basis with another conditioner. But I never thought of shopping Pantene specifically for my kinky-curly hair needs. Then I happened to see this pop up on Amazon:


Yeah. There's a whole lineup of products in that Gold Series

Pricewise, most of the products run about $7 to $9 each if bought individually. I see that there are some sets of products for sale. I am happy with the shampoo I use and I already sometimes use Pantene's foaming conditioner so I don't need to go broke buying an entire line of products. What I always need though is daily moisture. So I gave this a try:


That's the Hydrating Butter Creme. It's "infused with argan oil" and supposed to have moisture that lasts 17 hours. I wanted to see about that.


The texture is a creamy oil that has a slightly 
watery melt-down.

I haven't tried it on my freshly washed and conditioned hair but I did test it out today. My hair is 3 days post-wash/condition/twist. It's decent but was still a bit dried out from not being wrapped every night. Also, I ran out of the Hydrasteam products that were so good for my hair. 

Anyway.

This morning, my hair was dry - not crunchy-dry but in that thirsty-need-some-moisture-quick kind of mood. I've been using other products very lightly every day but it's that time of year when the air is getting drier and cooler. My hair always has trouble adjusting to seasonal changes.


Just so I wasn't applying this product to bone-dry hair, I fine-misted it with some water beforehand. I applied about a teaspoon's worth of product to each of four sections of my hair. 

First impressions - immediate impression? This stuff smells SO good. It smells a tiny bit like the Marrakesh oil that is so popular. Not as sensual but it has that slightly amber scent that gets stronger with any kind of warmth. Most of the smell abates quickly, but my hair still has a really pleasant scent for anyone who gets close.

The next impression is that this is very moisturizing. Once I tried just running a small amount through the sections of my hair, I knew I was going to want to use it the next time I twist my hair. So... I did.

That's water-spritzed & the product

It takes an amount of about half the size of a dime for each twist. The tube is a nice 6.8 ounces so that's fine. 

Basically, yes, this does a fabulous job of moisturizing very dry hair. Because of that, I don't care about anything else, but some people will be happy to hear that it is "sulfate-free". 

Best of all, it produced a nice twist-out that was moisturized without being greasy.

Girl, yasss...

I have to admit that this just makes my hair feel better than the Shea Moisture I had been using. My hair felt smoother and had some shine - and shine is not something my hair easily does. But I think that everyone's hair is different and responds differently to products. This just happens to be something that my hair likes apparently.

I started writing this post, as always, several days ago. The update is that my hair does love this. It dried out a bit after a couple of days but I was able to twist again with just a water-spritz and, voila, the moisture revived. Remember what I said about the size of the tube? That's going to last longer than expected because some water will re-boost the first application.

Since I can afford this so much better than I can the HydraSteam products, I will probably use this as a staple and use the HydraSteam when I can.

Peace

--Free

Wednesday, November 04, 2020

**REVIEW** Cascara (aka: Coffee Fruit Tea)

**UPDATE** I have CKD stage 3b. I have learned that that I have to be careful using this coffee product. As always, you should check with your medical care team before adding or trying anything new in your diet. Every healthy thing is not healthy for everyone. 


So, way back about this time last year, I was talking about coffee and some of the brands I like drinking black and sugar-free. Luzianne was my favorite for that but I haven't been able to find it lately. Well, I can find it all over Amazon but only if I want to use my entire grocery budget to pay for it.

Anyway. I'm not here to talk about regular coffee.

I might have mentioned it in that coffee post or in another of my rambles but the product I am talking about today is cascara - also known as coffee fruit and coffee fruit tea. So, coffee but not coffee the way most of us are used to it. Actually, cascara is the husk of the coffee bean. It kind of looks like extra-dry raisins.


It's an interesting thing, cascara. Nothing like coffee and nothing like any tea I've had. The taste of it is more of a fruity-syrupy-tasting beverage. As a matter of fact, I just realized that the taste reminds me a bit of raisin. Hmmm.

Hot or cold, the taste is about the same but I do prefer it cold. If I drink it hot, I am tempted to add honey to it for some reason.

As a beverage, it's referred to as cascara tea. Odd, right? Since it's the husk of the coffee bean. The husk is actually considered a "waste" product. Eat Cultured is more concise and precise, saying:

"Cascara, which translates as "husk" or "peel" in Spanish, refers to the outer husk of the coffee cherry that wraps around coffee beans. Since it's essentially the "fruit" of the coffee tree, it's also a valuable source of fiber and antioxidants." (source)

I am drinking the tea because of those antioxidants. I've been talking about ORAC values again recently and I am happy to say that cascara tea is the best-tasting thing I've tried from that list. 

By the way, this happens to be the brand I am trying. I ordered from Amazon but the coffee is from Twin Engine Coffee


They do have a Facebook page and they were super-responsive to questions and requests for info.

I think it's a shame that cascara has been getting tossed away all this time. We all ingest a lot of silly foods and beverages and we've been trashing something as ORAC-packed as cascara. Makes me wonder what all else has been going to needless waste...

Anyway, I have been replacing about half the daily coffee I drink with the cascara. I will either drink it cold and solo or add it to one of my sparkling waters. Last week I had a dry night-time throat so I sipped on some of the hot tea with raw honey before bed. It didn't keep me awake and it was soothing to my throat. 

One of the benefits I heard the tea offers is a mild laxative effect. I have not found myself with a huge change to my, er, movements but I do feel a bit more regular. I also pee a lot. That's because I tend to drink a lot of clear or sparkling water with the tea or after having some. I've read reviews where other people feel more of an energy boost.

I am always fairly fatigued, even on the best of my days, and I haven't noticed a prolonged boost of energy but I do seem to be a little more focused for a few hours after drinking a couple cups of tea. 

Now that I am used to having the tea as a staple, I am learning that the best way to prepare it is by soaking some beans overnight so that I have the drink on hand for the next day. This is not a brew-and-go tea. Even when steeping in hot water, it takes a while to get a decent cup. It's just easier for me to always have some soaking and ready to either heat up or drink cold.


It didn't come in that tacky jar.
I just wanted to show what it looks like

If I start noticing any better energy effects over time, I will update this post. Keep in mind that the drink might be more energizing to someone with more normal health.

The price of the tea is reasonable and I am sure that as I shop around, I will find even better prices. One thing I plan to do is to dry the remains of the used husks and dry grinding them to add to smoothies. I want to get every last bit of use from the tea.

Until I have an update, that's it for now.

Peace

--Free


P.S.: Since I wrote the draft of this post a few weeks ago, I do have an update. I have been baking a lot of bread and have a couple of times added the liquid from the tea in place of water. Results are not bad.

I hope the post makes sense. I went back in and added a little info and photos just now so. Please forgive any errors.

Monday, November 02, 2020

Bake Away The Blues (Bread & Water Roux)

 When I get stressed, baking helps calm me. Stress seems to send signals to my sarc to join the party so my brain might not be functioning well enough to do anything complicated. But I can almost always bake.

October was not good for my life. As if 2020 doesn't suck hard enough, it doesn't want to go out without dragging down as much joy as it can... Can I get an amen?

Anyway.

I spent about 3 days on the couch, not able to move or care. I watched YouTube videos hour after hour after hour. When I started getting sore from laying there, I decided to get up and maybe bake something - bread or rolls from scratch. Then, at some point, I got it into my head that I wanted to find a video on how to make brioche. 

Most videos on making brioche are either too talky. All I wanted was a recipe. I found one and... What a mess. I basically wasted a lot of flour, butter, eggs, and sugar. I should have looked at the comments before trying the recipe because there were a lot of people wondering just what the heck the baker was doing.

Also, I don't have a stand mixer. That seemed to be a must-have for kneading brioche dough. I was discouraged until I found the more awesome YouTube channel ever for baking recipes. The. Most. Awesome. Ever. 

The host/baker/cook in the Savor Easy videos ticks all the boxes for making great instructional videos. The entire focus is on the ingredients and procedure. Tomorrow, I will be trying a new batch of brioche.


Isn't that the best baking video? No frill, no life stories told, just right-to-the-point instructions. I need to learn from her! I'm hoping she has a recipe for babka. I've been wanting to bake one of those since forever.

I don't have the energy to start baking yet. I'm still mostly confined to the couch because, on top of everything else (cue the violins), I have a cold I can't shake. 

But -

Until I can get on my feet long enough to bake, I have been enjoying the Culinary Boot Camp videos from Chef Jacob Burton's channel

Like I said, baking/cooking is a stress reliever. I go through cycles of liking either baking or cooking, one more than the other. Winter seems to bring out my inner baker chick.  I don't like complicated baking challenges. You won't ever see me doing anything that involves preparing more than one dough or pastry for a finished product. I will never, ever qualify for The Great British Bakeoff. I like simple things that I can share with family or neighbors.

how satisfying is that?

There is nothing more simple in the baking world than bread, right? Well, I was always kind of terrified of making bread. A couple of years ago, I found a recipe from the Big Family Homestead channel and I made their recipe for Amish Sweet Bread. It was fun and easy and made the apartment smell fabulous. This is the recipe and it's actually called just "Amish White Bread". My bad. They actually have a good playlist of recipes very worth checking out.

I have talked about making Japanese Milk Bread for the longest. I just never felt comfortable with the recipes I found. Welp, Savor Easy has me covered. Theirs doesn't look the exact same as other recipes I've watched, but I think it will be good enough for me. I learned a while back that the secret to softer bread is to add a water roux. Say what??? 

The Water Roux Method

aka 

Tangzhong

Apparently this "water roux" is a bread starter known as Tangzhong and is what makes Hokkaido Milk Bread so yummy soft.


look how soft & fluffy...

The roux is a simple bread flour and water mix that is cooked to thickening. The tricky part is knowing ratios and when to add it. Here is a video I found that best explains the procedure and answers basic questions:


Her instructions are great but I still had questions, like what about how much to add to various recipe amounts? Thankfully, commenters had answers. This one is the most helpful of all:

"The Tangzhong roux should use 5% of the original recipe flour amount, by weight. The amount of water used should be 5 times the weight of the flour used in the Tanzhong roux. The water amount used in the Tanzhong roux should be taken from the original amount of water in the recipe. You are not adding an extra amount of water or flour to the recipe, just using some of the original ingredient amounts in a different way."

The same commenter also had this to say:

"I make the roux in a microwave. Use a pyrex cup. My microwave is 1100 watts. With room temperature water, 25 gm flour and 125 gm water I microwave for 20 seconds. Stir will with whisk. Take temp. Microwave 10 more seconds. Stir, take temp. Microwave a final 5 seconds. Stir and take temp. The roux is at about 65 C / 150 F. This is enough for a 450 gm / 1 lb loaf of bread. Cool to below 55 C / 130 F and add to bread maker."

Note: you can find conversions by asking Google or here is one site with chartsHere is a graphic. Also, here is a calculator site, if you don't mind accepting the cookies. Ironically.

The only answer I couldn't find anywhere is to the question of when to add the roux. I have decided that, since the roux can be stored for later use, I can add it to a dough before I prep it for the first proofing. I dunno. I will try it that way. As soon as I get back into the swing of things, I will be getting my Tang-zhong. Get it?

If any of you have used or plan to use the Tangzhong method, let me know how your bread turns out.

Peace

--Free