Translate this blog....

Thursday, February 18, 2021

I Tried African Threading on My Natural Hair (Part 1)

 African threading is probably the most ingenious hair care technique known. And I am mad that I hadn't heard about it before a couple of weeks ago. I don't usually shout about it but some cultures just never get the credit they deserve.

Why is this not a bigger deal? I don't know. But let's talk about the genius of hair threading. First, some background. I tried to find some older resources but apparently, the threading trend wasn't hot online before 2010 (if my search results can be trusted).

This is what I did find and like, so I am sharing:

This video tutorial is the best one I have seen for learning how to do threading. (And, for some reason, I now think I might have seen this at some point in the past.)

Currently, there are a lot of videos and articles about threading - some that have been out long enough that I should have noticed before now. I have learned a lot about how to do it but the information sometimes conflicts on what threading material to use (yarn, rubberized thread, metal thread, etc.) or techniques for the ends (tuck and wrap or leave loose, etc.).  I like the idea of tucking the ends and was wrapping but it was tricky for me to do with yarn. I could do it with the rubber thread but... well, more on that in a moment.

I used that video tutorial (above) and some of the one in that linked history & tutorial  for general guides. However, I did end up trying different threading materials. The first was rubberized thread and did not work well with my very shea-moisturized hair! Here is my process for the 1st and 2nd attempts.


The Supplies I Used


Trying this for the first time & 
got it cheaper at Sally's


Okay Smooth All Natural,100% Pure
Unrefined Daily Skin Moisturizer

And for my scalp, my favorite JBCO
 (until I find something better-priced!)

"Bead String Rubber
Stretchy String Elastic String"


This is what my hair looked like (unstretched) before I did my first (successful) yarn-threading. It has been washed, deep-conditioned, sealed and moisturized.


This is what my first (and failed) attempt with the rubberized thread looked like:

No Bueno! Unh uh!
(but the ends are tucked)


I could not get my threading started closer to the root. Again, I think it's because my fingers were too slick with shea.
 
I removed the rubber thread the very next day, re-washed and conditioned my hair, and started over. This time I went with acrylic yarn. This is cheaper and much MUCH easier for me to use as an inexperienced threader.


This also took less time because I wasn't struggling (unsuccessfully) to keep the threading near the root.  
I did trim the yarn afterward

"Kizzy! Kizzy!!"

I think I did an okay job, I will need to learn to keep the gaps smaller and to get closer to the ends of the hair. The toughest thing will be learning to end up with something stylish enough to wear uncovered. In the meantime, I am wearing scarves. I usually wear these neck-gaiter-type scarves just because they are  a cute (and lazy) way to keep my head warm in the winter.


I can't wait to get through the next several days (5 or 7 is what I am shooting for) so that I can re-thread and see if I do a better job. I am pleased though. The one thing I worry about is that I used too much shea butter. It was literally oozing from between the threads when I finished wrapping my hair. I think it will dry down some though from being threaded and being tucked into a scarf. Plus, it is super arid here in the winter so...

By the way, the threading is not uncomfortable to sleep on. I sleep with the scarf on so that I can secure the threading in a suitable arrangement for laying on. 

I will do a Part 2 when I take down and re-thread my hair in - well, however many days I can last!

Peace
--Free


FYI: I linked to the gaiter scarves I use just because I love them so much. I don't get any compensation or affiliate credit. I bought them last year when they were about 10 bucks and, after many washing and almost daily wear, they are like new. I want to get more but I see the price has gone up. The price depends on the color/pattern you choose; I got the Dark Grey set of 6.

Friday, February 12, 2021

**RECIPES** Drinking Chia Seeds (without gagging)

**UPDATE**

I have CKD stage 3b and have learned that I have to watch my intake of chia seeds. 

Before you ever try something new in your diet, make sure to talk to your medical care team.


 Chia seeds are a great source of fiber, highly nutritious, high in antioxidants, a good source of protein, and omega 3. 

You can get a nice fix of seeds by mixing them into food, cereals, and baked goods.

Or - and this is the quickest way to ingest them - you can drink them. People make chia water or add chia to their juices. 

Personally, I have a slight aversion to the texture of soaked chia seeds. I can deal better with them in a juice because it reminds me of drinking aloe juice with the pulp. Otherwise, I just feel like I'm drinking globulets of something. Ick.

So here is what I came up with and want to share with anyone interested. I dump the chia (about 2 tablespoons twice a day) into about 8 ounces of water and drink it down before the seeds plump. 

Of course, I do have to swish some follow-up water to rinse away any residual seeds from my mouth and teeth but I don't mind. 

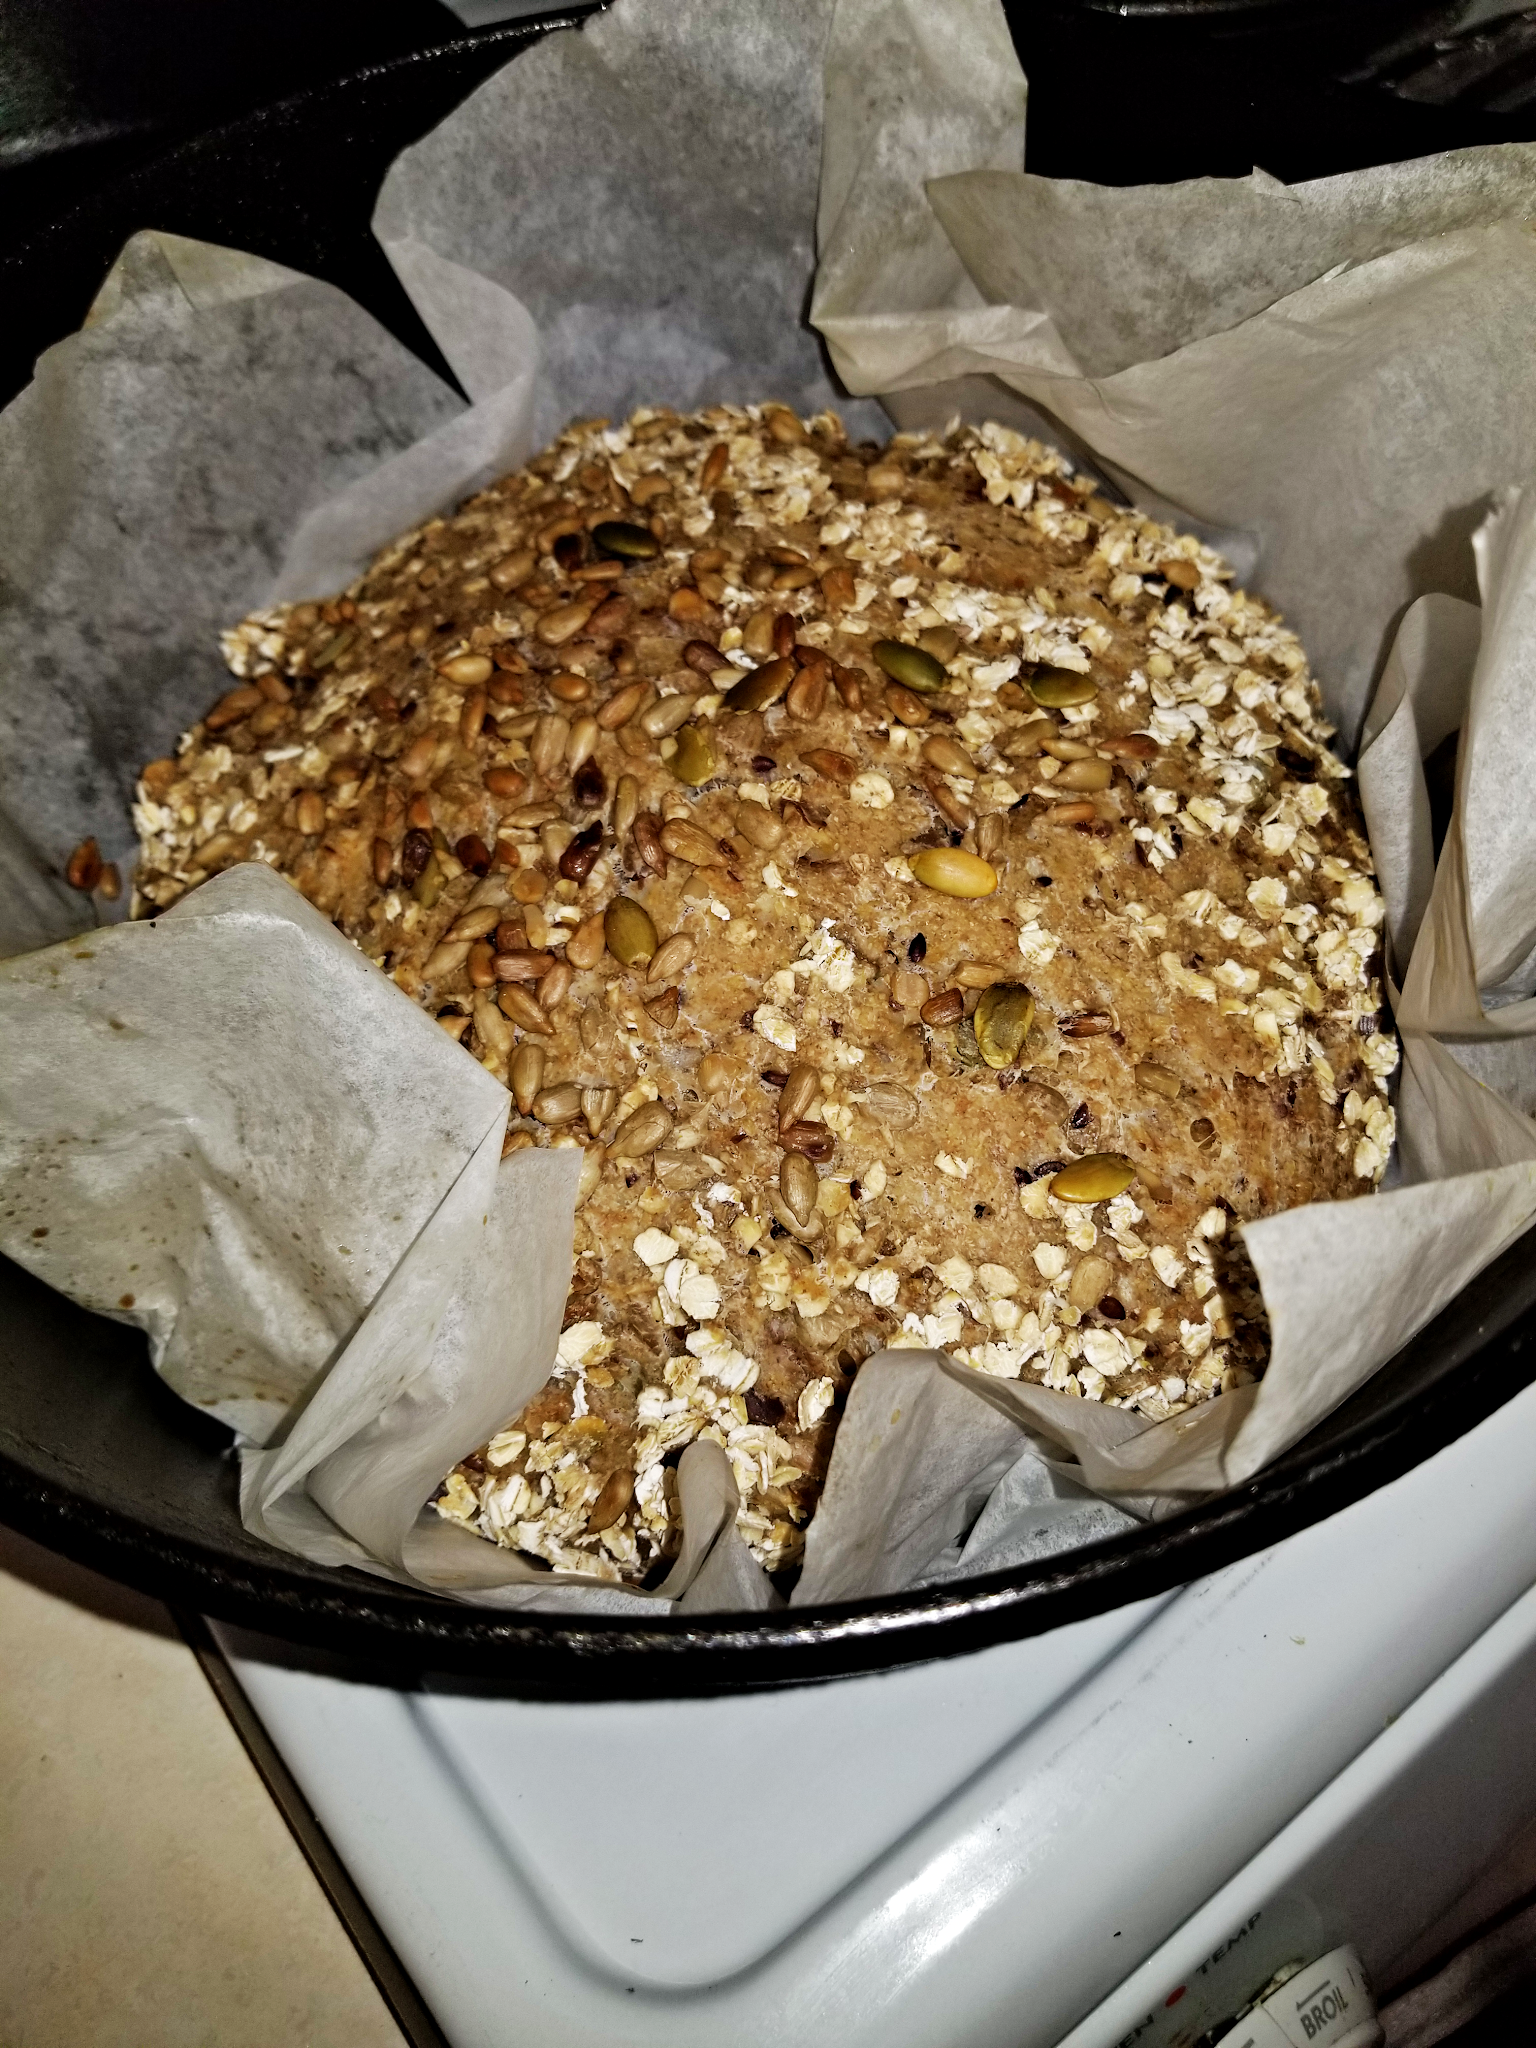
Because I'm not crazy about wet seeds, I bake them into this cookie recipe. (My alterations below the recipe.)

Apologies to Allrecipes but showing an image was easier than typing out the recipe because my brain is on off-mode today.

Source Link 
Allrecipes.com

My alterations & notes:

  • I omit the raisins so my cookies are flatter. Adding an extra tablespoon or so bulks them up or you can add more oats.
  • I omit the coconut flakes and double up on the seeds. I go overboard with chia, flax and sunflower. I also add about 2 tablespoons of ground flax.
  • I once cut back slightly on the dry sugars. Instead of 1 cup each, I did about 3/4 cup each. And...
  • I once substituted half the brown sugar with a golden monk fruit sweetener. This is the one time that I couldn't tell a huge difference in substituted sweetener.
  • I once used 1 2/4 cup brown sugar (half light/half dark) and 2/4 cup white sugar for a total of 2 cups of sugar in the recipe. This was good but I really had to watch the bake time!
  • As with any recipe, don't let the butter get too soft for creaming. I did this once and my cookies literally melted and stuck to the parchment. I couldn't even scrape them off and ended up wasting all those precious ingredients...
  • I tried adding a tablespoon of blackstrap molasses once and this gave the cookies a darker bake and a slightly sweeter texture. Watch your bake though, the extra sweetness can shorten the time in the oven.
  • This recipe can take a LOT of chia seeds. They are small enough that they don't over-bulk the dough.
This recipe is pretty forgiving and I've found you can play with a lot of the ingredients as long as your basic dry ingredients remain about the same.

The chia seeds kind of pop when you bite them


That's just one way to get a lot of chia seeds (and make your sweet tooth happy) but if you want to keep it healthier, stick to the waters. 


I do my first hit of chia water in the morning before I eat or drink anything else. I take another hit at night before bed (or earlier if I want to curb snack cravings). 

Knocking back the seeds this way is so much easier for me than dealing with wet clumps of them.

NOTE: I didn't find this out until I was prepping for this post. Apparently, if you have renal issues... 

oh, me, me!

:-(

...you should read up about ingesting lots of chia. Sucks for me. I will be checking with my docs since I am just borderline because of the sarcoidosis...

Peace

--Free

Sunday, February 07, 2021

Facebook Is Not My Family nor Is It My Friend

 Family, friends, all loved ones:

Please stop limiting your important announcements to Facebook posts.

I don't live and die by Facebook. I can go DAYS without opening Facebook.

I don't want to miss out on knowing when someone in my family needs prayer or some other support just BECAUSE I DON'T WORSHIP FACEBOOK.

People, stop. 

The first time I knew Facebook was going to be a problem was a few years ago, I couldn't locate an obituary for a friend. I searched the local papers and found nothing. Turns out, the only obituary of any substance was on Facebook. 

That should not be a thing.

So, stop. Please. 

If you have something important that a friend or family member or other loved one should be aware of, don't assume that Facebook is the center of their universe. 

Living our lives online is a big part of the reason for many of our current problems.

Want to get a broad idea of what's happening in the world? You might have to check several sources and then use your critical thinking skills to process the information but, trust me, you can do it. Pick up your newspaper. Pick up more than one newspaper. Don't depend on the Facebook algorithms to supply your daily dose of world news and information.   


Want to keep up on your friends - you know, the people you actually know and have seen without a filter? Then pick up your phone every now and then for more than checking your online social media. Remember, you had a social circle before you relegated everything to Facebook and Instagram and all the other Like-me-notice-me networks.

Want to keep some part of your humanity that isn't controlled by AI or some billionaire selling your life away for their profits? Maybe put down your phone and try practicing making eye contact, heart contact, life contact, actual contact with the living and breathing, and God-created people in your life.

Want to feel better about yourself? About your own daily blessings? About the way you look and feel and live? You know - the home you have, the kids you have, the spouse you have, the possessions you have, the clothes you wear, the way your life is? PUT DOWN THE DAMN PHONE.

Is it great to have some of the benefits of social media? Absolutely. It is until it's not.

It is when:

  • You can find and share resources that help you live and learn better.
  • You can help society in general with solutions to problems.
  • You can teach yourself and your child about things that help enrich your lives.
It is not when:
  • You can't tell what is real or not about -
    • basic news and information
    • people who may or may not be your friend (or enemy)
    • what ordinary human beings look like as children, teens, adults, and seniors
    • normal expectations for normal daily living in a society
  • You are indoctrinated to indulge in every one of the deadly sins. 

  • You find yourself coveting how other people look, live, eat, vacation, and couple-up or (Lord help me) 'un-couple'.
  • You are so busy watching other people live their lives (or what they portray) to live your own with any semblance of natural joy.
  • You can't engage in any kind of conversational debate without using social media as your (unchecked) fact source.
  • You always come in on the middle of potentially serious issues without getting a more well-rounded idea (see the 1619 debate; QAnon; Black Lives (or Blue lives or All lives) Matter; and on and on and on.)
And I really could go on and on but I will just stop by pointing back to the Boiling Frog Syndrome. Some of us are old enough to remember life without cellphones. For those that do, remember how you could remember important phone numbers - or at least your own? We don't have to anymore - until we do. Don't lose that phone and have to use someone's landline...

Every advancement - or let's more accurately say "progression" - in technology, we gain something and we lose something. 


Reaching way back, we learned to better record and store information and we lost oral history traditions. That's neither all bad nor all good. We did lose the necessity to communicate in some ways. (Does anyone remember their family griots? Ours was my mother and aunts and uncles.)

Closer in time, we gained access to a wide wealth of information and learning (via the internet and other media technology), yet many of us don't take advantage. There is less of a restriction on educational resources (in developed and able societies) but is there? I don't have numbers but I would be interested to see them for comparisons of some things. Wonder what the average daily engagement is among certain age groups for Facebook or Instagram or TikTok for, say, Wikipedia or Khan Academy? (And did y'all know that there is such a thing as Wikiversity?) 

I often wonder how many people actually read the entire articles in the links they so quickly share on Twitter? I personally know that I will get more interaction from people online if I share a link to something about a singer, actor, or reality TV personality than if I link to some educational resources. I have numbers from this very blog on the engagement made with certain posts. Trust me, people are not really running the numbers up on the posts I did listing links to autodidact resources... Don't believe me? Here is what my Most Viewed Stats show as of today:

Not one education resource shown


The Number 1 post is a silly one I did poking fun of people being less than adult-like in their behaviors. That has been in the top spot from about a month after it first posted. It's not even that well-written. All the other spots are taken by product review posts. We want to laugh and be beautiful more than we want to learn something, I guess.

(By the way, if you are interested,
you can use the Search at the top left
of the blog to look up "educational" 
for those resources.)

I say all this just to remind everyone: Make the internet and social media work for you and not the other way round. Let it be nutrition to your life and not just empty calories. (Yeah, corny, but you know what I mean.)

Peace

--Free


P.S.: I just re-read this and I am very pleased if I say so myself. I am not usually able to put out anything as coherent as this post. My brain was feeling great today and I was so motivated. Maybe I should get this mad more often and see if it helps alleviate my sarc symptoms. 


Tuesday, January 26, 2021

**REVIEW** Sweet Almond Oil

 Of all the many, many oils I have used over the years, I never got around to trying sweet almond oil. I have no idea how I missed this one. Now that I have tried it... Wow. It's up there with my favorites like Marula and pumpkin seed. I would have to say that it beats both of those as a treatment for the face. Pumpkin can be too thick and "heavy"; Marula is better, in my opinion, for the hair. Plus, good quality Marula tends to be pricy.

This is the brand of sweet almond that I am trying:


There are, of course, several brands but I chose this one for the positive reviews and cheap price - under $3 for the 4-ounce bottle. It really does only take a few drops to treat my face and neck. If I decide to try it on my hair (as a post-wash sealer/moisturizer), I will be getting a much larger bottle.


I am raving about this over other oils (to use on the face) because of the way it soaks into the skin. There is very little residue detectable and almost zero added shine. How great is it that this relieves my dry facial skin without making me look all greasy?

Another positive: one ingredient and only one.


There are probably a million benefits listed online but I will skip those. What I love about this - in addition to the above-mentioned things - is how soft it makes my skin feel. I will probably use this as my "wake-up" oil. In the winter, the first thing in the morning, I have to pat my dried-out skin with a bit of water from my bedside water bottle. If I don't, it almost hurts to yawn. Seriously. Actually, I sometimes even hydrate my face on my nighttime jogs to the bathroom. 

The summer weather here is much more humid and awesome for the skin. Winter though is incredibly parching. 

This stuff is pretty much a friend to my entire face and neck. I have already put some in a little tube for use on my lips.


Anyway, I wanted to share a short take on this oil. It's going to be my best friend first thing in the morning and last thing at night. If I ever try another brand (doubtful), I will come back and compare.

Peace

--Free

**UPDATING LINKS** Archaeology, History, and People from the Bible

 This will be a post that I update on a semi-regular basis. It's going to be a list of links to articles and information. Everything here will relate in some way to people from the Bible in archeology and secular history. Please enjoy.

Perhaps you should bookmark this page so that you can come back and check for updates.

Peace
--Free

Friday, January 22, 2021

**REVIEW** Tangle Teezer Thick & Curly Detangling Hairbrush

 Listen. If you have kinky-curly-nappy-knotty-whatever hair, you need this in your life. 


I have tried a Denman brush, a flexible vent brush, and a couple other brushes to help with tangling and snagging. The Denman brush works better for smoothing in some curls and waves. The vent brush is what I have been using for detangling and, until now, it was my favorite. Until now.

This Tangle Teezer surprised the crap out of me. For one thing, I almost canceled the order right after I bought it. I thought about the price ($12+ with tax), for something that looked so small, then I saw that it wasn't due to be delivered until the 2nd week of February (I ordered it on January 18th and I am not a patient woman). While I was putting in the cancellation, I got the notice that the item had shipped. Okay. So I decided that I could also return it if I was disappointed.

The Teezer turned out not to be as small as it seemed from the Amazon photos. It's just about the size of my computer mouse and is even shaped to be palmed just like the mouse. It's more comfortable to hold than brushes with handles. The shape also helps in how you use the brush to detangle from ends to root.

Now, back to where I started this post...

I have some of the kinkiest, knottiest, 4C hair that there is. It's great when it's been moisturized and styled but, chile, right after washing, this stuff is a job. In other words, I usually have to fight to get to the point of not ripping out at least some of my hair on wash day. Or any day when my hair is dried out. Wash days can be a nightmare. I am not ashamed to admit that I have put off washing my hair for a day or two just because I could not deal with the detangling struggles. Ugh!

But not with the Teezer.

I am shocked that this works so well because the bristles seem a bit fragile when I run my fingers across them. They are not silicone-soft but they are not stiff and unyielding. Yet, they manage to just sort of glide through the kinks and knots in my hair. I brushed my hair tonight before doing a co-wash. Then I brushed it after I washed it so that I could put up my twists. This is what the brush looks like.


This is what my vent brush looks like after I used it (pre-wash) to brush through one small section of hair. I wanted something to compare.


SO, yeah, I'm only mad that I never heard of this Tangle Teezer before. As soon as I realized how good it was at detangling, I went ahead and lightly trimmed my ends tonight. I want to see how good my hair looks without so much breakage in a couple of months.

There are some good videos online of ladies using the Tangle Teezer. I have one warning: Be very careful that you get the right Teezer for your type of hair. I read one review where a 4C chick was disappointed because she got the Teezer for a thinner, straighter type of hair. Now, excuse me, while I go tie up my twists for the night. I can wait to use this Teezer again.

Peace

--Free

Tuesday, January 12, 2021

**REVIEW** Hamilton Beach 2 Lb Digital Bread Maker

 As mentioned in a prior post, here is my review of the breadmaker that I got for Christmas.


The machine, the bread pan and
2 kneading paddles

You can see the controls beside the LED
and 12 usage options along the 
top left side

I chose this one after looking at a bunch of others because:

  • The features, especially being programmable and being able to make a variety of items.
  • The price was reasonable & I didn't want or need the fanciest, priciest machine from my family.
  • Things mentioned in less-than-glowing reviews didn't really put me off.
  • It looked easy to clean.
Now that I have the machine and have used it, I'm really pleased with my choice. I can add these to the positives:
  • Incredibly easy to use. I was sweating and stressing but as soon as I started, it was a snap.
  • Even though it's quite large and my kitchen is small, I have found a counter for leaving it out on and a space for storing it away. And, believe, me, my kitchen is almost too small to cuss a cat in.
  • It's very quiet. I have one annoying and noisy neighbor who I always complain about. I didn't want a machine that made me look bad. I can use this thing at night and it wouldn't wake anyone in the apartment.
There are some things I wish were better, but they don't ruin my experience. These include:
  • The LED display doesn't show where in the breadmaking cycle the machine is at. I have to pay attention to the alerting beeps if I want to add seeds/nuts or remove the prepared dough for baking in the oven. (I sometimes want a loaf made in the cast iron or fixed into a particular shape.) I also like to remove the bread after the last kneading so that I can remove the paddle. That way, I don't end up with that hold at the bottom of my finished bread.
  • Since my recipes include a lot of seed/nuts and mixed flours, I do have to open the machine sometimes. I do this to see if I need to scrape down the ingredients. For my thinner doughs, I have not had to do this.
  • Hamilton Beach does not have one of the silicone-scraper kneading paddles. As a matter or fact, there are no accessories for this machine as far as I know.
Not much to complain about there. Also, the beeping is fairly loud so I can listen for when to add things or remove the paddle.

As I said, this is a pretty quiet machine. Here is what it sounds like (and you can see that I am standing right above it filming):


Basically, I can run this machine in the kitchen and just barely hear it from the bedroom about 12 feet away with the door open. Tiny apartment living can be challenging so this is a Plus.

Here is one of my first loaves of bread because I ate the 2nd loaf without getting photos!


Whole wheat & white flour; turmeric, chia seeds, sunflower seeds, 
and flax (seed and ground).

My play on an Ezekiel Bread type of loaf. With a twist!


I got the basic recipe online. and added the turmeric.

 Now that I have gotten comfortable, I will be modifying all recipes with nuts, ancient grain flours, and as much healthy stuff as I can think of. I don't want to live by bread alone, but I want to enjoy every piece of bread I eat.

I have not even thought about how to use all of the functions yet but here are the choices:


Glad the option is there but I 
won't be using the gluten-free...


The Basic cycle is what I used to make my first loaves of bread. I plan to try doing a Brioche-style loaf soon though. But the thing I am most excited about is that Jam setting. 

I first thought that the Jam setting is the one I would never use (I mean, after the Gluten-free option), but I have watched videos showing how easy it is to make jam in these things. Of all the methods I watched, the easiest recipe was this one:
  • Fruit (fresh or frozen but I am going to use unsweetened canned pineapple)
  • Sugar (anywhere from 1 to 4 cups. Apparently, sugar thickens the outcome if you aren't using pectin)
  • Lemon juice. 
I have seen some recipe videos where people acted pectin to thicken the jam. Since I plan to make very small batches, and I don't want a lot of sugar, I will use either no pectin or a sugar-free version. Also, I am cutting way back on sugar - which is why I'll use pectin at all. This lady here had the most no-nonsense recipe for beginners, in my opinion.

One of the best marmalades I ever had was one I found back home in Anchorage. It was a pineapple-orange marmalade that I've never found yet in Iowa stores. 

Oh, and this machine makes both jam and jelly...

Thanks to Spruce Eats, I understand the differences between jam, jelly, and marmalade:


The more you know...

So that's is all about this amazing bread machine.

The price has been swinging all over the place for the past year. I started looking at this one about 6 months ago when the price seemed to hover between 80 to 90 dollars. When I sent my family the link, the price was around 90 bucks.  I almost changed my mind and when I made the final decision, the price was down to 80 and some change. Not bad, right? Well, when I just now went over to grab the link for this post, the price was sitting at 70 dollars. Crazy.

Still, it is worth what it cost. If I was able to buy it for myself, I would not have been mad about paying $100. If you have priced Ezekiel Bread (or any other good quality bread) lately, you will see how fast the machine pays for itself. And with the jam? Shut UP!

Next time, I will be reviewing the Stand Mixer that was my second gift.

Peace
--Free

Thursday, January 07, 2021

Christmas Gifts & Better Nutrition

NOTE: Soon, I will be posting reviews

 of each of the appliances mentioned here.


Guess what I did? I thought I had posted about my Christmas gifts from my family and... The unfinished draft is still sitting on my blog list.

Well, here goes.

For Christmas, I got a stand mixer and a bread machine. Every year, my family asks what I want and I wanted a bread machine. They encouraged me to think of a second item so I asked for a stand mixer.

This is the stand mixer:


This is the bread machine:


I am in love with both of these appliances! I had not used a bread machine since my sister had one years ago. We only ever used ready-to-use bread mixes and I think we gave up buying them because of the prices. The bread wasn't even that good, come to think of it. Well, we have come a long way.

My stand mixer is perfect for my tiny kitchen. When I'm not using it, it fits right on top of the fridge next to the Instant Pot. I had to clean out a cabinet to store the bread machine!

Anyway, I made my first bread today and it came out so much better than I expected. It was slightly salty but that was from using the Food.com recipe. My instincts were to cut down on the salt and add some honey or brown sugar. Since this was my very first loaf, I didn't mess with the recipe, but now I am more confident. King Arthur Flour had a much better-sounding recipe but I wanted to try the simpler one. Bad decision. If you try it, I suggest cutting back on the salt and adding some honey. The bread I made works only because I have some honey butter made up to use on it.


Whole wheat flour/White bread flour mix with chia, sunflower & flax seeds;
turmeric powder and oatmeal

I was using the stand mixer from Day One. I mixed up a from-scratch cake and some frosting. Not very healthy, right? Well, for my next creation, I am going to attempt to make these whole wheat cookies - or rather sables. I will substitute the hemp hearts (which I don't have) for sunflower, chia, and flax seeds. 

My goal is to eventually make both some bread and cookies with some "ancient grains" added in. But I will save some of those ideas as I get money for ingredients.

By the way, for anyone who has considered getting either of these appliances but wanted more detail, go and read every review you can. My family basically let me pick out the ones I wanted and I sifted through a lot of info and reviews. The one thing I didn't find for either was how loud they run. 

The bread machine sounds like a very, very quiet washing machine and only makes noise when kneading. The beeping to signal ending and beginning of cycles was not very loud. I can run the kneading cycle at night and not disturb anyone sleeping 10 feet away in the bedroom with an open door.


The mixer is slightly louder but not annoying at all. I would only run it during the day though. It's not that it's really loud, but it's a more constant whirring than the bread mixer.


I will say that the only thing I wish for the bread machine is that the LED indicated which part of the cycle is currently happening. It's seriously easy to set the machine for bread type/crust shade/start but when I would check to see which kneading or proofing cycle it was on (1st, 2nd, or 3rd) so that I could remove the bread paddle before the last proof start. Other than that, it's perfect.

By the way, the helpful tips listed in the notes to this video are awesome. This is where I learned about removing the paddle so as not to have a hole in my finished bread! Big thanks to that channel.

So, while I hate making resolutions for the start of a year, I can say that I will be saving money and eating better. I whipped up my own version (kind of) of Ezekiel bread for about 40 cents (I'm guestimating here). And I do plan to learn more about ancient grains.

To my family, I want to say again how much I love that they love me!

Peace

--Free


Wednesday, January 06, 2021

Nutrition Confusion

 Just wanted to post this in case someone can enlighten me.

I have 2 different brands of Pinto Beans. The cheaper, local store brand beans have a much higher fiber content and are darker in color. They also seem just a bit smaller. The other brand I got from Walmart has less fiber and are lighter in color.

Once I noticed the fiber, I looked closer and saw the there are wild differences in fat, sodium, calcium, and potassium. There are smaller differences in some of the other listings.

1/4 cup serving size for both

The color difference is seriously obvious

I did read somewhere a while back that darker beans are "older". Still, I couldn't find anything on the nutritional differences. I have put out feelers on Reddit.

If anyone can clear this up for me, please do. It's times like this when I really miss Google Plus. There were such helpful people in the communities there. Facebook is more... ya know, self-centered.


Peace

--Free

Tuesday, January 05, 2021

Thursday, December 24, 2020

Part One - Beans, Beans, and More Beans (and some recipes)

 In all my talk about upping my daily fiber intake, I think I've only really mentioned bread. Every eating regime needs variety and it's literally true that man cannot live by bread alone. Or, at least, this woman can't.

(Speaking of bread, though: I anxiously await my bread machine (thanks, oh family of mine!) and cannot wait to start exploring recipes.)

As I try moving more toward a 90/10 plant-based regimen, I am trying different beans. I really do love beans but have limited myself to pinto and navy beans for the most part. I don't like dry-tasting beans and I can live without black-eyed peas. Thankfully, there are a lot of varieties of beans to try. 

The first "new" beans I tried were the black beans from Faraon. (I read lots of info about the benefits of black beans.)When I soaked these overnight (as I tend to do with all my beans), I was shocked at the deep purple/black of the water. I wondered if I had gotten sham beans that had been dyed to indicated a healthier color! Nope. That is common for these beans. For as much of the color that washed off in the soak, there was still a deep black color to the soup that cooked off the beans. The color actually adds to the appeal. It's certainly not boring.

Here is the nutritional label on the Faraon Beans I got from Amazon.


Here is the recipe for the way I cooked the beans (pretty much the same as I cook pinto beans):

BLACK BEANS

  1. Soak beans overnight (at least 10 hours) in cold water (in the fridge)
  2. Drain the water, put the beans in a pot with fresh water (at least 3 inches above the beans).
  3. Do NOT add salt or salty seasonings until beans have cooked at least an hour or almost finished cooking. Apparently, adding salt slows the softening of the beans.
  4. Let the beans boil for a few minutes, then turn them down to just a strong simmer, checking every half an hour. (NOTE: I keep a second, smaller pot of water heated on low to add to the beans if they start drying out.)
  5. Once the beans are on simmer, add a little bit of olive oil (I add about a teaspoon for every dry cup I'm cooking) and add onions and garlic pieces.  Some people use different seasonings like bay leaves, thyme, etc.
  6. Check the water level and texture of the beans about every 30 minutes. Add the other hot water as needed. Don't add too much at a time; you don't want the finished beans to be too watery. They will take anywhere from 2 hours to 2 1/2 hours to cook. (The longer they have been pre-soaked, the sooner they will finish cooking.) 
  7. Don't forget to add any salty seasonings when they are near finished.


Black beans with onion & garlic


(The next time I make them, I will add the things I use in my pinto beans: diced, stewed tomatoes, a little tomato paste, and on some occasions, ground beef that's been cooked and seasonings.)

The taste of the black beans is so nice. They have the creamy tasted I read about when looking up information. Creamy and smooth. I was able to eat these beans with cornbread just the same as I do with pinto beans. Yummy and extremely filling. I can see why people like eating these beans with rice, but I don't want to add any more starch to my diet if I can help it.

Here's my basic cornbread recipe as remembered from how my mom used to make it:

BASIC CORNBREAD

  1. Using a cast-iron or oven-safe skillet or baking pan (I use a 9.5-inch cast iron skillet), add a tablespoon of butter to the skillet or pan. Either use melted butter or let it melt by sitting the pan on a low-heat stove. Heat stove to 450 degrees.
  2. In a bowl, mix the dry ingredients:
    1. 1 1/2 cup of yellow cornmeal
    2. 1 cup all-purpose flour
    3. 2 tsp of baking powder
    4. 1 tsp table salt
    5. 1 1/2 Tbl of sugar
  3. Add to the dry ingredients and just mix enough to combine everything (I like to mix cornbread with a wooden spoon):
    1. 1 cup of milk (I use whole milk) 
    2. A lightly beaten egg
    3. 1/4 cup of oil (I use vegetable or canola)
  4. Pour the batter into the center of the skillet, then using a spoon, scoop some of the butter from the sides onto the center of the batter.
  5. Depending on the size and depth of the pan, bake from 15 to 25 minutes, until a toothpick comes out of the center cleanly. Edges might be very brown.

Oven-baked cornbread in 
a cast-iron skillet

By the way, this odd-looking thing on the pot of beans is one of those "spill-stopper" lids


PureGenius boil-over 
spill-stopper lid

Even though I had low expectations, I have to say that I am thrilled with the way this one works. It really did save me from a nasty spill-over when I got yakking on the phone and forgot to check the beans. Thanks to the contrast of colors on the lid, you can easily see the black of the bean juice.

Next time, I will talk about the small red beans and pink beans. I have no idea what to expect from the pink beans!

Peace

--Free

Tuesday, December 08, 2020

Not All Fiber Works The Same

 Okay. This is going to get a little bit personal. Today, I am going to be talking about my fiber regimen. Not too personal but... real personal.

I told you recently about my need to change up my daily nutritional habits. My kidneys are being crazy and my energy is dropping more than usual. I have been advised to seriously up my fiber intake, lower my intake of preservatives, and drink SO much more water. I feel like I am participating in a water challenge with fiber thrown in for extra credit.


Before now, if I needed it, I would take an OTC stool softener - Dulcalax was my go-to - and that always worked. Eventually. I remember once taking one Dulcalax every eight hours for a couple of days with no result. Until there were results. Results of sudden and horrific proportions.  After that, I stuck to things like Benefiber and it's generic siblings and Psyllium supplements. Same result: they don't work until they suddenly do work too well. Or not, depending.

The past few days, I have been taking in nothing but vegetables (mostly tomato, avocado, onion, cabbage), water, and bread. Not just any bread though but only the most fiber-filled and nutritious kind. I've eaten whole-grain bread, seeded bread, sprouted grain, and sprouted seed bread. I even went near bankruptcy to buy a loaf of the famous Ezekiel bread. 

Here's the thing: not all fiber works the same. The stool softeners and the manufactured fiber supplements work slow and unpredictably. The fiber in the bread and the fiber in the vegetables... That is swift justice. Swift but not brutal.

Without going into more detail than necessary, I will just say that I can highly recommend the fiber found in food over the supplements and manufactured types. Results are more predictable and comfortable. And regular. Very regular.

Also, I feel better. My belly is a lot less bloated so my clothes fit better. I don't have that constant feeling of slight discomfort. My energy is not up as much as I would like but I think that might take more time.

I have learned that with taking in so much natural fiber, the real trick to results and comfort is to drink the water. Lots of water. It's as if the fiber is the wind-up and the water is the pitch. (Look at me talking in baseball lingo!)

Another benefit is that I am not eating as much food. I know that this is Fiber 101 because fiber is more filling than most other nutrients. Eating less means buying fewer groceries, That's awesome because I can only afford one loaf of Ezekiel bread every 3rd quarter of the fiscal year...

Do you know how thankful I am that my family is the best ever? They are getting me a bread machine for Christmas. The makers of Ezekiel bread (and Dave's Killer Bread) will not be seeing any more of my collected pennies once I get that machine. I love their concept and backstories (especially for Dave's), but I leave it to Gwen Paltrow and Oprah and friends to pick up the tab. I really don't see enough difference between Ezekiel Bread and some other choices to warrant spending all that extra moolah.

By the way, the Ezekiel bread is not bad but it's not as tasty (in my opinion) as some of the other grain bread. It's free of preservatives, which is a good thing, but that shortens the shelf-life. Also, I found it to be very dry. I can only eat it in nibbles or else I have to toast it. I keep it in the freezer and thaw it one piece at a time. I have to protect that investment.

I told you previously that I have found an affordable supplier of grains and seeds. I already found yeast in larger quantities so I think I can keep up this high fiber situation without going broke.

For anyone else looking for decent quality and nutritious bread, I can say (speaking with no credentials other than my taste buds and ability to read a label) that Aldi's Seedtastic and Ancient Grains breads are amazingly tasty.  They aren't cheap-cheap (around $3.25 to 3.85 a loaf, depending on the type), but they are so good


Ezekiel Bread
Ingredients

Again, I am no expert, so take everything I say the way you would an article in the Daily Mail. Do your own research. I have been checking info from papers/articles by dieticians and nutritionists (you know- doing my search-learning) and, so far, I think there are some rules of thumb to go by and some things I have learned:

  • High fiber is best with proper water intake. I wonder if it isn't even troublesome to not drink enough water if you are doing a high-fiber diet.
  • When choosing bread and cereals, etc, look for "sprouted" seeds and grains. I can't remember why this is even though I looked it up.
  • Avoiding preservatives as much as possible is great.
  • The first high-fiber day I had killed my cravings for "junk".
  • I have been eating at a different pace (see below) than before doing high-fiber.
A typical day's meals for me prior to this was something like this:
  • breakfast of coffee with creamer, white toasted bread with butter and jam.
  • lunch of white bread (or Brioche, or thick Italian loaf) sandwich of chicken patty or deli turkey and something sweet like a honey bun
  • snacks of honey bun, vanilla brioche loaf (Aldi's has the best), or some other sweet treat
  • dinner or vegetables (maybe), fish or chicken of, if I'm lazy or tired, another sandwich.
  • evening snack(s) PB&J sandwich or a bun or sweet bread and some hot tea with sweetened creamer.
A typical day recently:
  • breakfast of coffee & creamer, toasted bread (seeded, sprouted or something like that) either dry or with butter
  • lunch of sandwich of avocado, tomato, sweet onion, and maybe mini sweet peppers on seeded bread with mayo.
  • snack of bread, toasted or not, buttered or not.
  • dinner or baked fish or chicken with a side or avocado, tomatoes,onions seasoned with sweet and mild rice vinegar or just salt and pepper, a piece of bread - and you know what kind.
  • evening snack of a banana or a couple of dates or a piece of bread (toasted or raw, buttered or not).
I am planning to make small batches of honey butter* to put on my bread (as a snack). I have not yet made the trendy "avocado toast" and I refuse to. 

It will be fun to do an update on how I feel after a longer period of eating fiber-filled foods on a regular basis. I promise, but right now, I have to go to the Ladies Room...

Peace
--Free

Thursday, December 03, 2020

**REVIEW** Cute Contact Lens Carry Cases

This is going to be a quick post about something I picked up the other day.

My new contact lenses are - once again - a pain in the boot. I miss the days of having the same prescription for each eye. Too easy. However, I had to get a new case to carry spares in. My old one lasted over 4 years but... I think I damaged the hinges. The case will pop open if I move it or tip it. So I replaced it with what I thought was just another cheap case:


It cost around 6 bucks so I wasn't really expecting much. I was surprised. Several cases look (and probably function) the same, depending on color and shape preferences. I just picked this one and I guess I didn't read the description well enough (I only cared about a cheap price) and I got two cases, not one.


Getting 2 is certainly a reason to choose this particular case.

Each case comes with a bottle for carrying a bit of solution (always handy); a tiny set of rubber-tipped tweezers (learning to love them); and something called a "stick connection" (really a stick to place the lens in the eye). That's all on top of the cute little lens case. And a mirror. For under 7 bucks.

I've never used a "stick connection" and was a little nervous. Now I don't ever want to be without one. I always hate trying to balance a lens on the tip of my finger. I usually drop the lens and have to hope it didn't fall into my toothbrush holder.

My two favorite things though are the holder for the solution and the tweezers. Listen, there's nothing worse than trying to dump a lens out of a case onto your palm. Or trying to dig out the lens without turning it inside out. 

The only thing I don't like is that the cases are so glossy that the outsides are print magnets. On the other hand, they are so glossy that they can be used as mirrors. Speaking of mirrors: the ones inside each case are not useful for inserting lenses. The case is too small and difficult to prop anywhere. I might get better at using the mirror but for now, I just love the bottle, tweezers, and stick.

Like I said, you can find cases similar to these all over Amazon. I saw round ones, oval ones, gold- or silver- or copper-toned ones. There are even some with cartoon or pop culture characters on them. There are some for men and for teens. I even saw some that came in sets of 6.  

these are from here


these are from here


Better yet, I saw one set that holds a pair of glasses and a pair of contacts.

Add caption

You're welcome.


Peace

--Free


NOTE: For those who might wonder, Thought it might seem so, I do NOT get any affiliate benefits from the Amazon links I post. I simply like sharing info about items that I find and buy - whether on Amazon or elsewhere. 

Wednesday, December 02, 2020

Trying to Make Artisan Wheat (I think)

 Okay, so this is my first time doing bread in the Dutch oven. I'm not even sure if what I am doing can be called "artisan". Because of the type of flour I'm using, I'm not sure if I can call it a true "wheat" bread.


It is wheat, so...

Here's the thing though, I felt so good while preparing the dough. I've been really wiped out lately and with trying to change my diet (again), it's been a drain. This recipe was one of the easier ones because it's a "no-knead" type. I don't have to knead it because it has to sit for 8 to 24 hours to rise.

I didn't take a Before photo. It was after 9 at night and, yeah. But here is what it looked like this morning:


That did better than I expected. The dough is really damp and was just one big odd-looking lump when I went to bed. This morning's dough was puffed and kind of yummy-looking. Before I had to push out the air and get it ready for the 2nd rise.


I changed a couple of things about the recipe, but here is the video I used.


I like this dude. He gets to the point and is very clear with instructions. If this bread is messed up, it's totally going to be on me. 

Like I said, I made changes. I didn't have sesame seeds and I didn't have the flax in seed form. I used pumpkin and sunflower seeds. I literally picked up the cheap packs of seeds at the corner grocery. I do have ground flax and since this is all about a high-fiber diet, I added that. Without measuring. Yikes. I didn't measure the seeds either. I figured the more the merrier and just went for it.

One thing that I really did want to add but held back was some brown sugar or blackstrap molasses. Or vanilla extract. Restraint is the word of the day. I played around the rules enough. I can always test adding things the next time.

As I was writing this, I was waiting for the bread to finish baking. Nervous! But, it turned out to look a lot like the one in the video. I am impressed with myself.


I am pleased! It smells amazing and none of the seeds burned. I am nervous about cutting into it, but... 


It turned out awesome and really could do with another 5 or 6 minutes in the oven (I'm putting it back in).  I am trying to remember what Paul Hollywood says about the seeds not distributing throughout the bake... Still, I am kinda happy.

The one thing I am really disappointed in is that I didn't follow my instincts and add something sweet - sugar, syrup, honey - the bread tastes like organic store-bought bread that is slightly salty.

Okay. So now I know. I will be making more and this time, I am going to add sugar, syrup, or honey. This would be the best thing ever with some sweetness to it.

Peace

--Free